Mr. Anonymous Game #7 @ 6/10/2014

Signed-In Members Don't See This Ad

robutacion

Member
Joined
Aug 6, 2009
Messages
6,514
Location
Australia - SA Adelaide Hills
Hi peoples,

Well, I couldn't tell you if, this game is better suited to older or newer turners, its all about imagination however, some experience may help...!:wink::biggrin:

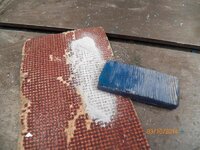
Ok so, on the top of my bandsaw table, there 2 items, one is a piece of 60 grit sandpaper, and the other is a piece/off-cut of one of my Resifills (the resin part), there is a third item that is part of this question but that, I forgot to add to the pic, and that is a hammer, yes one of those tools that are made to hit nails and other stuff...!

The questions are; (it has all to do with pen turning):eek::confused:

What do I use these 3 items for, and how ...????

The prize is a 500gr (8 blanks) box full of goodies, you pay the shipping as normal (AU$14.00), I will think what, I'm not sure yet...!:wink:

Remember:

*- You can play but, you can't claim the prize if you have been awarded in these games, for less than 1 month.

*- You can give as many guesses as you like but, only one per post.

*- All IAP members are welcome to play.

*- If you give the best answer, you are the winner but, if you don't want to claim the prize, you will be asked to select another IAP member, regardless if that member has participated in this game or not, your decision.

*- You will asked to Paypal the cost of shipping to, nyodine@yahoo.com.au

*- If you have any questions, please don't hesitate to PM me.

*- Have fun.

Good luck...!

Cheers
George
 

Attachments

  • 046.JPG
    046.JPG
    100.4 KB · Views: 313
Last edited:
Signed-In Members Don't See This Ad

Karl_99

Member
Joined
Aug 20, 2012
Messages
1,672
Location
Winfield, PA
You use the sandpaper to break down the resin to dust to use for fill in a blank. The hammer is used to tamp the dust mixture into the crack or crevice.
 

1080Wayne

Member
Joined
Feb 5, 2006
Messages
3,344
Location
Brownfield, Alberta, Canada.
You use the hammer to imprint the grit pattern of the sandpaper onto the Resifill piece , thereby transferring some of the garnet or aluminum oxide into the Resifill . You will then overcast with a beautiful mix of complementary colours , making them so attractive that we will buy them as tools to un-sharpen our chisels . I don`t know how you keep thinking these things up , George .
 

Krash

Member
Joined
Feb 10, 2014
Messages
1,259
Location
Albuquerque, NM
Mitch, I was thinking the same type of thing ...

Sandpaper to create a fine dust.
A hammer to make some chips.
Mix, pour, and swirl then use the cutoff and hammer to tap the mixture and wood into the mold for vacuum/curing.

Just my very uninformed guess. :biggrin:
 

Gofer

Member
Joined
Aug 16, 2009
Messages
597
Location
Morinville, Alberta, Canada
The sandpaper is for making the new blanks smooth .... the leftover pr is for prying the new blanks out of the mold ... and if prying doesnt work then the hammer will take care of that problem. ; )

Bruce
 

Edgar

New Member Advocate
Staff member
Joined
Feb 6, 2013
Messages
6,899
Location
Alvin, TX 77511
The hammer is used to test the resin to see if it's fully cured. If the head of the hammer sinks into the resin, it needs more curing time. The sandpaper is to smooth out any chips if you tapped a finished blank too hard.
 

JustmeinMS

Member
Joined
Feb 15, 2013
Messages
258
Location
Brookhaven, MS 39601
The resin is hit by the hammer lightly on the end to create fragments. The sandpaper is used to create a powder like substance (dust) that is added to your resin as well as the fragments. The end result is that white swirly with blue shattered glass looking resin pour that everyone wants.
 

robutacion

Member
Joined
Aug 6, 2009
Messages
6,514
Location
Australia - SA Adelaide Hills
The resin is hit by the hammer lightly on the end to create fragments. The sandpaper is used to create a powder like substance (dust) that is added to your resin as well as the fragments. The end result is that white swirly with blue shattered glass looking resin pour that everyone wants.

Well mate, you probably don't do castings to think that way, the reality is that, those effects you are referring to, are not created that way, is the Pearlex type powders that create that effect, some like the Sky-Blue, you simply mix it and pour, you don't need to touch it...!

We learn something new everyday, huh...???:wink:

Cheers
George
 

robutacion

Member
Joined
Aug 6, 2009
Messages
6,514
Location
Australia - SA Adelaide Hills
You use the hammer to imprint the grit pattern of the sandpaper onto the Resifill piece , thereby transferring some of the garnet or aluminum oxide into the Resifill . You will then overcast with a beautiful mix of complementary colours , making them so attractive that we will buy them as tools to un-sharpen our chisels . I don`t know how you keep thinking these things up , George .

Well, wouldn't it be a lot easier to grab a handful of sand and throw it in the mix...??? Why would I bother, I already have the natural Palm root that comes with the "complementary" soil/dirt in it so, that one is enough...!:biggrin:

A possibility but, not the correct answer, sorry...!

Cheers
George
 

robutacion

Member
Joined
Aug 6, 2009
Messages
6,514
Location
Australia - SA Adelaide Hills
You guys have some imagination and while most of the guesses could be a possibility, no none has yet gave the correct answer, sorry...!

Sure, some parts of your answers are correct, such as;

-The hammer is solely used to crash pieces of the resin (crystals type) 010.JPG012.JPG

- The sandpaper is used to make fine dust from the piece of the resin/acrylic

However, none of these 2 items, are to be mixed with resin to make blanks...!:eek::confused:

PS: There are 2 other "things" that I use these 2 items for, in fact, I actually spend a couple of hours doing just that, this afternoon, well...! one use out of the 2 possible...!:)

Better answers, please...!

Cheers
George
 

Krash

Member
Joined
Feb 10, 2014
Messages
1,259
Location
Albuquerque, NM
Wow George ... this is a mystery! :eek:

I can't think of anything else to do with resin dust and chips except to fill voids but it seems like someone has already guessed this. But, to follow your advice in a different post, I'll post anyway (even though I'm not eligible to win).

Sandpaper - to create resin dust
Hammer - to create resin chips
Resin cutoff - to be abused by the sandpaper and hammer :rolleyes:

Use #1 - use dust to fill small voids in blanks
Use #2 - use chips to fill large voids in blanks.
 

lyonsacc

Member
Joined
Aug 31, 2012
Messages
1,615
Location
Cincinnati, OH
I can't resist - I must guess

Resin - to create dust and chips
Sandpaper - to create resin dust
Hammer - to create resin chunks

Use - use the dust/powder to coat your molds to keep the resin from sticking to the molds!?!
 

Sprung

Member
Joined
Jul 1, 2014
Messages
773
Location
NE WI
My guess is the same as ones that have already been made. Sandpaper to create dust and hammer to create chips to fill in voids - inlay work. Maybe in contrast to wood, such as turquoise and other commonly used fillers?
 

robutacion

Member
Joined
Aug 6, 2009
Messages
6,514
Location
Australia - SA Adelaide Hills
Interestingly, and even after my post #13, no one seems to make the right connection however, no one has answered the 2 part question correctly.

I have already confirmed what the first part of the question is but, I have also clarified that, I'm not casting blanks with it so, I will have to use them for something else.

In fact, wood turning, either big or small pieces, can sometimes require a step that is an art, all on its own, learning the multitude of possibilities and techniques, is normally only achieve with many years of experience and "necessity" as the mother of invention, if I say any more, I will be answering my own question.

So remember, the question has 2 parts, both have to be correct for me to consider, a winner...!:wink::biggrin:

Cheers
George
 

Karl_99

Member
Joined
Aug 20, 2012
Messages
1,672
Location
Winfield, PA
The hammer breaks large pieces and the sandpaper creates dust to use as fill or inlay in other woodturning or artwork.
 

Karl_99

Member
Joined
Aug 20, 2012
Messages
1,672
Location
Winfield, PA
The sandpaper is used to create dust and the hammer is used to create a dimple or well in a wood work that needs some fill or inlay.
 

Karl_99

Member
Joined
Aug 20, 2012
Messages
1,672
Location
Winfield, PA
The hammer is used to fracture larger chips and the sandpaper is used to make dust. These are used to make "stained glass" art inlays.
 

SteveJ

Member
Joined
Jul 11, 2012
Messages
3,376
Location
Grand Junction, Colorado
The hammer is solely used to crash pieces of the resin (crystals type)

The sandpaper is used to make fine dust from the piece of the resin/acrylic

They are then used to produce pendants.
 

SteveJ

Member
Joined
Jul 11, 2012
Messages
3,376
Location
Grand Junction, Colorado
The hammer is solely used to crash pieces of the resin (crystals type)

The sandpaper is used to make fine dust from the piece of the resin/acrylic

The pieces and dust are then used for inserts in kaleidoscopes
 

CaptainKarma

Member
Joined
Jun 27, 2009
Messages
6
Location
Pittsburgh, PA
Hammer to fracture the cutoffs, Sand paper for making dust from the cutoffs and both products are used to fill a kaleidoscope. The band saw just happens to be a convenient peace to keep the tools with a platform to perform the crushing and sanding.

Doh! Too slow on the submit button
 
Last edited:

SteveJ

Member
Joined
Jul 11, 2012
Messages
3,376
Location
Grand Junction, Colorado
The hammer is solely used to crash pieces of the resin (crystals type)

The sandpaper is used to make fine dust from the piece of the resin/acrylic

The pieces of resin are sprinkled into your hair and the dust is used as pixie dust to enable you to fly around in a tutu. (Looking every bit like Tinkerbell)
 
Last edited:

robutacion

Member
Joined
Aug 6, 2009
Messages
6,514
Location
Australia - SA Adelaide Hills
You guys are killing me...!:eek::wink::biggrin:

Why is that, no one can think of the obvious, after all, I said that, this is what I do/use to...???:confused:

Everyone gets the first part right but, where/the reason I use this mix with, something else (off-course), is so obvious, well so I thought...!:eek:

Cheers
George
 

robutacion

Member
Joined
Aug 6, 2009
Messages
6,514
Location
Australia - SA Adelaide Hills
I'm still stuck on why you would use a hammer on your bandsaw...

Well mate, my bandsaw has a very heavy and strong cast iron steel table that, it seems, was positioned (bandsaw) in a strategic location for me, it became a great working and casting bench however, its has proven to be also a great option to smash things up with a small hammer, the forces exerted are not sufficient to damage the table and cleans up easily so, it works for me...!:wink:

Cheers
George
 

SteveJ

Member
Joined
Jul 11, 2012
Messages
3,376
Location
Grand Junction, Colorado
The hammer is solely used to crash pieces of the resin (crystals type)

The sandpaper is used to make fine dust from the piece of the resin/acrylic

You then use what you have created to burnish/polish blanks you have turned
 

robutacion

Member
Joined
Aug 6, 2009
Messages
6,514
Location
Australia - SA Adelaide Hills
The hammer is solely used to crash pieces of the resin (crystals type)

The sandpaper is used to make fine dust from the piece of the resin/acrylic

You then use what you have created to burnish/polish blanks you have turned

No, no, no mate, that would scratch the hell out of the finish...!:eek:

What is the one thing that, we all have to perform every so often when making a pen...???

George
 
Last edited:

robutacion

Member
Joined
Aug 6, 2009
Messages
6,514
Location
Australia - SA Adelaide Hills
What is the one thing that, we all have to perform every so often when making a pen...???

George

Go use the bathroom
But I can't figure out how the resin chunks & dust figure in

Yes, that is "one" of the things that always seem to happen when you leave the house and go to the workshop to do something, huh...???

You know why you can't figure out...??? because is so obvious but the mind is tricking you and everyone else, I can see...!

George
 

SteveJ

Member
Joined
Jul 11, 2012
Messages
3,376
Location
Grand Junction, Colorado
The hammer is solely used to crash pieces of the resin (crystals type)

The sandpaper is used to make fine dust from the piece of the resin/acrylic

Then use what you have "created" to repair pens and blanks.

(just in case Karl is ineligible)
 
Signed-In Members Don't See This Ad

robutacion

Member
Joined
Aug 6, 2009
Messages
6,514
Location
Australia - SA Adelaide Hills
And the winner is...???

Use the sandpaper to make dust and use the hammer to make small chips to make repairs in blanks

Bingo...!:biggrin:

Congratulations mate, you finally go it right...!

Blank repairs is an art, knowing what to use and what to do in all types of repairs and materials to be repaired, can save you lots of money and frustration.

"Most" blanks can be repaired, some are easier than others however, there are a few simple principles and techniques that, when used, can make the difference between success and failure.

I always seen a repair as a challenge and never been afraid to attempt the most difficult repairs, it doesn't work all the time but, it gives you a sense of accomplishment when it does.

This was the very reason why I thought of making this question(s) game...!

Is no big problem, if you already knew it, good for you but, if you didn't, and that is the case with many of the new turners, you don't need to wait years of trying stuff to find out about these simple principles, the sooner you learn about them, the quicker you can put them into practice and salvage/repair some blanks that would be otherwise, and item to go in the bottom draw...!

In this case, these materials work for Resifills or any other blank that has a combination of materials however, there is no reason why, it couldn't be used in a all acrylic blanks. Wood repairs have the same principle but require a slight different approach, particularly when the are of repair is not a very small one.

I had yesterday (as I said) some blanks that needed some repairs, the clear casts were easy as I can use simply the CA to fill in however, the coloured blanks required a matching material. The idea of using epoxy or CA with some Pearlex powders, is possible but very tricky as we tend to use far too much powder, even though, we used only a tiny little bit, the mix is always too dark and the effects are of a solid colour look.

You can't get any closer match than a off cut of the same blank, if the repair is only a tiny little hole, you use the finer dust produced with the sandpaper, (never used anything bigger that 60 grit paper) some medium to thick CA will allow you a lot6 more working time than with a thin CA.

I got about 2 minutes (about 20° celsius) of working time in my 2 mixes yesterday, I used medium CA. I had a few blanks to repair, in clear, green and red, this normally doesn't happen, not in this quantity but, I used the last bit of my last 20lt drum that was only 2 months old but, has been open far too many times as all the batches I done with it, were small batches (about 2lt each) and the resin was a bit thicker than normal, it didn't help the fact that, I have been using the Winter catalyst % which is higher than in Summer and we have just changed Seasons and the day way a little warmer than normal so, that extra hardener has made the thicker resin to set off 5 to 10 minutes earlier and that was just enough to stop the pressure in the pot to squeeze the resin into some holes (where normally the seeds are).

I use the very same thing if I'm turning a sample or making a pen, from a pinhole to a rice grain size repair, dust and crystals(small smashed chunks) and some CA is all you need.

For very small pinholes I use a needle point to dip in the mix and pour into the tiny hole, in a bigger hole, I use a pair of long nose tweezers to grab and position the bigger resin pieces into the hole, mixing the finer dust and CA and fill the whole area, using a pointed applicator/icecream wooden stick, toothpick, kabob skewer, etc....! 002.JPG

In the pics attached, you see the bunch of blanks that I'm referring to from yesterday, they are going to be resanded and then soaked with super thin CA, before they are ready to go...!
005.JPG006.JPG

Remember that, if you make these sort of blanks, you may need to make these repairs but, the purpose of this exercise is to demonstrated the repairs principles, on blanks that you are turning into pens, is there where, the best repair techniques make a big difference...!

I hope you enjoyed the lesson...!:biggrin:

Thank you to all participants, this is only going to be a one prize game, I had great responses and some very silly indeed, all makes part of the fun so, thank you...!

Well, I haven't yet put any thought in what the prize is going to be, I either send a surprise package (8 blanks) or will contact the winner by PM and ask if he has any "suggestions"....!:wink:

Once again peoples, thank you...!

PS: Paypal me AU$14.00 to, nyodine@yahoo.com.au, please...!

Cheers
George
 
Top Bottom