Mold Wanted

Signed-In Members Don't See This Ad

Gilrock

Member
Joined
Oct 18, 2011
Messages
560
Location
Tucson, AZ
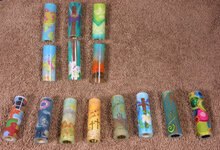
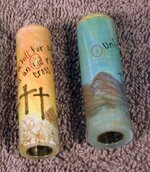
I've spent over $150 for a few resin saver molds but I think they save a little too much resin for my tastes. I end up with a flat spot on the top side and when I turn it down till it's round there is not a lot of material left. I'm filling the mold as much as I can without it spilling over. I'm going to be casting blanks for others and I'm thinking people will want a blank with more material on it so they can feel like they have some amount of work to do. ;)

I'm squaring the ends and then turning just enough so that the flat spot is gone and I can do minor buffing to be able to photograph the art in the blank. For customers who might want to have a nice curve in the middle I don't feel like I'm leaving them much material to play with.

So now I'm contemplating making my own mold or figuring out how to extend my resin saver mold up a little higher. If anyone else makes a mold that leaves more resin around the tube I might be interested....just PM me. I'm mainly doing Sierra and JrGentII for now.

Thanks,
Gil
 
Signed-In Members Don't See This Ad

wolftat

Product Reviews Manager
Joined
Aug 19, 2007
Messages
5,377
Location
Fairfield, CT, USA.
Gil, I believe the resin saver mold was developed to not have all the extra resin that is wasted when it is turned off. You may have the wrong molds if you are looking for bigger blanks.
 

Justturnin

Member
Joined
Aug 19, 2011
Messages
2,235
Location
Houston, Tx
That is a tough one. I know Charlie says you can repair the molds w/ some Silicone Sealer so I wonder if you could build up around the top w/ it as well. Just an idea.
 

Gilrock

Member
Joined
Oct 18, 2011
Messages
560
Location
Tucson, AZ
Yeah I think the resin saver molds are fine for my own personal use. I don't need the blank to be any thicker...but I know the blanks I've purchased usually come with a good 3/16" to 1/4" of material around the tube. I got a few messages with options to consider...part of me kinda wants to try making one myself for the fun of it so I'll be thinking about it.

Thanks,
Gil
 

NewLondon88

Local Chapter Leader
Joined
May 15, 2008
Messages
5,077
Location
Claremont NH
I'm a little surprised... this is the first time I've heard of someone wanting
to save LESS resin!
I've had several emails asking if I could make the blanks smaller to save
even more resin than they do now. (yes, but not cost effective)

With the exception of the full sized pens, the blanks are 3/4", the same
as you would get if you bought a commercial blank and drilled it out. This
is large enough for all of the kits, even the full sized kits, which top out
around .650" or so.

If you're pouring on a level surface, then filling the mold will already give
you a blank with more than enough resin (even if you're making one with
a huge bulge in it) but if you want to beef up the edges with caulking or
bathroom sealer, go for it. Just understand that any more resin you pour
will get turned away.
 

Phunky_2003

Member
Joined
May 18, 2009
Messages
1,470
Location
Bonham Texas
I use quite a few of Charlies molds. I've sold alot of blanks made with them. I've never had a complaint about the amount of material left on the blanks. I preturn them before selling, to me it allows customers to see the blanks better.

I have had a problem where I had to recast a couple of times. That was due to me not sitting mold on level surface and one side or the other had to be recasted. Now I have dedicated surface for placing the molds during curing.
 

Gilrock

Member
Joined
Oct 18, 2011
Messages
560
Location
Tucson, AZ
I'm sorry if I hurt anyone's feeling cause I wanted something different. I'm not asking anyone to change their molds to suit me. I think I'll just make my own then no one can get upset at me.

I poured my Sierra blanks and it was a flat surface and I completely filled to the edge and when I pre-turned my blanks it's measuring slightly under 5/8". If it was 3/4" I'd be fine with it. Visually the nipples that go inside the tubes do not look like the distance to the top edge of the mold is consistent. But I will verify with calipers. I'm sure it's fine for most of you...I just want more breathing room.

Also I think I want to design it where I can put it under pressure so I'm going to design it such that the airspace inside the tube is eliminated. I just want this for personal use I'm not going to try to cut into anyone's mold making business.

I'm done with this topic...sorry I brought it up.

Gil
 

NewLondon88

Local Chapter Leader
Joined
May 15, 2008
Messages
5,077
Location
Claremont NH
I didn't see any hurt feelings.. mine are undamaged :tongue:
I was just surprised at the request to use more resin, and pouring
on an un-level surface can cause problems so I thought I'd mention
it. I've done it myself when I wasn't paying attention, and I just
need to pour a bit more and make sure it's level.

If you're going to make something to use pressure, you'd likely want
a thinner silicone and you'll need a vacuum setup to de-gas the
silicone before pouring it. Give yourself plenty of room, as the rubber
will triple in volume and then collapse before you can pour. Thinner
(lower cps) will allow it to flow better in undercuts and around the
bottom of tubes
 

Gilrock

Member
Joined
Oct 18, 2011
Messages
560
Location
Tucson, AZ
OK peace...I probably shouldn't look at the forum before I'm fully awake. I just saw the post with several likes on it and felt under attack.

Gil
 

G1Pens

Member
Joined
Oct 4, 2010
Messages
1,859
Location
Atlanta, GA area (Dacula)
I've purchased blanks cast in resin saver molds. They are shipped exactly as they come from the mold. I think most pen turners will recognize them as such and will not have issues with them. Maybe you are worrying about something that really doesn't matter to the purchasers?
 

Justturnin

Member
Joined
Aug 19, 2011
Messages
2,235
Location
Houston, Tx
I was thinking about this earlier. One thing you may be experiencing is the PR shrinking. I have had a couple of instances where the PR shrank so much I had to clean the blanks off and recast the tops to fill the mold back up. With clear there is no line but you have to make sure the blank is CLEAN or that little speck of dust will magnify like you wouldnt believe and it will always be just below where the Clip will cover......DAMHIKT.


Also,
Check out the Library "it's Virgil" has an article in there on casting snake skins and he does not use a mold, shot I think he uses a Glad tupperware bowl.....
 

Gilrock

Member
Joined
Oct 18, 2011
Messages
560
Location
Tucson, AZ
I've purchased blanks cast in resin saver molds. They are shipped exactly as they come from the mold. I think most pen turners will recognize them as such and will not have issues with them. Maybe you are worrying about something that really doesn't matter to the purchasers?

Yeah maybe I am. But I do think I need to pre-turn them into cylinders so they can be photographed to show the painted image on them. For the first two I just did I'm using Beall Buffing wheels to put a quick polish on the blank so the image will show through well for a photo.

I think the bigger goal may be trying to have a good way to eliminate air bubbles without me having to poke into the mold. I already messed up a piece of my wife's artwork doing that method. I'm going to try PTownSubbie's molds also and see if using them under pressure works well for eliminating the bubbles. My other experiment is going to be seeing if I can put the resin under pressure real quick and then return to normal pressure and pour into the resin savers. I just don't know if that will eliminate the bubbles fast enough or whether the bubbles return as soon as you pull the resin from the chamber. I ordered one of the nice casting pressure pots from finishsystems.com yesterday...I'm sure I'll be able to make use of that toy. :)

Gil
 

Justturnin

Member
Joined
Aug 19, 2011
Messages
2,235
Location
Houston, Tx
Yeah maybe I am. But I do think I need to pre-turn them into cylinders so they can be photographed to show the painted image on them. For the first two I just did I'm using Beall Buffing wheels to put a quick polish on the blank so the image will show through well for a photo.

I think the bigger goal may be trying to have a good way to eliminate air bubbles without me having to poke into the mold. I already messed up a piece of my wife's artwork doing that method. I'm going to try PTownSubbie's molds also and see if using them under pressure works well for eliminating the bubbles. My other experiment is going to be seeing if I can put the resin under pressure real quick and then return to normal pressure and pour into the resin savers. I just don't know if that will eliminate the bubbles fast enough or whether the bubbles return as soon as you pull the resin from the chamber. I ordered one of the nice casting pressure pots from finishsystems.com yesterday...I'm sure I'll be able to make use of that toy. :)

Gil

Are you warming your resin? When I use my RS Molds or any molds w/ PR I heat the resin until it is thin as water. I will mix the Cat in and let it sit for a minute and the bubbles will rise in the cup and you can pop them w/ a toothpick. I then pour slowly over the tube and rock the mold back and forth to coat the entire tube then I fill one side and tip it so the PR runs into the other mold. What I am trying to do is completly coat the bottom and remove any trapped air. Once I have the tubes good and wet I pour the rest until the PR is rising above the mold edges. I did place it in a pressure pot at first but now I set it on my shopsmith w/ the motor running to vibrate the mold and make the bubbles rise.

If you are using PR under pressure you have to leave it under pressure for a long time, I do 18-24 hours. If you release the pressure while the PR is still wet/gel the bubbles you just compressed until they are invisible will swell back up and could cause the PR to release from the tube as they swell against it. If you are just doing Painted tubes I would just use the Heated resin and vibrating table and that should be good.

Good luck, cant wait to see one of these.
 

Old Lar

Member
Joined
Dec 26, 2009
Messages
732
Location
Sturgis, SD
I agree with what Chris says. Make sure the pr is warm. That has nearly eliminated all bubbles that I had in cast blanks. The bubbles come to the surface easier as well. I also have a heat lamp on the mold for a half hour after the mold is poured. This also helps the resin to set up sooner and cure it.
 

Gilrock

Member
Joined
Oct 18, 2011
Messages
560
Location
Tucson, AZ
Maybe I didn't get the PR warm enough....I bought a Harbour Freight Jewelry cleaner and put hot water from the sink in it and ran the heater and every couple minutes kicked off a 3 min. cycle. I had it in there at least 15 minutes. I didn't notice any recognizable thinning of the PR. And when I ran the cycles the vibration actually introduced air bubbles. I had better luck on my first blank where I didn't heat anything. Below is an image of most of the blanks I cast along with a closeup showing where I messed up a couple of them. A good number of these either have one or two tiny air bubbles near the tube or they have small marks where I touched the tube with a toothpick moving the air bubbles. I think coating the tubes with something first to seal in the paint would have cured the second issue.

Thanks,
Gil
 

Attachments

  • Blanks1.jpg
    Blanks1.jpg
    253 KB · Views: 175
  • Blanks2.jpg
    Blanks2.jpg
    59.9 KB · Views: 150

MesquiteMan

Retired Head Moderator
Joined
Oct 18, 2005
Messages
5,678
Location
San Marcos, TX, USA.
My other experiment is going to be seeing if I can put the resin under pressure real quick and then return to normal pressure and pour into the resin savers. I just don't know if that will eliminate the bubbles fast enough or whether the bubbles return as soon as you pull the resin from the chamber.
Gil

You would have much greater success pulling a vacuum to degass the resin, then pour it. Pulling a vacuum will cause the air in the resin to expand and come to the surface, thus removing it form the resin. Pressure will just crush the bubbles but the air will still be there so when the pressure is released, it will immediately expand and reappear.
 

its_virgil

Member
Joined
Jan 1, 2004
Messages
8,127
Location
Wichita Falls, TX, USA.
I have several resin saver molds for various kits and I've never had any problem with the amount of resin for any of the kits. I make and sell a few snake skin blanks and have not had any customers complain about the amount of resin.

The ultrasonic cleaner cleaner causes air in solution to come out. That is what you are seeing. The cleaner does not introduce air but causes air already there tio be released.

I notice a considerable amount of thinning using the cleaner and heat function...even in warmer weather. Maybe your heater is not working correctly. Mine get hot fast also.

The warm resin will start to gell much quicker than when not warmed. If you don't like that result then definitely stop using the heat.

If you use vacuum with polyester resin do not pull over 27 in because the styrene solvent will be removed at 28 in. When I was using vacuum I kept the vacuum around 25 in.

Personally, I really like using the ultrasonic cleaner so much better than using vacuum and then pressure. To each his own.

Do a good turn daily!
Don
 
Last edited:

Gilrock

Member
Joined
Oct 18, 2011
Messages
560
Location
Tucson, AZ
Thanks for the input Don. I did get the idea for the cleaner from you're article. If you don't mind a couple questions I'm curious about how you use the cleaner. Do you run the heater without running a vibrating cycle? About how long does it take to thin you're resin? The manual said not to run more than 3 cycles in 15 minutes so curious how many cycles you run and whether you delay between cycles and let he heater run by itself.

What I didn't like was the bubbles didn't seem to be vibrating up to the surface. And when I tried to work bubbles to the surface they didn't want to pop. In you're article you were using a dental pick to move the bubbles and I know you said you run it underneath the blank but that falls into the category of "crossing my fingers" that I've removed all the bubbles. And yes I did discover the heated resin didn't leave me much time for working the bubbles. I was trying to pour two molds and barely had time to do one before I noticed it turning to gel. I also found that I must have dropped several MEKP drops near the same spot before I was able to stir because I had a gel spot where I wasn't able to move bubbles.

I know this technique is working for some of you but it seems like too many variables and too much of a headache to move the bubbles around. Also I'd have to start coating the paintings enough that I could touch them while in the resin without causing damage. A dental pick on a painting is a little more risky than a snakeskin. One scratch and I'm scraping pieces.

Gil
 

its_virgil

Member
Joined
Jan 1, 2004
Messages
8,127
Location
Wichita Falls, TX, USA.
I run the cleaner for two cycles with heat. I sometimes turn off the heat for the second cycle. The water in my cleaner gets really hot and I start with hot tap water. If I'm not ready to cast I will turn the heater back on while I finish preparing to cast. Starting with hot tap water and letting the heater run for a couple of minutes prior to starting the cleaner the resin is thin after the first cycle. But, I only use enough resin to pour into one or sometimes two molds. So, at the most I am only dealing with maybe 2 to 2.5 ounces of resin at one time and less if I am only casting one mold.
Good luck and I hope you find a system that works for you. Casting snake skins and painted tubes both present special problems.
Do a good turn daily!
Don


Thanks for the input Don. I did get the idea for the cleaner from you're article. If you don't mind a couple questions I'm curious about how you use the cleaner. Do you run the heater without running a vibrating cycle? About how long does it take to thin you're resin? The manual said not to run more than 3 cycles in 15 minutes so curious how many cycles you run and whether you delay between cycles and let he heater run by itself.

Gil
 

Gilrock

Member
Joined
Oct 18, 2011
Messages
560
Location
Tucson, AZ
So, at the most I am only dealing with maybe 2 to 2.5 ounces of resin at one time and less if I am only casting one mold.

Ah maybe that was my difference...when I said two molds I was using two of the large molds so I was pouring 8 Sierras and 4 Jr Gent's so I had about 10 ounces of resin split between two containers. I'm gonna stick to 1 pen at a time till I'm happy with the process.

Gil
 
Top Bottom