Wmcullen
Member
I'm not sure if this process is right or wrong; unique or common. But it works for me and I want to share in case it's interesting. |
13: Miter touch
last post: 12: Improved Eccentric Ring


last post: 12: Improved Eccentric Ring
There's no shortage of ways to make miter cuts but here's what I put together while exploring a (discarded) idea for assembling pens with an eccentric ring of dots in the middle of a segment. As always, I'm happy to share in case it's useful to others.

The Problem
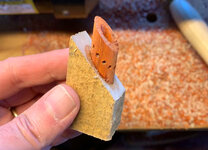
Before sandwiching this miter cut piece of padauk between two pieces of maple, I needed to make sure certain elements (the drilled holes) were perfectly centered. I worried if I tried to simply hold the blank in a regular miter box, the piece would move.
Solution
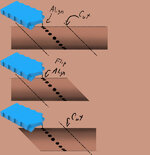
I made a miter box specific for pen blanks with two chips that snap down on top to apply clamping pressure, hold the blank in place, and measure consistent distances.
Here's how it works.

After drilling an eccentric ring of holes in a roughly turned blank I wanted to make 45-degree cuts at equal distances above and below the holes so they would look perfectly centered.

The miter box was 3D printed.
To hold the piece steady I built chips with teeth along the sides to slide down the miter box walls. The chips also have a pointy end so they can align with the holes I drilled. This all makes it easy to make repeatable cuts.


Summary
While this process worked, I think I found an easier way to make the pen I was trying for. But I can see myself using this miter box for other projects under different circumstances. If you'd find it helpful the 3d geometry file is attached.
- Cullen
Notes on the Miter Box
The attached file 45DegMiterBoxForPens.zip contains an *.obj file with the geometry.
This miter box works well with my Japanese pull saw (https://www.amazon.com/gp/product/B07314SWRF/ref=ppx_yo_dt_b_search_asin_title?ie=UTF8&psc=1)
The Problem
Before sandwiching this miter cut piece of padauk between two pieces of maple, I needed to make sure certain elements (the drilled holes) were perfectly centered. I worried if I tried to simply hold the blank in a regular miter box, the piece would move.
Solution
I made a miter box specific for pen blanks with two chips that snap down on top to apply clamping pressure, hold the blank in place, and measure consistent distances.
Here's how it works.
After drilling an eccentric ring of holes in a roughly turned blank I wanted to make 45-degree cuts at equal distances above and below the holes so they would look perfectly centered.
The miter box was 3D printed.
To hold the piece steady I built chips with teeth along the sides to slide down the miter box walls. The chips also have a pointy end so they can align with the holes I drilled. This all makes it easy to make repeatable cuts.
Summary
While this process worked, I think I found an easier way to make the pen I was trying for. But I can see myself using this miter box for other projects under different circumstances. If you'd find it helpful the 3d geometry file is attached.
- Cullen
Notes on the Miter Box
The attached file 45DegMiterBoxForPens.zip contains an *.obj file with the geometry.
This miter box works well with my Japanese pull saw (https://www.amazon.com/gp/product/B07314SWRF/ref=ppx_yo_dt_b_search_asin_title?ie=UTF8&psc=1)