Majestic: Antique Olive

Signed-In Members Don't See This Ad
See more from Pitoon

Pitoon

Member
Joined
Oct 27, 2013
Messages
381
Location
Vicenza, Italy
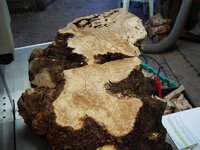
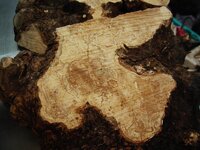
Tomorrow I plan on starting a Majestic kit. I figured I would post pics from start to finish. I'm hoping I can pull this one off. The blank gives just enough space not to mess up on drilling.....along with it being warped and cupped. Drilling this one is going to take some precise lining up and drilling.....and patients, lol!

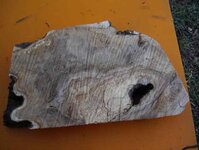
Here's the blank i plan on using.....

Side 1
1799017_621066317943354_1631827384_o.jpg


Side 2
1077580_621067264609926_260432552_o.jpg
 
Signed-In Members Don't See This Ad

mark james

IAP Collection, Curator
Joined
Sep 6, 2012
Messages
12,773
Location
Medina, Ohio
Good luck. I look forward to seeing the end result. Nice grain patterns.

PS: I had to do a double take on your signature... I had not heard of United Herpes... :eek:

Time for a new set of glasses!! :rolleyes:
 

robutacion

Member
Joined
Aug 6, 2009
Messages
6,514
Location
Australia - SA Adelaide Hills
Tomorrow I plan on starting a Majestic kit. I figured I would post pics from start to finish. I'm hoping I can pull this one off. The blank gives just enough space not to mess up on drilling.....along with it being warped and cupped. Drilling this one is going to take some precise lining up and drilling.....and patients, lol!

Here's the blank i plan on using.....

After the blanks is cut in 2 and to size (lengths) all those bends become less obvious but if the blanks is on the "skinny" side of things, it may be a challenge, alright...!

Is that dark colouration/stain a blue(ish) or a dark grey, does it stink...???

I lose a lot of amazing Olive root blanks due to extreme shrinking, my normal size is 21mm dry so, I cut the Olive wood at about 1" square, I have lots of blanks that have shrunk to under 15mm and less, not counting the bends/curves and twists they endup with. All is strapped tight in my drying towers but, I can't control with it, if I don't cut it into pen blanks, it cracks like mad and shrinks, cutting them as pen blanks (1" square) seems to control most of the cracks but, the shrinking can be overwhelming and its happen to...! guess what...??? the prettiest blanks of the bunch, bugger...!

I have to find a use for all the shrunken to buggery, pretty blanks...!:frown:

That blank will also produce a spectacular pen, looking forwards to see it done...!

Good luck,

Cheers
George
 

Pitoon

Member
Joined
Oct 27, 2013
Messages
381
Location
Vicenza, Italy
Tomorrow I plan on starting a Majestic kit. I figured I would post pics from start to finish. I'm hoping I can pull this one off. The blank gives just enough space not to mess up on drilling.....along with it being warped and cupped. Drilling this one is going to take some precise lining up and drilling.....and patients, lol!

Here's the blank i plan on using.....

After the blanks is cut in 2 and to size (lengths) all those bends become less obvious but if the blanks is on the "skinny" side of things, it may be a challenge, alright...!

Is that dark colouration/stain a blue(ish) or a dark grey, does it stink...???

I lose a lot of amazing Olive root blanks due to extreme shrinking, my normal size is 21mm dry so, I cut the Olive wood at about 1" square, I have lots of blanks that have shrunk to under 15mm and less, not counting the bends/curves and twists they endup with. All is strapped tight in my drying towers but, I can't control with it, if I don't cut it into pen blanks, it cracks like mad and shrinks, cutting them as pen blanks (1" square) seems to control most of the cracks but, the shrinking can be overwhelming and its happen to...! guess what...??? the prettiest blanks of the bunch, bugger...!

I have to find a use for all the shrunken to buggery, pretty blanks...!:frown:

That blank will also produce a spectacular pen, looking forwards to see it done...!

Good luck,

Cheers
George

The blank on that side is a bit light blueish grey, so i'm supposing that it was in the begining stages of some spalting. We'll see how deep it got into the wood once i start turning.

Pitoon
 

robutacion

Member
Joined
Aug 6, 2009
Messages
6,514
Location
Australia - SA Adelaide Hills
Tomorrow I plan on starting a Majestic kit. I figured I would post pics from start to finish. I'm hoping I can pull this one off. The blank gives just enough space not to mess up on drilling.....along with it being warped and cupped. Drilling this one is going to take some precise lining up and drilling.....and patients, lol!

Here's the blank i plan on using.....

After the blanks is cut in 2 and to size (lengths) all those bends become less obvious but if the blanks is on the "skinny" side of things, it may be a challenge, alright...!

Is that dark colouration/stain a blue(ish) or a dark grey, does it stink...???

I lose a lot of amazing Olive root blanks due to extreme shrinking, my normal size is 21mm dry so, I cut the Olive wood at about 1" square, I have lots of blanks that have shrunk to under 15mm and less, not counting the bends/curves and twists they endup with. All is strapped tight in my drying towers but, I can't control with it, if I don't cut it into pen blanks, it cracks like mad and shrinks, cutting them as pen blanks (1" square) seems to control most of the cracks but, the shrinking can be overwhelming and its happen to...! guess what...??? the prettiest blanks of the bunch, bugger...!

I have to find a use for all the shrunken to buggery, pretty blanks...!:frown:

That blank will also produce a spectacular pen, looking forwards to see it done...!

Good luck,

Cheers
George

The blank on that side is a bit light blueish grey, so i'm supposing that it was in the begining stages of some spalting. We'll see how deep it got into the wood once i start turning.

Pitoon

Yes and no, Olive wood doesn't spalt as most other woods do, in your case the closest to the bottom/rotten part of the root the darker the grey(ish) will be, and the more will stink, you need to make sure that wood/blanks you are going to work with is free of moisture, maybe a few hours in an oven at 60° celsius will suffice to get any moisture out that otherwise, will play havoc with the finish you intend to give it.

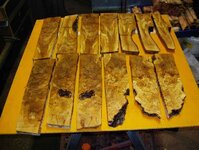
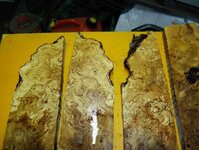
The spalting in Olive wood is formed by transforming into a white colour that becomes very powderish, a very unique spalting but also a very fragile one. Stabilising is the best solution but, not always the spalting appears on the rotten areas, there most of the time the woos simply get dark grey and that its while the spalting tend to form in the pockets of softwood that have preserved high levels of moisture, something like this,

Timbers preparartion 035_(1).jpg timber preparation 215_(1).jpg timber preparation 216_(1).jpgtimber preparation 1451a_(1).jpg
timber preparation 1498.jpg timber preparation 1502.jpg
timber preparation 1507.jpg

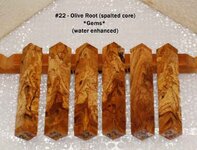
Looking for some pics of pens made with this spalted Olive root, I couldn't find any but I remembered one that I posted on IAP, long ago, here

Cheers
George
 

Pitoon

Member
Joined
Oct 27, 2013
Messages
381
Location
Vicenza, Italy
Tomorrow I plan on starting a Majestic kit. I figured I would post pics from start to finish. I'm hoping I can pull this one off. The blank gives just enough space not to mess up on drilling.....along with it being warped and cupped. Drilling this one is going to take some precise lining up and drilling.....and patients, lol!

Here's the blank i plan on using.....

After the blanks is cut in 2 and to size (lengths) all those bends become less obvious but if the blanks is on the "skinny" side of things, it may be a challenge, alright...!

Is that dark colouration/stain a blue(ish) or a dark grey, does it stink...???

I lose a lot of amazing Olive root blanks due to extreme shrinking, my normal size is 21mm dry so, I cut the Olive wood at about 1" square, I have lots of blanks that have shrunk to under 15mm and less, not counting the bends/curves and twists they endup with. All is strapped tight in my drying towers but, I can't control with it, if I don't cut it into pen blanks, it cracks like mad and shrinks, cutting them as pen blanks (1" square) seems to control most of the cracks but, the shrinking can be overwhelming and its happen to...! guess what...??? the prettiest blanks of the bunch, bugger...!

I have to find a use for all the shrunken to buggery, pretty blanks...!:frown:

That blank will also produce a spectacular pen, looking forwards to see it done...!

Good luck,

Cheers
George

The blank on that side is a bit light blueish grey, so i'm supposing that it was in the begining stages of some spalting. We'll see how deep it got into the wood once i start turning.

Pitoon

Yes and no, Olive wood doesn't spalt as most other woods do, in your case the closest to the bottom/rotten part of the root the darker the grey(ish) will be, and the more will stink, you need to make sure that wood/blanks you are going to work with is free of moisture, maybe a few hours in an oven at 60° celsius will suffice to get any moisture out that otherwise, will play havoc with the finish you intend to give it.

The spalting in Olive wood is formed by transforming into a white colour that becomes very powderish, a very unique spalting but also a very fragile one. Stabilising is the best solution but, not always the spalting appears on the rotten areas, there most of the time the woos simply get dark grey and that its while the spalting tend to form in the pockets of softwood that have preserved high levels of moisture, something like this,

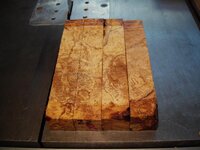
View attachment 108397 View attachment 108398 View attachment 108399View attachment 108400
View attachment 108401 View attachment 108402
View attachment 108403

Looking for some pics of pens made with this spalted Olive root, I couldn't find any but I remembered one that I posted on IAP, long ago, here

Cheers
George

Great pics! When i cut this blank is was cut 1in x1in and in the pic it's close to 3/4in now. So yeah some major shrinkage and warping.

I just looked at your old thread. Those olive pens are awesome!

I would have to say that olive is one of my favorite woods.

Pitoon
 

Pitoon

Member
Joined
Oct 27, 2013
Messages
381
Location
Vicenza, Italy
Well today during lunch I manged to partially turn the blank. Hoping to finish the blank after work. The grain is very pleasing! Now just have to finish turning and apply that first coat of thin CA to see the really colors.

Thanks for looking!

Pitoon

1795183_621298267920159_1520646371_o.jpg


1658546_621309717919014_1943502373_o.jpg
 
Joined
Aug 6, 2013
Messages
836
Location
Jasper Indiana
That is a very beautiful pen Pitoon the grain and colors are amazing, there is just one problem. All of the beautiful pen contests coming for the Bash state the pen can't have been posted before, you could have won with this pen and it is going to be hard to top:)

Great looking pen well done.

Mike
 

Pitoon

Member
Joined
Oct 27, 2013
Messages
381
Location
Vicenza, Italy
Thanks everyone for the kind words! I plan on starting on another Majestic today with intentions of completing it this weekend. I'll be working with a blank i have never used before...so it will be interesting.

Pitoon
 

steamshovel

Member
Joined
Oct 2, 2011
Messages
303
Location
Middleton Idaho 83644-5506 USA
That is a very nice pen. Where can I buy a Majestic pen kit like that. Does it have kit number? I want a ball point. Is yours a ball point or a rollerball?

I agree that pen would win any contest it enters.

Preston
 

Pitoon

Member
Joined
Oct 27, 2013
Messages
381
Location
Vicenza, Italy
Steamshovel,
The cheaper pen kits are ball point, while the higher end kits are exclusively rollerball. You could probable modify it to accept a ball point refill, but why? I find rollerball pens write so much smoother compared to ball points.

Pitoon
 

mark james

IAP Collection, Curator
Joined
Sep 6, 2012
Messages
12,773
Location
Medina, Ohio
Excellent final! The blank, kit and craftsmanship worked well!!

Be proud - that's a great pen!

PS: If it needs a home... :tongue:
 

robutacion

Member
Joined
Aug 6, 2009
Messages
6,514
Location
Australia - SA Adelaide Hills
Well, I only seen this pen today, and I like it very much...!

Great fit and I wonder where all the bluish/dark greyish that was in the blanks, went...!

Sometimes these colourations are only formed at the wood surface, which is a shame, it could have looked more unique, for a piece of Olive wood root burl...!

Well done.

Cheers
George
 
Top Bottom