Just Another Pine Cone Pen

Signed-In Members Don't See This Ad
See more from maxman400

maxman400

Member
Joined
May 25, 2009
Messages
3,111
Location
Omaha Arkansas
This a JR Gent from CSUSA, Dressed in another pine cone cast in Alumilite. Pearl yellow and clear orange the dyes are from alumilite, with a CA finish. I used a Brass Antique solution to darken the tubes after sanding and before gluing. This is my second entry in the Fall Festival.
Thanks for looking, any comments welcome. :)
 

Attachments

  • HF Pine cone II 001_edited-1.jpg
    HF Pine cone II 001_edited-1.jpg
    87.7 KB · Views: 519
  • HF Pine cone II 011_edited-1.jpg
    HF Pine cone II 011_edited-1.jpg
    90.5 KB · Views: 325
  • HF Pine cone II 022_edited-1.jpg
    HF Pine cone II 022_edited-1.jpg
    35.4 KB · Views: 231
  • HF Pine cone II 038_edited-1.jpg
    HF Pine cone II 038_edited-1.jpg
    36.7 KB · Views: 214
  • HF Pine cone II 023_edited-1.jpg
    HF Pine cone II 023_edited-1.jpg
    67.7 KB · Views: 242
Signed-In Members Don't See This Ad

maxman400

Member
Joined
May 25, 2009
Messages
3,111
Location
Omaha Arkansas
Very nice. how do you do that. I am a newbie and would love to learn the casting side.
Casting will eat up your money real fast, But there is some good videos on u-tube, and at alumilite.com and there is some fantastic info in the IAP library on casting.
 

wb7whi

Member
Joined
Aug 29, 2008
Messages
304
Location
Spokane WA
This is a beautiful pen as are many other pine cone pens I have seen. They are truely one of a kind.
Is the process too simple for a step by step? I am thinking you trim the cone on the bandsaw. When casting do you make an effort to center the cone for drilling later? Once cast you cut to size and drill. If you cut too deep you will hit wood. Does it go away during the finish?
You can tell by my questions that I dont know what I am talking about so please to be patient. Thanks...
 

ngeb528

Member
Joined
Mar 4, 2009
Messages
808
Location
Deland, FL
Fantastic. I love the color variations and it goes very well on the Jr Gent. Hope you win cause you deserve it with that entry.
 

workinforwood

Member
Joined
Mar 1, 2007
Messages
8,173
Location
Eaton Rapids, Michigan, USA.
It's another winner Max! I'm a big fan of that particular type of cone too. I use those alot myself because i like the effect they give off with the tight bottom and then quickly the leaves stem further apart.

Is the process too simple for a step by step? I am thinking you trim the cone on the bandsaw. When casting do you make an effort to center the cone for drilling later? Once cast you cut to size and drill. If you cut too deep you will hit wood. Does it go away during the finish?
You can tell by my questions that I dont know what I am talking about so please to be patient. Thanks...

I know when i make them, I trim them, otherwise it would eat up too much resin. I use a 7/8 wide mold. I trim them so they fit nice and snug down in the mold. I do not worry about if the core is very centered. I fill the mold with alumilite mixed with whatever colors and stuff and pressurize at 40 Lbs. That's it. Usually can't tell where the center is and don't really care. I think they actually look better when you drill off center revealing part of the core on one side of the pen. It's quite a simple process and pine cone pens sell well! BTW..that's two pine cones I see there. They are real fat and tight on the bottom and taper fast to a point where theres very few leaves. He has them so the tips are facing each other. You can use any type of pine cone and they all give different effects.
 
Last edited:

maxman400

Member
Joined
May 25, 2009
Messages
3,111
Location
Omaha Arkansas
It's another winner Max! I'm a big fan of that particular type of cone too. I use those alot myself because i like the effect they give off with the tight bottom and then quickly the leaves stem further apart.


I know when i make them, I trim them, otherwise it would eat up too much resin. I use a 7/8 wide mold. I trim them so they fit nice and snug down in the mold. I do not worry about if the core is very centered. I fill the mold with alumilite mixed with whatever colors and stuff and pressurize at 40 Lbs. That's it. Usually can't tell where the center is and don't really care. I think they actually look better when you drill off center revealing part of the core on one side of the pen. It's quite a simple process and pine cone pens sell well! BTW..that's two pine cones I see there. They are real fat and tight on the bottom and taper fast to a point where theres very few leaves. He has them so the tips are facing each other. You can use any type of pine cone and they all give different effects.
Jeff hit it right on the head, the only difference is I started using my sander instead of the band saw because the saw tries to break the peddles off. I use a mold that I made from a plastic cutting board, and seal the cracks with CA. After trimming I gently blow out the dust and dirt and put the cone in the mold. If you trim it just a little proud the cone will wedge it self in the mold and will not try to float. Add the Alumilite and put in the PP and set to 40 PSI, I leave it for about 2 hours. Cut, Drill, Turn, Finish. :biggrin:
 

workinforwood

Member
Joined
Mar 1, 2007
Messages
8,173
Location
Eaton Rapids, Michigan, USA.
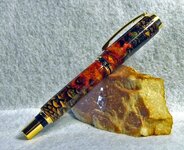
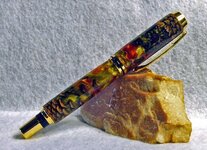
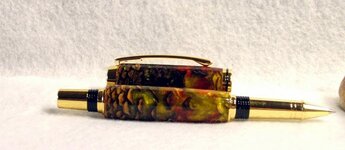
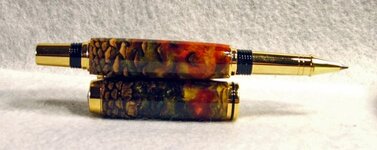
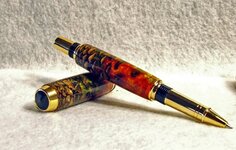
The cone is not colored Steve/Pam. The resin is colored by Max before he poured it in. I wouldn't be surprised that if you took some pine cones and soaked them in dyed alcohol that they would absorb the color, but I think that would take away from the natural beauty that is the cone. People want to be able to easily identify what is in the pen. Notice too, that Max said he chemically colored the tube. That being just a different way of changing the tubes color, but the bottom line is you need to do something to the brass, like at least spray paint it so that no brass shows through the resin. He is pouring his resin so it is semi-translucent for a nice deep effect. You can also pour it a solid color/colors, but then you loose the depth. You still have an awesome pen either way, but the depth is more jaw dropping, as it reveals not only the exposed pieces of cone but the walls of the cone leaves as well.

So how many cones you have now Max? I have 25 ready for my next show.
 

maxman400

Member
Joined
May 25, 2009
Messages
3,111
Location
Omaha Arkansas
So how many cones you have now Max? I have 25 ready for my next show.
I currently only have 3 (2 unsold), I have made about 15. But it seems that as soon as some one sees it it's gone. I have an order for two Slim Lines with out casting. Everybody is amazed at what a pine cone looks like on the inside, which is great for us. :)
 

GregHight

Member
Joined
Jun 7, 2009
Messages
138
Location
Wylie, TX and Beaumont, TX
What kind of pine cones do you use? I have been experimenting with Ponderosa pine cones as they are about the largest available without getting into the hard to get exotic Coulter Pine cones (widow makers) that can be upwards of 12 lbs! http://en.wikipedia.org/wiki/Coulter_Pine

Without casting, I can make a nice pen using the largest part of a cone for each half of a pen. You just have to make sure you stabilize with CA thin before starting to drill or turn. I finally have everything together to cast with alumilte and hopefully I can do it tonight. BTW, how long should you wait to try and turn after taking it out of the pressure pot?
 
Top Bottom