Hi Mark,
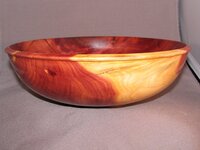
I You haven't mentioned what the wood is, I would swear that was my Australian Black Wattle wood, amazingly identical in the yellows and browns...!

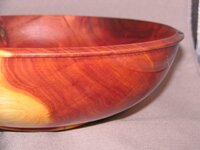
The shape is very elegant and the proportions are good. You need to show the base of the bowls so that we can see the foot in more detail but it looks OK.
I like the way you finish the top edge of the bowl, while one can see that the bowl was turned quite thin, the bowl's "lip" gives it some class...!
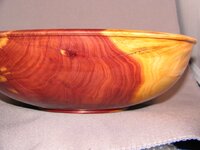
In relation to the finish, the wood looks well sanded and finished, the only detail that I believe you can improve considerably is the repair/fillings. There is a difference in between a repair and a filling, while both require an foreign material to "fill" a space, a repair can be made into a match or a contrast, the filling will be always a feature, there is a contrast also...! I explain,
One of the best habits to have, is to keep the sawdust/savings of every wood type you turn. A glass jar (gem jar type) are ideal for this, simply write a tag or on the glass what that wood is and store it. Why would I need this???, one would ask...!!!, well, look at the example of your bowl, where you have 2 very distinct colours wood colours. If you want to "match" your repair, there is, make it in such way that is almost invisible, you need to have the 2 different colours of sawdust to repair effectively the cracks that run trough both wood colours.
Using the wood's own sawdust, is not going to do it as you will have a mix of the 2 colours and what you need is 2 individual colours. If you want a perfect match, you have to use the same wood and cut the 2 colours off and then make the sawdust out of each one, either by using a belt sander with its dust bag collector or any other sanding tool of identical characteristics...!
You can also make the wood into thin shavings (planner, etc...!) and use a coffee grinder to make it into fine dust. The mixing of each dust colour, can be made with CA/ epoxy or wood glue, depending of how fast you want to finish that piece but, when you have one colour mixed with glue, fill the wood with it, only the portion that match's the mix colour, and then repeat the process with the other colour...!
I have found that the jars I have from the different woods I use, always have the colours I need at any time and that is a very handy thing to have...!
In relation to the "fillings", many materials can be use here, from plastics to stones and anything in between, anything is possible. I particularly like to use Turquoise stone crashed dust, or identical type of gemstones, they all produce great effects but require some extra effort for finishing as stone doesn't sand/finish the same as wood, there is, the methods to level the filling with the wood and the sanding of the stone material is easily done with stone working material, such as a diamond disk on your grinder and diamond sanding paper, readily available by abrasive suppliers...!
I use often also PR (Polyester Resin) on my fillings, particularly for large areas where, the PR can be you most economical option. Does not take much to prepare the surface for the PR pouring, the only down size is that you have to wait considerably longer to finish the piece, still, it all can be done in about 6 hours...!
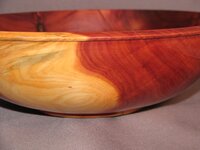
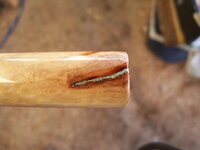
Actually, and while talking about stone fillings, I have used yesterday on one of my pen blank samples, a new Turquoise fine dust that I got from the US recently. I normally don't use it this fine but I wanted to try it out on the very small cracks and see what coloration's it would come out, of this new suppliers's gems stone.
The pic I have attached, is a good example of a contrast filling/repair, the area is very small, about 1/2" long and 1mm wide, I could have used a wood colour that would match the darker wood colour around the flaw/crack and make it invisible but, I wanted to see what type of "blues" would come out of such fine stone powder...!
I hope, this info can assist you in further projects...!:wink::biggrin:
Cheers
George