IPAD stylus build question

Signed-In Members Don't See This Ad

dow

Member
Joined
Jun 25, 2009
Messages
585
Location
Boerne, TX, USA
I went on CSUSA's website and ordered some stylus tips to put on some slimline pens. While there, I noticed their demo picture. Anybody have a clue how they managed to cut down a slimline kit this much and still have the transmission work? My estimate is that the upper tube on this pen is about 3/4-7/8" long and the lower tube is somewhere around 1-1/4". That seems too short for the Cross refill, much less the transmission. If I recall correctly, the tranny sticks up out of the lower tube by over an inch itself. Regardless, that would sure make a handy two-in-one pen. Ideas, anyone?

 
Last edited:
Signed-In Members Don't See This Ad

sbrant

Member
Joined
Jun 14, 2005
Messages
48
Location
North Port, Fl, USA.
I have purchased the stylus and the soft stylus tips from CSA. The stylus tip on the slim lines adds length to the pens cap but their is not change to the actual length of the tubes or the pen itself. The pen photo must be photoshopped.
 

Sam@CSUSA

Member
Joined
Feb 3, 2011
Messages
79
Location
Provo, UT
I had left work for the day shortly after this thread was started so I didn't know about this question until somebody from the office called me and asked me to look at this when I got home. As the maker of this pen I can assure you that it is not photoshopped. I can also say this is not an easy pen to make either (I haven't done any others as I don't have the spare parts to easily recreate it). I'll give you all a list of the used parts now and if anybody would like I can list some more detail instructions in the next few days. So let me know and I will do my best.

Here are the parts needed:
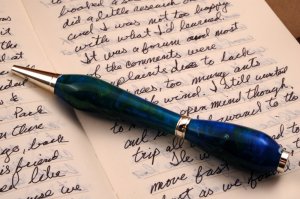
Spare Teacher's Pen Kit (namely 1 short tube, a transmission, and the refill with threaded coupler).
Spare Chrome Slimline Kit (namely writing tip, center band, and clip).
As for the lower tube, this is actually the tube supplied with the bobble stylus kit. (When I initially made some stylus kits for myself, I felt the tube included with the bobble stylus was too short so I set it aside and made mine with a standard 7mm tube for a slimline kit). I'm sorry I don't know the exact length at this moment but eyeballing it I would say it is proud of an inch.

Since the refill used is a shorter one the transmission will get pushed into the longer tube farther than normal. When making this I really just used the guess and check method (I guess something good did come out of grade school!). As all of you know though, before you can mess with the transmission you have to put the writing tip in first. This is the tricky part of the whole process. The hole in the tip for the refill to protrude is too small for the teacher's pen refill to fit through. To resolve this, I took some coarse grit sand paper (120 grit I believe) and rolled it into a thin tube that would fit up the tip of the nib and sanded it out to size. This was a little time consuming but that's how I did it. (After completing the pen, Rex Burningham and I discussed using a small drill bit to bore it out quicker. I haven't actually tried that yet so don't experiment with that if you're worried about messing up the parts. I'll try to find some more spare parts and let you know what I discover).

Hopefully this sheds more light on how this pen was created. I realize this isn't for everyone as it requires lots of parts from different kits. Perhaps if there is enough interest in a pen kit of this size, it can be considered for addition to our line of kits. Let me know if there are any questions! I will try to answer questions in a timely manner but I won't be back in the office until tomorrow morning!
 

EBorraga

Passed Away July 17, 2022
In Memoriam
Joined
Oct 19, 2009
Messages
4,049
Location
Louisville, KY
Pretty interesting Sam. I like the overall look of the pen. It reminds me of a golf pencil. Perfect size and a stylus on the end. I may have to experiment myself as this would be a hit with all my disc golf buddies!!
 

76winger

Member
Joined
Aug 30, 2009
Messages
2,784
Location
Lebanon Indiana
I can envision a way this "possibly" could be made with a slimline kit. I haven't tried it and don't have measurements, but here's what I'm thinking:

This idea would work very well with a wood body, but may with an acrylic one:
How about using the bottom tube and nib from a standard slimline, and turn the body short, with part of the brass tube extending above it. Then make a matching length body for the top, but with only a short brass tube in the top of the body, so the lower part of the upper body would extend down over the transmission and brass tube extending above the lower body.

For this to work you'd be cutting the upper tube into two pieces and only using one half in the top of the upper body, but would need to insert the lower part while turning to keep the bottom part of the body stable during the turning process.

Just writing down thoughts as I personally think a combination stylus and pen is a better idea than the little miniature stylus that is tethered to the headphone jack.
 

dow

Member
Joined
Jun 25, 2009
Messages
585
Location
Boerne, TX, USA
Thanks for the info, Sam. That explains it pretty well. I just looked at the teacher's pen instructions, and it makes sense. I think that I can make the whole thing with some bulk 7mm tube stock and what slimline kits I've got on hand, with the exception of the threaded couplers. I'll see what I can dig up as soon as I get the time.

Thanks again!
Dow

P. S. I'm probably the cause of your call yesterday. I called in and spoke with Kami and asked her about it and she said that she'd check for me. Nice girl. Great customer service as well. She even sent me a thank you card for my order last week. :biggrin:
 

Live2Dive

Member
Joined
Dec 15, 2010
Messages
123
Location
Littleton, CO
I've done something similar to a few slims, by just trial and error with cutting down the upper tube length. Here a few shots of what I was able to do. I did modify the ink refill for both of these by about a half inch, but there is no ink that far down the refill. I could see this as an easy mod to get the look of the example above. I might have to get a few stylus tips and give it a go.

1_slim-1-small.jpg


1_slim-3-small.jpg
 

sbell111

Member
Joined
Jan 16, 2008
Messages
3,465
Location
Franklin, TN
The hole in the tip for the refill to protrude is too small for the teacher's pen refill to fit through. To resolve this, I took some coarse grit sand paper (120 grit I believe) and rolled it into a thin tube that would fit up the tip of the nib and sanded it out to size. This was a little time consuming but that's how I did it. (After completing the pen, Rex Burningham and I discussed using a small drill bit to bore it out quicker. I haven't actually tried that yet so don't experiment with that if you're worried about messing up the parts. I'll try to find some more spare parts and let you know what I discover).
I use a drill bit to adjust the nib holes on any 'parker' pen that I make so that a gel refill can be used. It's easy to do and no pen has ever been returned related to this modification.

Hopefully this sheds more light on how this pen was created. I realize this isn't for everyone as it requires lots of parts from different kits. Perhaps if there is enough interest in a pen kit of this size, it can be considered for addition to our line of kits. Let me know if there are any questions! I will try to answer questions in a timely manner but I won't be back in the office until tomorrow morning!
I had assumed that it was a mini (keychain/credit card/teacher) pen kit with slimline shiny parts and a slightly cut-down top tube.

My issue with the referenced pen is that the clip extends to the lower barrel. While I do like the look, it is likely to cause damage to the lower barrel as the cartridge is extended and retracted. For this reason, I would either not install a clip on such a pen or I would use the shorter clip from the credit card pen. Actually, I would probably just make the pen using the credit card kit and be happy.
 
Last edited:
Top Bottom