Imperial and GIMP

Signed-In Members Don't See This Ad
See more from propencity

propencity

Member
Joined
Feb 8, 2009
Messages
337
Location
Pearland, TX
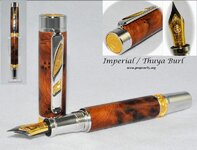
Got my Imperial Kit from CUSA a week ago and couldn't decide on the blank to use but finally settled on Thuya Burl.

Rough Gouge to round.
Skew chisel to complete turn.
Dry sand to 600 and MM to 12k.

Could never get the glassy finish that I wanted even after 8 coats of CA/BLO.
Also having fun learning to use GIMP for the MAC to layer multiple images into one (attachment)

Comments are welcome and appreciated. Thanks, Mark.
 

Attachments

  • Imperial_ThuyaBurl_small2.jpg
    Imperial_ThuyaBurl_small2.jpg
    62.6 KB · Views: 280
Signed-In Members Don't See This Ad

dennisg

Member
Joined
Jul 12, 2008
Messages
314
Location
Jacksonville, Florida, USA.
The pen looks great. For a more glossy shine try some brasso or plastic polish. That really brings out the shine.

"Could never get the glassy finish that I wanted even after 8 coats of CA/BLO. "
 

propencity

Member
Joined
Feb 8, 2009
Messages
337
Location
Pearland, TX
Thanks for the feedback.

Thank you everyone for the feedback and comments.

Dennis - good suggestion on the plastic finish. I will give that a try on the next wood pen I make.

Paul - the gold inlays on the clip, band, and top are are shaped to be "bamboo leaf, to represent longevity, grace and strength". At least as described by CUSA website.

This was my first time trying the Imperial kit and it is too bad that they are closing it out. It really makes for a nice pen with all the 3D engravings and the barrel made to really accentuate the grain of the wood. Assembly was fairly easy, not too many parts to pressed, and I think (haven't tried yet) but the fountain pen nib/nib holder on these kits can be replaced with the rollerball tip (from the rollerball kit); all the other fittings seem to be the same between fp and rollerball.
 
Top Bottom