When we made our first segmented pens we had no idea what we were doing and made it up as we went.
Here are the basic steps we took:
1) We got the blanks we wanted to segment, and a pen kit.
2) We drilled a hole as far into the uncut blank that our drill
press would allow.
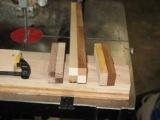
3) Set the cms to 45*, and started cutting the wood into different
sized slices. (use something like Gary's PLEASE)
4) sand the tube(s ), dry fit your cut pieces to figure out the
pattern you want.
5) we use CA for segmenting, so this step is when you glue your
fingers to the wood, tube, workbench, each other, etc
in other words. Be careful! Just put a little glue inside
the hole of the first piece of wood, slide it on, put glue
on the next piece and on the surface between, press together
till set enough to hold or I sprayed the outside with a
little accelerator to keep the pieces from moving around.
I use a plastic bag from a kit under my work, so that it
won't stick to the bench when I set it down.
6) when cured turn into a pen.
Good luck, it is a lot of fun. By the way we still make a few segments this way.
The most important step is be safte. The next important one is have fun and let your imagination run free. The next is POST pictures, so we can see it.

")