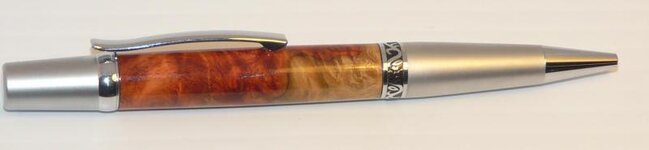
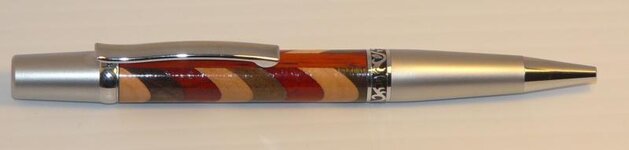
I have been trying to get an ultra high gloss shine but mine just doesn't seem to measure up against what I see out there. I attached a few of my CA and BLO finished pens, they are pretty shiny but I want them to look like glass. I put 6 coats of BOL and CA then sanded with 600 grit ending with a Mylands high gloss polish. Any suggestions out there are welcome

You are using an out of date browser. It may not display this or other websites correctly.
You should upgrade or use an alternative browser.
You should upgrade or use an alternative browser.
How to obtain a High Gloss Shine
- Thread starter psperan
- Start date
Signed-In Members Don't See This Ad

Signed-In Members Don't See This Ad
G1Pens
Member
To get the high gloss, you will need to use Micro Mesh. There are 9 levels, the last being 12000 grit. That will get you there. I have always done my MM dry until recently and I switched to wet. It seems to have kicked them up a notch. I always finish with a polish. Some guys use a buffing wheel after the MM.
dgscott
Member
Polish to a much higher grit and then buff on a cotton wheel.
I agree. Get yourself some MicroMesh, polish to 12,000 grit. If you are able to buff, buff with white diamond then with carnuba (BTW, use two differen wheels for this).
Doug
hdtran
Member
What they said. I think I can see lines going circumferentially on your pens, from either the application of the BLO/CA, or the 600 paper, or both. Did you do longitudinal sanding with the lathe off after sanding?
I sand to 600 (actually, I don't sand anymore. I use Ken Ferrell's amazing woodchuck pen pro!), with longitudinal sanding between each grit. Then, after the BLO/CA, I start micromesh at 3600 (again, with the longitudinal sanding) all the way to 12000 (micromesh numbers are not the same as regular sandpaper number, so please take those numbers as labels and not grit size). Use slow speed for your micromesh. If you can't wait for the micromesh, you can use high speed and grocery bag paper (tip from an article by the late Russ Fairfield). Micromesh, if used at slow speed (and not allowed to heat up), can be reused a lot; just slap it against your pants, or handwash it.
My last step is usually a very thin coat of carnauba wax, polished off with a t-shirt cloth at high speed.
Best of luck!
its_virgil
Member
micromesh,buffing compound...there are several, Flitz, NOVUS 1 2 3, McGuires ScratchX swirl and fine scratch remover, and the list goes on and on. Toss the Mylands, all buffing wheels are not the same...stay away from the box home stores, I'm not a wax fan but many seem to be. Getting the shine is not difficult but takes the correct approach. Read this thread:
http://www.penturners.org/forum/showthread.php?t=55476&highlight=buffing
Do a good turn daily!
Don
http://www.penturners.org/forum/showthread.php?t=55476&highlight=buffing
Do a good turn daily!
Don
1080Wayne
Member
Phil
Sometimes it takes persperation !! If you look closely at the shine line on the segmented pen , you will see many interruptions in the line , indicating that not enough time was spent with the grits coarser than 600 . The benefits of Micromesh will be maximized if the proper groundwork has been done first .
Wayne
its_virgil
Member
What is your sanding routine prior to the CA application? One thing I learned early on from Russ Fairfield is the final finish will not be any better than the surface onto which it is placed. I sand to 800 then use micromesh on the bare wood prior to applying CA with or without boiled linseed oil. You may have so homework and research to do. Good luck. Getting that shine is not difficult but does take just a little work and use of the correct technique and products.
Do a good turn daily!
Don
Do a good turn daily!
Don
robutacion
Member
I reckon, it needs more CA on it, depth look is achieved with lots of CA layers and the gloss is better if the CA as a thick layer over the wood. This will also allow you to get all the sanding and polishing done feeling safer that you aren't going to go through and get the wood, or leave so little amount of CA that is nearly impossible to get ant decent shine out of the blank.
All the other suggestions given here on the last polishing details are good and will give you better results also.
Hope this helps...!
Cheers
George
All the other suggestions given here on the last polishing details are good and will give you better results also.
Hope this helps...!
Cheers
George
Buzzzz4
Member
I also did away with the BLO. CA only resulted in a much clearer and shinier finish for me. Added to all the above comments.
seamus7227
Member
its_virgil (Don Ward) gave me a crash course on applying a CA finish, my first couple of pens weren't bad, the next few I just couldn't get it. I then spent the next 2 to 3 months trying to master that finishing technique and in the process developed a way that worked best for me. It it still based on the same methods that Don taught me but I had to figure out timing and all of the fine details that really come more from practice rather than me telling you through text on a page.
I only use Bounty kitchen towels to apply the CA,(hopefully by this point you have sanded to 400-600 and wiped all sawdust off with denatured alcohol) turn on lathe to around 1500 rpm, 6 to 8 drops of CA on the towel, wipe back and fourth a few passes and back off. Snif, and you will know if the CA is activating:frown: by the repugnant smell it creates when activating(typically within a minute), apply 8 more coats that same way, MM with 1500(orange pad) to take off the top layer and make smooth, maybe apply a few more final coats, then I may apply a pea sized amount of BLO, Wipe blank thoroughly with clean paper towel then MM to 12000 and then use plastic polish with a clean white t-shirt to buff clean. In the end, as others will tell you too, there are many ways to skin a cat. You just need to find what's best for you. Be patient, you may not figure it out overnight. But with determination, you will!
I only use Bounty kitchen towels to apply the CA,(hopefully by this point you have sanded to 400-600 and wiped all sawdust off with denatured alcohol) turn on lathe to around 1500 rpm, 6 to 8 drops of CA on the towel, wipe back and fourth a few passes and back off. Snif, and you will know if the CA is activating:frown: by the repugnant smell it creates when activating(typically within a minute), apply 8 more coats that same way, MM with 1500(orange pad) to take off the top layer and make smooth, maybe apply a few more final coats, then I may apply a pea sized amount of BLO, Wipe blank thoroughly with clean paper towel then MM to 12000 and then use plastic polish with a clean white t-shirt to buff clean. In the end, as others will tell you too, there are many ways to skin a cat. You just need to find what's best for you. Be patient, you may not figure it out overnight. But with determination, you will!
Last edited:
Rangertrek
Member
I stopped using BLO over a year ago, strictly use CA now with MM, and sometimes scratch remover. Will start buffing soon.
bensoelberg
Member
Thanks everyone for this great advise. I do use the MM prior to any finish but that is it. I will try using it for the final finish. Appreciate all the tips!
I think that you'll find that this will help immensely. I highly recommend using the MM wet. Just adding water seemed to help me quite a bit.
edavisj316
Member
Your finish looks like mine did up until about two or three months ago. I use the wet PSI sanding pads which are about the same as the MM. What I discovered was that I was not getting all the ridges out with that fist sanding with the pads after the CA.
Now I have a bright light right over the lathe [65 watts] and I use a magnifying glass to make sure all the ridges are gone. The pen will look perfect until I look at it under the glass. Once I get a perfectly smooth finish with the first pad [no shiny lines, the whole pin will have an even haze] I then go through the rest of the grits. And yes it takes a while. My finishing time has more than tripled. Then I finish with the plastic polish.
That realy made the finish "pop." And the pens that I have shown on the site have all gotten complements for the finish.
This may not be the best or most eficient way of doing it. But it is working for me.
Ed<><
its_virgil
Member
My experience and observations: Ridges seem to be the result of using plastic baggies as the CA applicator and lots of sanding is required to smooth out the finish. Another cause of ridges can be too heavy of an application of CA especially, again, with plastic baggies. Paper towels, for me at least, do not produce or leave ridges...nothing to sand out. I do very little, if any, sanding between CA layers. I do not wet sand, but several do and it works fine. I do 6 or more layers using boiled linseed oil with the CA glue, micromesh sanding, buffing and the finish is done...in 10 minutes or so. Paper towel of choice for me is Bounty. Not sure I've shared that secret before:biggrin::biggrin::biggrin:.
Also, the CA glue will migrate to the larger diameters of the pen blank...because of speed and centrifugal force and such, again if the CA glue is applied too thick. Slow speed is needed. Paper towels seem to soak the excess CA and keep if from forming ridges and such.
No denatured alcohol used. If cleaning or wiping is needed I use accelerator...not the aerosol but the liquid from a container. I use accelerator to wipe down oily woods prior to applying the CA glue and oil.
Do a good turn daily!
Don
What I discovered was that I was not getting all the ridges out with that fist sanding with the pads after the CA.
Ed<><
Last edited:
edavisj316
Member
Point well taken Don.
I tried the baggies once or twice... didn't like it. Went back to the paper towels. But I agree, I think the ridges were/are being caused by to thick a layer of the CA. I was using the medium & thick CA from Woodcraft [the salesman told me not to touch the thin] I recently ran out and replaced with the CA from Wooden Wonders and from reading on here started using the thin and medium.
I think the CA is going on a lot thinner. That is resulting in a smoother pen from the start. And thus much less sanding.
My main point was that for what ever reason, his pen did not look like he had achieved a flat surface. I have done some real stinkers. But was still able to achieve a good finish through a lot of sanding. But that sure isn't the best way to get there.
Ed<><
Laurenr
Member
Remember too, that after you have applied the CA in multiple layers, what you have is an acrylic surface. You may then polish as you would any plastic, acrylic, or resin blank. Sand it to 800ish, then run through the MM wet. You may then apply any plastic polish. That should leave your blank pretty darn shiny.
After you get the blank sanded to 400 or 600, clean it and get all the dust off.
1. 3 or 4 coats of thin ca, sand with 600 just a little and wipe off dust and check to see if you broke through the finish anywhere. Redo if you did.
2. Apply an additional 5 to 10 coats of thin ca (i like to have the lathe going slow when I put on ca)
3. sand longways with 1200 micro mesh (wet) to get the rings out if you have any, then proceed to sanding to 12,000 wet.
4. Wipe off clean and dry, then polish with whatever you use. I use something called final finish that is a cue stick finishing product. It is very similar to Novus I think.
so pretty similar to what everyone else says. I use paper towels folded longways real tight and can get about 6 or so coats done with one towel.
jkirkb94
Member
I too ditched the BLO and got better results.
marcsitkin
Member
Wetting and clean rinsing the MM is the way to go, I too did away with the BLO . Wetting the MM will make it last a lot longer too.
Tom/oops99
Does the wet sanding affect the CA? Should the CA have a curing time before wet sanding?
dannyshoots
Member
I haven't used BLO and probably wont as Eric B. decided to do away with it. I use thin wrapping styrofoam cut into 2" squares and folded over as an applicator. I have used paper towels but they cost money and I get the strofoam wrapping stuff free. I set the lathe on it's slowest speed and drip thin CA on top of the work - holding the applicator lightly to the bottom of the barrel and work back and forth slowly across the length of it. Once I'm good with the amount of glue applied, I lightly mist the work with accelerator. Give it about 5 minutes to fully cure and WET sand it smooth with 600 grit. Now do it over again once more with thin CA and maybe 3 or 4 more times with medium CA. Always sanding smooth after each application. Once I'm satisfied with a good coating of CA then I wet sand with MM all the way to 12000 and then use Mylars #2 and #1 plastic polish. All polishing done on the lathe. I've never felt a need to polish on a wheel afterwards. Good luck.
moke
Member
I have not used BLO in a long time, just seemed like an extra step that wasn't needed. However, I read on a thread several months ago that BLO made the CA more durable in the long run....don't mean to hijack the thread but if anyone has any info to confirm this, it would be great!
soligen
Member
I'm going to give you a little different of a take of how I approach it. Maybe a little different viewpoint will help.
I don't think of CA as a finish. To me, applying a finish is like painting - you want layers to be smooth and blemish free. The way I think of applying CA in terms of encasing the blank in plastic. I apply it thick and I dont worry about the ridges as I apply the CA. I also skip the BLO. Since I am encasing in plastic, it doesnt make any sense to be to add layers of oil inside my plastic encasement. Besides, I never managed to get a good high gloss result when I use BLO.
I start by turning the pen a hair (3 - 5 tousandths) smaller than my target size, then start apply coats of CA. I start with a couple coats of thin to seal things up, then use medium to build up my platsic encasement. I use accellerator between each coat. I build it up really thick - at least 1/100" larger than my target size.
At this point things are a bit rough. Sanding this much off is time consuming and sanding can contribute to Out of Round issues. So, I make a light pass or 2 with my carbide scraper (I use a woodchuck pen pro with R2 insert) just to remove the roughness. Check to see if there are any shiny spots- if so, make another light pass. It's amazing how smooth you can get things with a tool like this. I re-measure the blank and as long as I am above my target size, I'm in good shape. If I took off too much then I go back to the CA, and this time put it on a little thicker. In time you will get a good feel for how much to put on.
At this point I have basically a platic blank, and I proceed list like I would when finishing a PR blank. The only difference is that CA is a bit harder than PR, so I start sanding wet at 600 grit (with PR I can start at 1000). If I'm still more than a few thou over size, I'll use the wood chuck a little bit more before starting to sand.
Work through all grits (wet) up through MM 12k. Stop the lathe and go with the grain for EVERY grit. Lastly, buff. I use blue rouge as it seems a tad finer than white diamond, but you would need to carefully examine the pens side by side to see and difference between blue and white buffing.
Waxing makes no difference to the gloss I get. IMO if wax helps your gloss, then you need to work on your finish more. Wax wears off quickly, and if your gloss relies on it, so will your gloss. What wax does is makes wiping off finger prints easier.
Also, if you see ridges in the gloss "gleam" when you hold the pen up to the light, then you either did not stop and go with the grain on every grit, or did not spend enough time on one of the grits.
I hope this helps.
Last edited:
glycerine
Member
Hut plastic polish works wonders!!
hdtran
Member
I have not used BLO in a long time, just seemed like an extra step that wasn't needed. However, I read on a thread several months ago that BLO made the CA more durable in the long run....don't mean to hijack the thread but if anyone has any info to confirm this, it would be great!
BLO will penetrate the surface of the wood. When it polymerizes, it will slightly harden the surface of the wood.
BLO is, according to various internet sources, a mild accelerator for CA glue. Accelerators for CA glue promote polymerization by donating an electron, so the use of an accelerator is likely to result in shorter polymer chains in the cyanoacrylate (this is speculation, as it's been more years than I care to remember since I had organic chemistry). Shorter polymer chains are correlated with lower tensile strength.
wb7whi
Member
psperan said:I have been trying to get an ultra high gloss shine but mine just doesn't seem to measure up against what I see out there. I attached a few of my CA and BLO finished pens, they are pretty shiny but I want them to look like glass. I put 6 coats of BOL and CA then sanded with 600 grit ending with a Mylands high gloss polish. Any suggestions out there are welcome
As Russ used to say, "You must finish the finish."
It wouldn't hurt to run thru 800 to 12000mm after the ca is applied. Buffers are really nice as well but personally I would rather see the wood rather than a super high gloss finish.
its_virgil
Member
Here is a question (from the Y! group)similar to yours and the answer given by a PhD in Chemistry: Do I know what the answer means? No! I like the results I get using both. I don't consider the finish to be alternating layers of oil and CA but if I understand the answer below the two become one (kinda like marriage) making both better together than what they are alone(a lot like marriage)!
********************************************************
Q: Does anyone understand how Boiled Linseed Oil and CA glue react to make such a
nice finish? When I use CA alone, it's extremely difficult to achieve a
consistent finish, but when you add BLO, it is very easy to get a nice finish.
A: Yes. The CA acts as a cross linker for the BLO - you basically get an
accelerated linseed oil resin matrix with added durability and water
resistance.
Normally, oxygen generates radicals in the oil which then act as cross linkers - a much slower reaction, and resulting in a resin with other properties than a CA-cross linked BLO resin).
Dr. Henk J.M. Verhaar
*********************************************************
Do a good turn daily!
Don
I have not used BLO in a long time, just seemed like an extra step that wasn't needed. However, I read on a thread several months ago that BLO made the CA more durable in the long run....don't mean to hijack the thread but if anyone has any info to confirm this, it would be great!
Sylvanite
Member
I once asked a chemist about the combination of BLO and CA. He told me I was actually producing a urethane finish. According to him, there are lots of ways of creating urethanes, and we had stumbled across one.
That said, I have since dropped BLO from my CA finish and am happier with the results. I have a few observations:
Eric
That said, I have since dropped BLO from my CA finish and am happier with the results. I have a few observations:
- In order to get a deep looking finish, the finish needs to be, well, deep. So, when I want that effect, I turn the wood shy, sand, and build up a thick CA coating.
- This thick buildup often results in ridges, or is uneven. I don't worry about it. I simply turn it back down with a skew presented as a scraper. That gets me a smooth, even, and straight surface that needs minimal sanding before polishing.
- When I complete the finish in one session, surface imperfections sometimes show up a day or more afterwards. I suspect that the CA glue shrinks (or the wood moves) a little while curing - even after it has set. I get best results when I let the blank sit overnight before smoothing.
Eric
[FONT="]This is how I do it. First go buy some of those blue shop paper towels they sell at home depot or some other home centers. Fold the ends to the center and then fold in half. Cut them into strips about 1 1/2 inches wide. These are what you will use to apply the CA. When working with wood make sure you sand then stop the lathe and cross sand. I start with 120 or 180 grit and work up to 400 grit. Go higher if you want too, but I don't usually need to. Look at the wood closely and make that decision on your own. You will know if a higher grit is needed. You don't want to see any scratches before applying the CA. IMPORTANT: Make sure you are wearing gloves that the CA can't penetrate. Don't use vinyl gloves they don't seem to hold up to the CA. Now, with the lathe turning at a slow speed hold a piece of paper towel under the wood and run across the top of your work a layer of thin CA. Let the paper catch the access CA and be sure to run it back and forth on the wood quickly. Don't keep it on the wood more than 2 seconds. Do it fast! Then spray with CA accelerator. Apply a second coat the same way. I use one piece of paper towel 4 times. Use each end and then turn over and use the other side each end. Now you want to apply a medium CA to the wood. I put about 8 to 10 drops on the end of the paper towel and run it a cross the bottom quickly. One-way and then back. Again be quick, you don't want to glue the paper towel to the wood. Apply about 8 coats the same way spraying with accelerator in between each coat. After you have applied all coats let it dry for about ten minutes. Now if you don't have a Micro Mesh Kit, buy one, this is what will achieve the high gloss finish. Now turn up the speed on the lathe fairly fast. Keep each piece of sand paper or Micro Mesh wet from here on out, dipping your sand paper or Micro Mesh in water. (Do not let the pieces dry out against the surface) I first start my sanding with a wet dry sand paper of 600 grit. Make sure you stop the lathe and cross sand between each step from here on out. Before I start with the Micro Mesh I want to make sure that the entire level of the surface is dulled and no pits or shiny surfaces exist. Stop the lathe and dry off your work with a clean paper towel to make sure there are no low spots that are shiny. If there are keep wet sanding until the surface is straight and level. Once this is achieved you can go through the steps of Micro Mech. Be sure to work up a slurry stop the lathe and cross sand with the Micro Mesh and dry it off between each step. At the end of the Micro Mesh steps you will have a high gloss finish. I like to make my last step a coat of plastic polish. Now the hard part, using all that CA is going to glue the bushings to the wood. I take a parting tool and cut away the CA on the bushings. If the bushings are still stuck when I remove them from the mandrel I knock them (the Bushings) on a hard surface with a downward force. Not too hard just enough to break them loose. Then I square up the blank by sanding any left over CA on the ends. This seems to work best for me. If anyone has any better tips please join in. I don't use BLO and I don't use a buffing wheel. I can't possibly see how buffing can make it shine anymore after 12,000 grit. Acrylic pieces go through the same steps minus the CA. When using fusion blanks I do apply a CA finish on the entire piece. Just make sure when working with straight Acrylic don't let it get dry and keep it wet and cool when sanding, otherwise I have had some pieces shrink on the tubes if they are overheated. I know this is not everyone's preferred method, but it works well.
[/FONT]
[/FONT]
Attachments


Aerotech
Member
what they said. no BLO, several layers of CA and sand with Micro mesh.
soligen
Member
[FONT="]Now the hard part, using all that CA is going to glue the bushings to the wood. I take a parting tool and cut away the CA on the bushings. If the bushings are still stuck when I remove them from the mandrel I knock them (the Bushings) on a hard surface with a downward force. Not too hard just enough to break them loose. Then I square up the blank by sanding any left over CA on the ends. [/FONT]
Nice process. I would suggest cutting the blanks away from the CA and squaring after the 600 grit sanding. This way you can get an accurate confirmation of your final dimension using calipers before you polish.
Even Better....thanks!
[FONT="]Now the hard part, using all that CA is going to glue the bushings to the wood. I take a parting tool and cut away the CA on the bushings. If the bushings are still stuck when I remove them from the mandrel I knock them (the Bushings) on a hard surface with a downward force. Not too hard just enough to break them loose. Then I square up the blank by sanding any left over CA on the ends. [/FONT]
Nice process. I would suggest cutting the blanks away from the CA and squaring after the 600 grit sanding. This way you can get an accurate confirmation of your final dimension using calipers before you polish.
bensoelberg
Member
Some really good tips and techniques in this thread. Hopefully it has helped the OP, Psperan. I, for one, would love to see a picture of your next pen right next to one of those that you posted earlier to see the progress that you've made.
Sawdust46
Member
Grub32 has a you tube video that will help you.
SGM Retired
Member
OK no BLO turners, I tried it your way today with blue towel using thin CA and going back and forth fast and just what I thought happened. The towel starts to stick to the surface, had to sand down and start all over again. So tell me again that you don't even use a drop of BLO on the towel to keep this from happening. Trying to get the finish I see others have in pictures. Thanks..
Signed-In Members Don't See This Ad
soligen
Member
Try looking at my earlier post. The finish you see does not come from the way the CA is applied - it comes from sanding and buffing to very fine grits after you build it up. Try not rubbing so much. Just 2 or 3 quick passes to spread out the CA. After you have enough on, remove the the roughness.
Eliminating the BLO requires a different technique, so doing things like you did before, but skipping the BLO, is not likely to work.
Eliminating the BLO requires a different technique, so doing things like you did before, but skipping the BLO, is not likely to work.
Last edited: