Dan Masshardt
Member
Even though I'm far from an expert, I'm often asked how I turn a custom finial for the Jr series pen kits.
Since I'm not setup to take videos, here is my photo tour. I hope that it may be of some use.
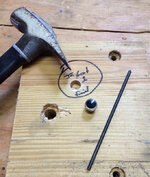
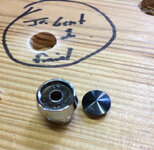
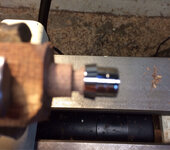
First I punch the existing finial cap out. Simply drill a hole in a piece of scrap wood that will support the outside of the piece while allowing the stock being punched out to fall into the hole.
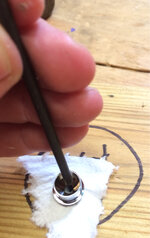
I put something like a paper towel or cloth in to protect the plating finish. I use a punch from my transfer punch set and give it a solid hit.
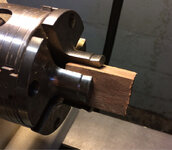
Next I chuck up a blank in my nova chuck's pin jaws. Often if I'm using the same material as the pen, I'll use the blank for the cap, turn the finial and then I can drill the tube hole.
Note: if you don't have a chuck like this, you can use a faceplate with a piece of wood screwed to it and trued up. Them simply glue the piece of scrap or material you are using for your finial to the center of the faceplate block.
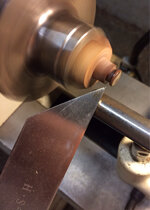
Next simply turn down the material to size. I use the finial cap with the stock piece punched out to check fit as I go. You could also use calipers but I find my method very easy.
Now sand and finish the piece to your liking. Keep in mind that if you sand the edges heavily it may reduce the diameter. Also, you'll have to decide how thick you want the piece to be.
Then part the piece off. I find the narrow parting tool to be excellent for this.
Don't worry is there is a little nub on the center of the back when you part it off. This will fit right into the hold in the piece it's going into.
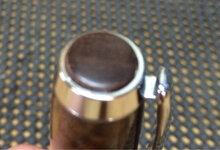
I highly recommend pressing the cap together before gluing the turned finial in. Otherwise there is a chance the thin piece could crack or be marred.
Used a small amount of epoxy or ca to glue the piece in place and you are good to go.
I hope this helps someone. Let me know if you have any questions.
Since I'm not setup to take videos, here is my photo tour. I hope that it may be of some use.
First I punch the existing finial cap out. Simply drill a hole in a piece of scrap wood that will support the outside of the piece while allowing the stock being punched out to fall into the hole.
I put something like a paper towel or cloth in to protect the plating finish. I use a punch from my transfer punch set and give it a solid hit.
Next I chuck up a blank in my nova chuck's pin jaws. Often if I'm using the same material as the pen, I'll use the blank for the cap, turn the finial and then I can drill the tube hole.
Note: if you don't have a chuck like this, you can use a faceplate with a piece of wood screwed to it and trued up. Them simply glue the piece of scrap or material you are using for your finial to the center of the faceplate block.
Next simply turn down the material to size. I use the finial cap with the stock piece punched out to check fit as I go. You could also use calipers but I find my method very easy.
Now sand and finish the piece to your liking. Keep in mind that if you sand the edges heavily it may reduce the diameter. Also, you'll have to decide how thick you want the piece to be.
Then part the piece off. I find the narrow parting tool to be excellent for this.
Don't worry is there is a little nub on the center of the back when you part it off. This will fit right into the hold in the piece it's going into.
I highly recommend pressing the cap together before gluing the turned finial in. Otherwise there is a chance the thin piece could crack or be marred.
Used a small amount of epoxy or ca to glue the piece in place and you are good to go.
I hope this helps someone. Let me know if you have any questions.