How do I use Photoshop to....

Signed-In Members Don't See This Ad

micharms

Member
Joined
Nov 8, 2004
Messages
681
Location
Port Elgin, Ontario, Canada.
put photos together. Often I see images on here that show different views of the same pen and they are all in the same frame not separate photos. Can I do this in Photoshop and if so can someone get me started? If not can I use Gimp and how do I get started?

Thanks in advance.
Michael
 
Signed-In Members Don't See This Ad

Katsin

Member
Joined
Feb 26, 2011
Messages
263
Location
Vernon, NJ
There about 50 ways to do anything in those sophisticated photo editing applications.

Here is one approach in Photoshop CS5 which should be similar in GIMP:

1) On the "File" menu, choose "New..."
2) Specify a width and height that is large enough to encompass all of the photos you want to add to the composite presentation. Think about the end product when choosing these values. For example, 800 pixels wide by 600 pixels high is often used when creating photos for IAP forums as it keeps download times brief.
3) Leave the new empty image open and proceed to open one of the images you want to add to the composite.
4) Copy the image you want to add to the composite to the clipboard. You can do this by selecting "Copy" off the "Edit" menu.
5) Switch back to the empty image and choose "Paste" off the "Edit" menu.
6) Immediately after you paste the image into the composite, choose "Free Transform" off the "Edit" menu to scale and position the photo you have added. Holding the Shift button will constrain portions as you transform the edition.
7) Rinse and repeat steps 4-6 to put several images into the composite.
8) Open up the "Layers" menu off of the "Window" menu to select the particular image you are modifying in the composite.

The "Image -> Adjustments" menu on Photoshop can be used to compensate for a host of photography sins. When images are shrunk they will typically benefit from a "Filter -> Sharpen -> Unsharp" mask to help them look good.

Good unsharp mask values to start with are: 85 amount/1 radius/4 levels or 50 amount/1 radius/4 levels

GIMP is very capable and the price is right so if you don't have access to Photoshop don't be afraid to use GIMP.
 

Lenny

Member
Joined
Jan 6, 2009
Messages
3,475
Location
Searsport, Maine
Check out my friend Janee's site ... Not sure how much she is doing now as she has had some major changes occur in her life in the last few years, but there is a wealth of info here .... http://myjanee.com/

Also you might look at (in Photoshop 7 at least) File> Automate>Picture Package or one of the other options there.

Like many programs, most of us only touch the surface of what they will do. :)
 

NewLondon88

Local Chapter Leader
Joined
May 15, 2008
Messages
5,077
Location
Claremont NH
I do almost what Katsin said, but maybe a screen or two less.

I start by opening one of the images and decide what I'd like the final
dimensions to be. He used the example of 800x600, so let's use that.
I try to CROP as close to those dimensions as I can instead of resizing.
Resizing, as mentioned, can really interfere with your image sometimes.
So I'll try to get the width to HALF of that 800 (since we're sharing the
real estate) so I'll crop/resize to get the width to 400 pixels. Photoshop
will let you change by either pixels or inches by going to Image> Image Size.
You can change the pixels up top, or change the inches (or points, picas
etc.) down bottom.

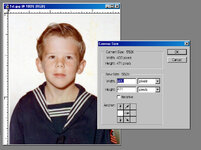
Then go to Image>CANVAS size .. make the canvas the full width you
want. Make it the height you want, too. Specify 800x600 and notice the
Anchor box at the bottom. If you leave the middle checked, Photoshop
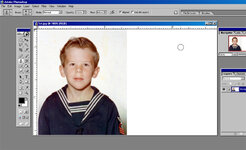
will leave your photo right in the center. If you check the LEFT box,
it will move your photo to the left (anchor it) and put the extra white
space on the right. Similarly, if you anchored at the right, the white space
would be on the left. Basically, you're saying "Put my photo HERE"
test1.jpg

Then you can go get your second image, crop/resize to fit that white
space (which is now 400x600 .. half of the 800x600 image area) and
copy it to the clipboard. Close the second file.. you're done with it.
test2.jpg
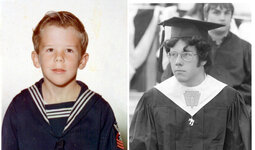
On your first image, you can use the magic wand to select the white
space and go to Edit>Paste Into (ie. paste clipboard image into the
space I just selected with the magic wand) You should now have an
800x600 image with two equal sized photos side by side.
test3.jpg
Flatten the image (Layer>Flatten Image) to put everything on one layer.
Otherwise, you can't save it as a jpeg.. jpeg won't save layers.

As Katsin said .. there are many many ways to do the same thing. You'll
get more familiar with the tools as you use them and you'll find what works
best for you.
 
Top Bottom