Holly and Ebony Sierra

Signed-In Members Don't See This Ad
See more from hebertjo

hebertjo

Member
Joined
Apr 28, 2008
Messages
231
Location
Phoenix, AZ, USA.
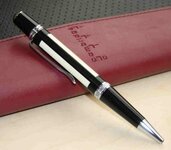
It has been a while since I posted a pen. I saw this design one day surfing the web but do not recall where it was. I thought it would go well with the black barrels of the sierra. The most difficult part about it is drilling a centered hole. This one is a little off center but it is hard to tell even if you are holding the pen.
 

Attachments

  • sierra_bw.jpg
    sierra_bw.jpg
    37.2 KB · Views: 401
Signed-In Members Don't See This Ad

hewunch

Member
Joined
Aug 5, 2008
Messages
4,663
Location
Albany, GA
Nice looking pen! I love the look (I made a couple similar but it was segmented with ebony windows)


Ok.... I have no idea how you make something like that.

Start off with a blank that looks like this, and add ebony ends.
glued.jpg
 

Skye

Member
Joined
Jan 3, 2006
Messages
3,487
Location
Rock Hill, SC
Hans didnt make the pen you weenie! :p

Hans, one thing I noticed was the horizontal line dividing the blank, but I didn't see a vertical one that would cap the ends. That's what's throwing me off.
 

VisExp

Member
Joined
Oct 1, 2007
Messages
2,738
Location
Palm Coast, FL, USA.
Hans, one thing I noticed was the horizontal line dividing the blank, but I didn't see a vertical one that would cap the ends. That's what's throwing me off.

Ebony in particular, and dark woods in general, are great for hiding joints like that :wink:

John, the pen looks great. The contrast between the holly and the ebony is stunning and the ebony goes very well with the kit body. You did a very nice job avoiding stains on the holly. Well done!
 

hebertjo

Member
Joined
Apr 28, 2008
Messages
231
Location
Phoenix, AZ, USA.
Thanks for the compliments.

Hewunch is correct about the build technique, it is not as difficult as it looks. I started with a blank of ebony cut it in half and glued in a strip of holly. I then rotated that 90 degrees and cut it in half and glued in another strip of holly. I believe the holly strips were 3/16".

I then drilled this segmented blank down the middle and I also drilled another blank of ebony. I then cut 2 segments of the ebony for the ends and then used epoxy and a clamp to glue all three pieces to the brass tube.

Using a standard 5"-6" blank I was able to make two pens. The first one is already sold.
 

Timbo

Member
Joined
Jan 4, 2008
Messages
1,188
Location
Kill Devil Hills, NC USA.
Since no one asked, what technique do you use to control bleeding onto the Holly? I could substitute white acrylic for the holly, but that would be too easy.:wink:
 

hebertjo

Member
Joined
Apr 28, 2008
Messages
231
Location
Phoenix, AZ, USA.
To control the bleed I simply turn until I am at the desired shape and then use a skew sideways (a la scraper) to get as good a finish as possible. Then with the lathe off I blot the surface lightly with a tack cloth to get any dust off (I have heard that some use compressed air, I have not tried that but a tack cloth is a lot less noisy then my air compressor). I have a tendency to want to wipe the blank with my hand and you must resist that because it just moves the dust around. Then I hit the holly with thin CA trying not to let it run around the blank, the goal is to have CA on just the top holly strip. Holly is far less dense then the ebony so it will soak in and seal it. Once all 4 strips have been CA'd then I CA the whole thing and then sand it flush again. Keep using the tack cloth after sanding because if you sand through the CA on the ebony you will have black dust everywhere. Once things are smooth again and clean I use medium CA to build a finish, along with some thin to fill in the ridges left by the medium.

Hope that helps
 

leehljp

Member Liaison
Joined
Feb 6, 2005
Messages
9,331
Location
Tunica, Mississippi,
To control the bleed I simply turn until I am at the desired shape and then use a skew sideways (a la scraper) to get as good a finish as possible. Then with the lathe off I blot the surface lightly with a tack cloth to get any dust off (I have heard that some use compressed air, I have not tried that but a tack cloth is a lot less noisy then my air compressor). I have a tendency to want to wipe the blank with my hand and you must resist that because it just moves the dust around. Then I hit the holly with thin CA trying not to let it run around the blank, the goal is to have CA on just the top holly strip. Holly is far less dense then the ebony so it will soak in and seal it. Once all 4 strips have been CA'd then I CA the whole thing and then sand it flush again. Keep using the tack cloth after sanding because if you sand through the CA on the ebony you will have black dust everywhere. Once things are smooth again and clean I use medium CA to build a finish, along with some thin to fill in the ridges left by the medium.

Hope that helps
That is a super pen! I really like it. I hope you don't mind if I copy it in the future.

I too finish some of my pens with a chisel rather than sand. I am not good with a skew, so I just rely on a very sharp home made scraper of sorts with just the right angled face on the bottom and a fine fine edge. It has done a great job of cutting a smooth finish without smearing the segments. Then I follow by several coats of CA before sanding.

I am glad to see you doing this and I will have to learn the skew usage for more complicated turnings.
 

rick_lindsey

Member
Joined
Feb 2, 2005
Messages
125
Location
Tucson, AZ
Start off with a blank that looks like this, and add ebony ends.

Oooh, thanks for that tip! I need a section rather like this for a pen that i've been scheming, and for some reason i was stuck thinking i needed a pinwheel shape... Your way would be way better if I can get the sizing right!

-Rick
 
Top Bottom