I finished this pen and everything looked fine.
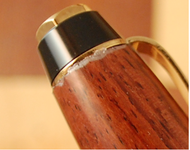
My wife went to take a photo of it and we saw this in the photo. This seems to have occurred after the pen set around for awhile.
OK I think something must have dried out or ???... but it look like the CA finish came away from the surface on the edge.
I did something to cause this. Any ideas or approaches to keep this from happening in the future.