Casting Help With Casting

Signed-In Members Don't See This Ad

Rolandranch

Member
Joined
Jun 18, 2015
Messages
1,052
Location
Tucson, AZ
I am having a lot of trouble casting rattlesnake pen blanks. I am using the PSI casting kit and the resin separates from the skin when I cast it. I have tried a few different things to try to prevent it but keep getting the same result. After it drys, the skin looks shiny because it has separated from the resin. The tube with the skin easily comes out of the resin.

I would really appreciate some tips.

Also, if there is a better resin for casting than PSI's please let me know. Thank you.
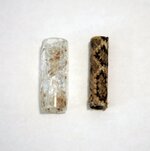
KK2X3467.jpg
This is the skin that I pushed out of the resin.
 
Signed-In Members Don't See This Ad
I make sure there are no oils on the skins left over from the tanning process. I also heat (warm) my resin to remove any chances of air bubbles forming (so far I have not had to use any pressure or vacuum on skins)
 
Remove the scale covers prior to gluing to the tube. Clean the skin with acetone or lacquer thinner before or after gluing the skin to the tube. Try applying a coat of thin CA to the skin prior to casting and let it cure for a day before casting. To remove the scale covers watch this: https://www.youtube.com/watch?v=rNg8fajC9YI
Do a good turn daily!
Don

I am having a lot of trouble casting rattlesnake pen blanks. I am using the PSI casting kit and the resin separates from the skin when I cast it. I have tried a few different things to try to prevent it but keep getting the same result. After it drys, the skin looks shiny because it has separated from the resin. The tube with the skin easily comes out of the resin.

I would really appreciate some tips.

Also, if there is a better resin for casting than PSI's please let me know. Thank you.

View attachment 148620
This is the skin that I pushed out of the resin.
 
Remove the scale covers prior to gluing to the tube. Clean the skin with acetone or lacquer thinner before or after gluing the skin to the tube. Try applying a coat of thin CA to the skin prior to casting and let it cure for a day before casting. To remove the scale covers watch this: https://www.youtube.com/watch?v=rNg8fajC9YI
Do a good turn daily!
Don
Thanks, I'll try that. I also have another question. Is it better to use tubes for casting or a tray?
 
Your choice. I use silicone molds from Fred Wissen: htt;://www.luv2turn.com
I have tried clear tubes but with mixed results. I will stay with what woks for me.
Do a good turn daily!
Don
I have cast some more blanks using your tips. I will see the results later when I pull them out. I was also wondering what is a good resin to use for casting. I have been using PSI's "Cast-a-Kit" but want to buy just the resin without all the accessories. Thank you for your help.
 
I think Don has hit the nail on the head with this one. Clean your skins, remove the scales, warn your resin and use the molds that work for you. Don likes resin horizontal molds and I like vertical tubes. We both fine tune our process to work for us. Try what you like, keep notes, and find what works for you and be consistent. As for resin, a lot of us use different types to suit the project. In my experience, I find silmar 41 to work great for all clear tube one casting. It smells, will shrink a bit and be tacky when taken out of the mold. A little sunlight or a clamp light above it for a bit will cure that. Alumilite is great for embedded casting and adheres well to wood, pinecones and objects with a quicker cure time and no odor. It's all on what your doing. Good luck!
 
Last edited:
I just took my blanks out of the pot this morning and they look great! I'm anxious to get turning them (got to finish school first). Thank you all for the tips!
 
So...How does the pen look?
Don

Sent from my SM-G900P using Forum Runner


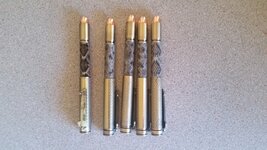
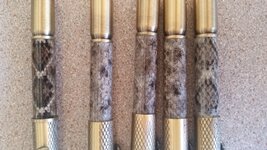
Well, they didn't turn out as well as I had hoped. The skins look very faded. This was either due to the skins not being as dark as I wanted or because removing the scales faded the pattern. You can see the pictures of them. The one that looks darker with a better pattern is the one I made last year (I have no idea why it turned out). All the others were the ones I finished recently.


20160520_095951.jpg

20160520_100022.jpg
 
Before I add my 2cents I need to say that some of those that already replied to your question helped me out quite a bit when I started casting. Therefore don't think I'm trying to tell you a better way just the things I've done a little different that "Worked For Me". First I switched to Denatured Alcohol because it seems to be less harsh. I noticed the acetone would bleach the colors if I let it soak too long. Second. When you paint your tubes before casting, you should if your not, the color you use can effect the final color of your skins as well. I use black occasionally, grey and the green used in camo. Good Luck.
 
Removing the scale covers did not affect the color or pattern of the skin. The pattern and color is in the scales which are part of the skin. Looking at the blanks (and skins) my opinion is the skins were from young snakes and the colors are not as vivid as with more mature snakes. The size of the diamond pattern makes me think they are from young snakes. Also, the skakes may have shed there skins just prior to their demise and the new skin did not have time to regain its coloring.

If you start using denatured alcohol you will need to allow the skin to dry before casting. Alcohol loves to take in water from the air. So, don't get in a hurry to to cast after cleaning the skin with alcohol.

Painting the tubes is a must. I use Rustoleum Camo in the flat dark green.

I don't think it is anything you did to make the skins look the way they do.

It also appears that all of the blanks on the new pens came from the same skin.
Do a good turn daily!
Don

So...How does the pen look?
Don

Sent from my SM-G900P using Forum Runner


Well, they didn't turn out as well as I had hoped. The skins look very faded. This was either due to the skins not being as dark as I wanted or because removing the scales faded the pattern. You can see the pictures of them. The one that looks darker with a better pattern is the one I made last year (I have no idea why it turned out). All the others were the ones I finished recently.


View attachment 149652

View attachment 149653
 
Back
Top Bottom