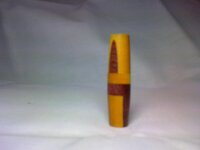
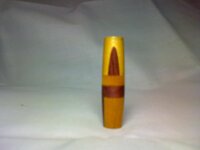
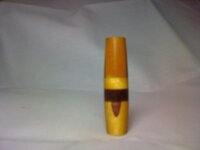
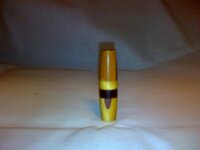
Help what did I do wrong...

Signed-In Members Don't See This Ad

DennisM

Member
Joined
Apr 30, 2009
Messages
636
Location
Northern Illinois
Ok I was trying out segmentation today.

1in squares, about 1/4" thick.

Purpleheart and yellowheart.

In the middle was 1, purpleheart and 1 yellow heart together.
Then standing up was PH/YH really hard to explain and stupid me didnt take a before picture.

Anyway I am thinking I am turning OOR somehow and that is causing the issue in the pics... Make any sense?
 

Attachments

  • 11-03-09_1740.jpg
    11-03-09_1740.jpg
    18.7 KB · Views: 336
  • 11-03-09_1739.jpg
    11-03-09_1739.jpg
    19.2 KB · Views: 321
  • 11-03-09_1738.jpg
    11-03-09_1738.jpg
    18 KB · Views: 285
  • 11-03-09_1737.jpg
    11-03-09_1737.jpg
    22.7 KB · Views: 261
Signed-In Members Don't See This Ad

ed4copies

Local Chapter Manager
Joined
Mar 25, 2005
Messages
24,532
Location
Racine, WI, USA.
When you put them on the lathe, you need to be centered relative to the PATTERN, not relative to the PIECE.

These are NOT always the same center point.
 

DennisM

Member
Joined
Apr 30, 2009
Messages
636
Location
Northern Illinois
When you put them on the lathe, you need to be centered relative to the PATTERN, not relative to the PIECE.

These are NOT always the same center point.

Well Carp! if that doesn't increase the level of difficulty.
Now where did I put that 10th grade geometry book....
 

CSue

Local Chapter Leader
Joined
Jan 16, 2007
Messages
2,368
Location
Laveen, AZ, USA.
And thats half the fun, Dennis.

I can't wait to see it when you know its how you want it! I really love the Purpleheart/Yellowheart combo.
 

VisExp

Member
Joined
Oct 1, 2007
Messages
2,738
Location
Palm Coast, FL, USA.
As Ed said, you need to drill through the center of the design, which is not necessarily the same as drilling through the center of the blank. The easiest way to do this is to mark the center point of the design on each end of the assembled blank. Then place it between centers and turn it to 3/4" round. Place the turned piece in a collet or scroll chuck and drill on the lathe.
 

leehljp

Member Liaison
Joined
Feb 6, 2005
Messages
9,337
Location
Tunica, Mississippi,
Stating this another way:

1. Precision alignment is a necessity. "Close enough" is a metaphor that means "not good enough" in the final analysis. :wink:

2. Jigs and fine adjustment of said jigs or saw is a necessity.

3. When precision like this becomes a necessity, it is much easier to drill on the lathe than on a DP, at least until enough precision experience on the DP is gained.

4. Use a drive center ( http://www.pennstateind.com/store/LCENT4.html ) similar to that in the link to center precisely both ends (drive end and tail stock end.) Turn one end round for about an inch in length, and then add a chuck to the headstock - chuck it from the head stock end. Drill from the tail stock end so that the drill bit is centered on the initial mounting hole point from that end. Viola a precision centered hole.

5. Don't get discouraged. It may take two or three blanks before you gain the experience needed. But if you learn it quicker, GREAT! However, once mastered, the experience will make you VERY productive and happy. It will be almost like learning to read for the first time! :biggrin:


Editing in - There are two groups of people who do this well:

1. Naturally gifted people who have the eye and hands of an artist and do this as a second nature. In their minds eye, they can see alignment of the wood and the alignment on the DP and lathe naturally. Gifted! And some here are this!

2. Those with experience, practice, persistence and JIGS and precise machines. Jigs, precision alignment ability of machines and clamps help make the playing field more level - and moves normal people up several levels to (at least close to) that of the realm of the gifted.
 
Last edited:

workinforwood

Member
Joined
Mar 1, 2007
Messages
8,173
Location
Eaton Rapids, Michigan, USA.
What I see is that the top and bottom are both two pieces glued side by side. I see that you did drill it in the proper location and that drilling it on a lathe would not have helped much. What I see is that in the top is light/dark side by side, the bottom is dark/light side by side, but the seam is not lined up. The on on top is over to the right. If you had drilled it on the lathe, lining up the seams with center, you would have come close to achieving your goal, but the seams that go lenthwise still would have been off. They would have been slightly on an angle. What the original blank looked like is most evident in picture 1. I see the walnut on top should have been back about 1/8" or so. Simply wasn't aligned right when assembled, but I like the pen anyhow. It's all just my theory without seeing the actual blank. If in fact the seems where lined up right, then you drilled it wrong which is everyone elses theory. You drilled it off center.
 
Last edited:

DennisM

Member
Joined
Apr 30, 2009
Messages
636
Location
Northern Illinois
here is what the blank looked like roughly. Only take the top section and roate it 90 deg.

I did mark the center on one end of the blank and drilled on the lathe. But I think since I am still using the chuck to hold it, I drilled it off center. I am picking up a collet chuck today.

all the pieces were the same size. I glued up the bottom pieces first, then the top, then glued the two sections together.

I am going to try again with it and this time mark both sides center and mount between centers and round it first then drill and see what happens..

Thanks so far for the advice, I have new level of respect for you guys that do the intense segmentations..
 

Attachments

  • blank1.jpg
    blank1.jpg
    9.2 KB · Views: 139

workinforwood

Member
Joined
Mar 1, 2007
Messages
8,173
Location
Eaton Rapids, Michigan, USA.
Good idea, try again. Try and keep all the seams lined up down the center. Then do the turn it round with centers thing. Then tape around the blank before you drill it. The tape helping to keep it together and if it does break off a section when you drill it, you won't need to search for the missing piece that may or may not be easily glued back on. Keep cleaning out the drill bit and hole too. Clogged debris in the hole is what causes a blow out.
 
Top Bottom