
Question for those of you that make kitless pens that are wood sleeved with ebonite.
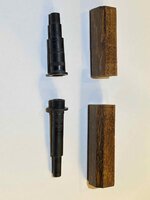
I am working on my first of this type and have made the sleeves from ebonite and drilled out the blanks. Things went well and everything fit nicely.
Here is the issue... when I went to epoxy the sleeves into the drilled blanks, it was really hard to get them seated all the way in. This was not because they were too tight, but because of the epoxy that must be displaced with nowhere to go. I tend toward using too much because I don't want to leave voids, so I usually have to scrape some off, fit again, scrape more off, etc. This pen will have no separate finials so the ends of the blanks are solid wood. I had to use a squeeze clamp to get it to stay in while the epoxy cured. I wasn't really comfortable with the amount of clamping force I needed to use.
There must be a better way. I am hoping that someone out there has some trick that I haven't thought of.
How do you do this?
Thanks!

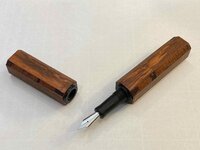
") ,I scuffed them with 80 grit, but think next time I may actually score rings in them on the lathe (a little like the Delrin cap sleeve in the Apollo and Artemis kits).
,I scuffed them with 80 grit, but think next time I may actually score rings in them on the lathe (a little like the Delrin cap sleeve in the Apollo and Artemis kits).