First kitless...steep learning curve!

Signed-In Members Don't See This Ad
See more from furini

furini

Member
Joined
Nov 23, 2008
Messages
214
Location
Brighton, UK
Hi all

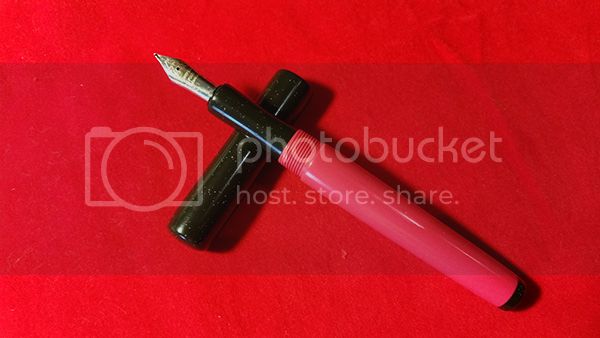
Have just completed my first kitless fountain pen...only took about 4 days!

Lots not quite right with it but next time I'll know what to do (I think). Before I have another go I'll make some closed end mandrels...did some quick ones in acrylic for this one but don't think they're really robust enough.

First casting with alumilite too and not entirely happy with the results as I wanted solid black and red (got black speckled with white and a rather pink red). Some air bubbles too. Proportions a little out as well - lid looks too long to me.

However, if you're contemplating having a go at kitless, go for it. It was great fun...and I now have a new pen to do my marking with when school starts again tomorrow...

It will have a Bock nib when the ink I've ordered arrives - I used a nib from a kit pen while fettling the fit. Making sections is HARD!! This is version 3... Thankfully Beaufort Inks supplied a couple of spare feeds and holders - it's as if they knew I was going to destroy at least one!
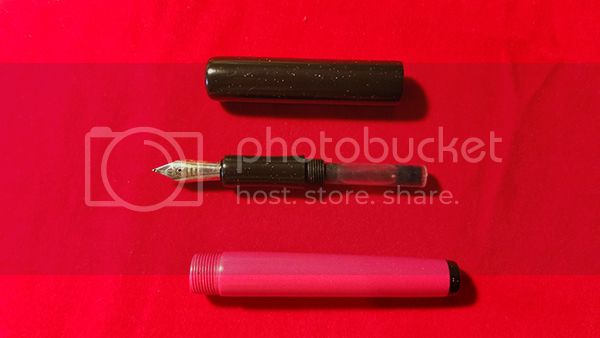


Capped length 130mm
Uncapped 123mm
Cap 60mm Dia 14mm
Section 27mm
Body tapered from 12.8mm to 10.5mm
Cap to body 12 x .8mm triple
Section to body 9 x .75mm
Nib holder Bock #5
 
Last edited:
Signed-In Members Don't See This Ad

mredburn

IAP Activities Manager
Staff member
Joined
Jul 5, 2009
Messages
8,753
Location
Fort Myers FL
Half the fun is the journey, the other half is laughing at everyone else making the same journey. Great beginnings make another. Its not really hard but its not real easy either. It will become much easier as you get a few more made.
 

Skie_M

Member
Joined
Aug 7, 2015
Messages
2,737
Location
Lawton, Ok
It looks quite nice to me! It's definitely at least a few steps ahead of where I can go, right now .... so keep forging ahead! (cuz we're right behind you!)
 

thewishman

Member
Joined
Mar 9, 2006
Messages
8,183
Location
Reynoldsburg, Ohio, USA.
Nice job! the first one is hard, but the second one is worse. After that, it gets easier. Now that you have the tools and experience, your imagination can really soar.:)
 

BSea

Member
Joined
Dec 28, 2009
Messages
4,628
Location
Little Rock, Arkansas
That's a very good 1st effort. It's lightyears ahead of my 1st one. And with custom pens, there is no wrong way to do something if it works, and you're happy with the results.

What did you use to color your alumilite? I can't imagine why you have white specks in the black parts unless there was some sort of foreign particles in the cup. Also, what type of alumilite did you use. Typically, I use the clear version. For a typical opaque red, I'll use red dye from US Composites. It's primarily for PR, but it works for alumilite too.
 

david44

Member
Joined
Jul 23, 2013
Messages
114
Location
Withernsea, East Yorkshire,UK
Looks good to me - speaking as one who has gone through (going through - there is dim light at the end of the tunnel) the same learning curve. It's great fun anyway and think of all the pupils who won't believe that you made it yourself - and who won't know what a fountain pen is!
 

furini

Member
Joined
Nov 23, 2008
Messages
214
Location
Brighton, UK
Thanks for all the replies and encouragement. I had a great time working on this and reading up about others' experiences on the site really inspired me to keep going with it. Mike, I know what you mean about it not being really hard or easy - it certainly demands concentration and focus. I'm going to write up some notes to help me remember things for the second one...hope it's not as bad you suggest, Chris!

BSea, I used this alumilite kit: Alumilite Amazing Casting Resin 16oz - Opaque White - Metal Clay Ltd with the colours they supply too (thinking about it there is a chance the mixing cup was a bit dusty): Resin - Resin Colour & Surface effects - Metal Clay Ltd. I'll give the clear one a go - just have to get some more nibs now...
Thanks, David - good luck with your curve too!
Cheers
Stewart
 

Charlie69

Member
Joined
Apr 12, 2013
Messages
189
Looks great to me. I started my 1 st kitless- a roller ball- recently and am thoroughly enjoying the process and learning curve. We're fortunate to have so much info here at iap available to us.
 

furini

Member
Joined
Nov 23, 2008
Messages
214
Location
Brighton, UK
Looks great to me. I started my 1 st kitless- a roller ball- recently and am thoroughly enjoying the process and learning curve. We're fortunate to have so much info here at iap available to us.

Thank, Charlie - I've literally spent years reading and re-reading the information here - it's been invaluable

Cheers

Stewart
 

builtbybill

Member
Joined
Dec 17, 2014
Messages
260
Location
Clayton, NC
Looks great to me, can't wait to see the next one. Hoping to give this a try in the not too distant future, just need to figure out what I "NEED" for taps and dies.
 

david44

Member
Joined
Jul 23, 2013
Messages
114
Location
Withernsea, East Yorkshire,UK
Lots of info on this site, Bill. Have a look in the "library". I spent a lot of time reading and looking at other folk's work before I had a go. I started with basic 9mm x 0.75 tap and die for the section to body and 12mm x 0.75 for the body to cap - both single start. I now have a little selection including 12mm x 0.8 triple start (thanks again to the brilliant service of M Redburn). Warning - it becomes obsessive!

Have a look at "Fountain Pen Network" as well.
 

BSea

Member
Joined
Dec 28, 2009
Messages
4,628
Location
Little Rock, Arkansas
Thanks for all the replies and encouragement. I had a great time working on this and reading up about others' experiences on the site really inspired me to keep going with it. Mike, I know what you mean about it not being really hard or easy - it certainly demands concentration and focus. I'm going to write up some notes to help me remember things for the second one...hope it's not as bad you suggest, Chris!

BSea, I used this alumilite kit: Alumilite Amazing Casting Resin 16oz - Opaque White - Metal Clay Ltd with the colours they supply too (thinking about it there is a chance the mixing cup was a bit dusty): Resin - Resin Colour & Surface effects - Metal Clay Ltd. I'll give the clear one a go - just have to get some more nibs now...
Thanks, David - good luck with your curve too!
Cheers
Stewart
Stewart, the white is the reason the blank came out pink. I just don't think you can get it red with the white as a base.
 

builtbybill

Member
Joined
Dec 17, 2014
Messages
260
Location
Clayton, NC
Lots of info on this site, Bill. Have a look in the "library". I spent a lot of time reading and looking at other folk's work before I had a go. I started with basic 9mm x 0.75 tap and die for the section to body and 12mm x 0.75 for the body to cap - both single start. I now have a little selection including 12mm x 0.8 triple start (thanks again to the brilliant service of M Redburn). Warning - it becomes obsessive!

Have a look at "Fountain Pen Network" as well.


Thanks for the info, I guess I CAN start with single starts, I thought I needed more than that.
 

david44

Member
Joined
Jul 23, 2013
Messages
114
Location
Withernsea, East Yorkshire,UK
Lots of info on this site, Bill. Have a look in the "library". I spent a lot of time reading and looking at other folk's work before I had a go. I started with basic 9mm x 0.75 tap and die for the section to body and 12mm x 0.75 for the body to cap - both single start. I now have a little selection including 12mm x 0.8 triple start (thanks again to the brilliant service of M Redburn). Warning - it becomes obsessive!

Have a look at "Fountain Pen Network" as well.


Thanks for the info, I guess I CAN start with single starts, I thought I needed more than that.

Single start are a cheaper investment just to learn with. They also give the time for the obsession to really take hold! Then it's easy to convince yourself that any expense is acceptable.:):wink:
 
Top Bottom