First Kitless Pen

Signed-In Members Don't See This Ad
See more from WHartman

WHartman

Member
Joined
Sep 20, 2010
Messages
43
Location
Illinois
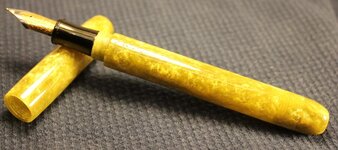
I did it!!!! My first kitless pen is completed!!! (Many thanks to the outstanding tutorial from BigShed).


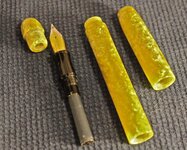
I do see a boatload of room for improvement, but its finished. I can't tell you how many blanks I went through trying to get a section finished. I finally broke down and ordered a El Grande section from Ernie, which is currently attached to the pen. This did create other issues for me though, right at the point where the section screws into the body. After the drilling and tapping...it is VERY thin...that is where 99% of my failures occurred.

Have to work on getting the sections right to create my own. Also need to extend a hearty thanks to Rick Herrell for his pin chucks... I ordered 2 pin chucks from Rick and used them in completing this pen. They are FANTASTIC and worked like a charm! Thanks Rick!

Please feel free to comment on the pen. I would like to hear what others have to say as I have a list of things that need to be fixed on it or on the next one.

Wade
 

Attachments

  • IMG_0067-1.jpg
    IMG_0067-1.jpg
    48.8 KB · Views: 235
  • IMG_0080-2.jpg
    IMG_0080-2.jpg
    93.6 KB · Views: 245
Signed-In Members Don't See This Ad

WHartman

Member
Joined
Sep 20, 2010
Messages
43
Location
Illinois
Lin,

I didn't use a cap for the body. I had a "lack of concentration" when I was creating the threads for the section on that end and ended up breaking them. So I just turned it around, re-threaded it and drilled through. On the end I assume you talking about, I just made a finial to screw in.

Wade
 
Joined
Aug 5, 2009
Messages
3,229
Location
Millersburg, OR
All in all great job. The threads look a little rough. You may want to use a different lubricant when you cut them and you can also gently use a toothbrush and scratch remover to clean them up. Don't be afraid to show the next one.
 

ToddMR

Member
Joined
May 3, 2010
Messages
1,715
Location
Columbus, OH
Good start. Not having tried doing one myself yet, I can't really critique yours. However I think you are off to a good beginning.
 

WHartman

Member
Joined
Sep 20, 2010
Messages
43
Location
Illinois
All in all great job. The threads look a little rough. You may want to use a different lubricant when you cut them and you can also gently use a toothbrush and scratch remover to clean them up. Don't be afraid to show the next one.

Yeah... I'm gonna try PAM on the next one. I used a tooth brush to clean it up, but I did not use scratch remover to clean the threads. I hope to have time tomorrow to work on another one.. hopefully it won't take as long to get it finished.

Thanks Chuck... it was one of my home brew blanks... I think it was the last one actually... I'll have to make some more in the summer (way to cold in the garage now).

Wade
 

SDB777

Member
Joined
Feb 6, 2010
Messages
6,620
Location
Cabot, Arkansas USA
Shawn has been using cooking oil for threading(seems that it would be much easier to control where it went then using PAM-unless you have some that doesn't come in a spray can)?

Cool blank to use. You could use as many as necessary, and it'd be difficult to tell the difference between the swirl patterns(good idea-I might do this on my first if you don't mind:wink:)

What thread taps/dies did you use, and what are the measurements?


Scott (thanks for sharing) B
 

WHartman

Member
Joined
Sep 20, 2010
Messages
43
Location
Illinois
Scott,

Nope I don't mind at all, glad to give you an idea :wink:
I basically followed the tutorial from BigShed, the only change I did was to use a 12x1 tap / die as I don't have a t/s tap and die.

12 x 1 tap and die was used on the cap / body.
10 x 1 tap and die for the section to the body.

The measurements are:

overall - 5.82
body - 5.32
cap - 2.31

Wade
 
Top Bottom