First Kitless in Blue Acrylic

Signed-In Members Don't See This Ad
See more from RichF

RichF

Member
Joined
Jun 20, 2010
Messages
351
Location
Mount Laurel, NJ
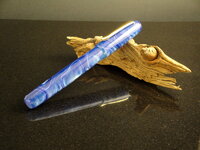
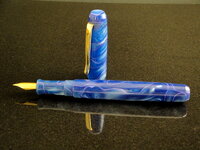
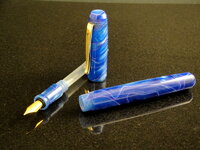
After finishing my PITH pen on Saturday, I decided it was time to try out the 12 mm triple-start set that I had purchased. I used a commercial acrylic blank since it was what I had readily available. The blank is paired with an all-in-one Schmidt nib and a rescued Sierra clip.

The learning curve on this was steep. There are several things that I can improve in the future, but I am very happy with the end result. The pen is the same size as a Junior series pen, but only weighs 5/8 oz.

Please excuse the dust in the photos.

Rich
 

Attachments

  • DSC02854.JPG
    DSC02854.JPG
    227.6 KB · Views: 271
  • DSC02857.JPG
    DSC02857.JPG
    221 KB · Views: 344
  • DSC02858.JPG
    DSC02858.JPG
    232.3 KB · Views: 275
Signed-In Members Don't See This Ad

MarkD

Member
Joined
Jan 24, 2011
Messages
2,293
Location
Sayre, PA
Very nice first kitless.
You are well on your way now!
Looking forward to see more!
 

drgoretex

Member
Joined
Aug 14, 2010
Messages
543
Location
Winnipeg
First kitless! that's absolutely amazing - you have done a beautiful job on this pen! The form and finish look excellent. Great job on the clip, too.

Ken
 

BSea

Member
Joined
Dec 28, 2009
Messages
4,628
Location
Little Rock, Arkansas
From 1 kitless rookie to another, GREAT JOB! I really like how you beveled the ends. I like that look. You said you used a commercial blank. You used more than 1 right? And you said you would do a few things different. What would you do different?
 

Texatdurango

Member
Joined
Apr 23, 2007
Messages
4,649
Location
Show Low, Arizona
Very nice looking pen, the clip install looks very clean from what I can see, GOOD JOB!

Remember that when you mention drill sizes and techniques, people are jotting down everything and will have questions.... like me, where did you find those odd size metric drills?

looks good, what size drill bit did you use for the barrel and cap?

The threaded areas were drilled to size for the taps (11.4 for 12 mm and 8.4 for 9 mm). I used a 7/16 to drill to depth for the cap and 21/64 for depth on the barrel.
 

RichF

Member
Joined
Jun 20, 2010
Messages
351
Location
Mount Laurel, NJ
Bob, you are right, this was made from 2 blanks. The blanks turned out a lot better than I expected, but they were a pain to work with since the material is a little on the soft side. As far as changes go, I would lengthen the section by 1/4" and adjust the cap/body appropriately. I think this would be more comfortable in my hands. I would also shorten the treading for the cap slighty--it is currently 2 full turns to remove the cap. It seems like 1.5 turns should be enough.
 

RichF

Member
Joined
Jun 20, 2010
Messages
351
Location
Mount Laurel, NJ
Good point. I "modified" an old Q size bit to be able to consistently drill 8.4 mm on my lathe. Same with an old 29/64 bit for 11.4 mm. I basically did several test drill, adjust (fine file/sandpaper), and repeat to get a consistent result for the hole diameter. Since I am working on a wood lathe, I wanted to kill as much error as possible. It took a few tries and is probably overkill, but I was able to get a good end result. The old bits aren't HSS, but work fine for acrylic after a quick touchup of the cutting edge.

I am happy with the clip install, but it was a problem area. Damaged the threading just before I finished cutting the slot to fit the clip. A bit of an oops moment. I was afriad the spring pressure from the clip wouls strip the remainiing threads, so I epoxied the cap peice holding the clip into position for security.

Very nice looking pen, the clip install looks very clean from what I can see, GOOD JOB!

Remember that when you mention drill sizes and techniques, people are jotting down everything and will have questions.... like me, where did you find those odd size metric drills?

looks good, what size drill bit did you use for the barrel and cap?

The threaded areas were drilled to size for the taps (11.4 for 12 mm and 8.4 for 9 mm). I used a 7/16 to drill to depth for the cap and 21/64 for depth on the barrel.
 

Curly

Member
Joined
Nov 20, 2010
Messages
4,853
Location
Saskatoon SK., Canada.
Great pen especially when made without the benefit a metal lathe. I agree about the learning curve.

Metric bits in 0.1mm increments are an industry standard. Suppliers like ENCO have them.
 

Texatdurango

Member
Joined
Apr 23, 2007
Messages
4,649
Location
Show Low, Arizona
Good point. I "modified" an old Q size bit to be able to consistently drill 8.4 mm on my lathe. Same with an old 29/64 bit for 11.4 mm. I basically did several test drill, adjust (fine file/sandpaper), and repeat to get a consistent result for the hole diameter. Since I am working on a wood lathe, I wanted to kill as much error as possible. It took a few tries and is probably overkill, but I was able to get a good end result. The old bits aren't HSS, but work fine for acrylic after a quick touchup of the cutting edge.

I am happy with the clip install, but it was a problem area. Damaged the threading just before I finished cutting the slot to fit the clip. A bit of an oops moment. I was afriad the spring pressure from the clip wouls strip the remainiing threads, so I epoxied the cap peice holding the clip into position for security.

For what it's worth... I make my cap long enough so I can get three full threads on the finial and I use a 9mm x .75mm thread. After I thread the little tenon on the finial I center drill the end to create a nice little dimple, that way you have a little extra clearance for the nib to go up inside.
 

RichF

Member
Joined
Jun 20, 2010
Messages
351
Location
Mount Laurel, NJ
I used a 9 x .75 as well. I did't include the loss os threads for recessing the clip in my plan, but I wsould have had 2.5 threads until the slip with the xacto knife. That left it too short to trust, so I recessed the clip into the upper part of the finial, and used epoxy. Great tip on adding the recess for extra clearance. I measured a couple of times before screwing the cap on with a nib installed.
 

Dalecamino

Local Chapter Leader
Joined
Jan 2, 2008
Messages
14,572
Location
Indianapolis, In.
Rich, I think you are there. You've discovered where you think you might improve on the next one and, I'm sure you will. I can't wait to see THAT one as well. Very nice work.
 
Top Bottom