OK, Here goes! (big sigh!) Thought I'd post pics on my first attempt at custom pen making.
Since these were my first, my main goal for these were to think through all the various parts and figure out how I could make a pen without any pre-made parts and a minimal amount of equipment (no special metal lathe, or tooling). The pens picture here are my first design attempt.
Design features:
1. Pen Type - Since I wanted to make all the parts, and don't even come close to having the equipment to make a fountain pen transmission assembly, I decided I'd start with a rollerball pen. I started out making the parts from hard maple stock, just to get the process and design elements down, then made a few others from wood, then went on to acrylic.
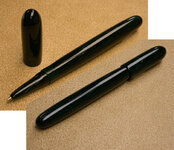
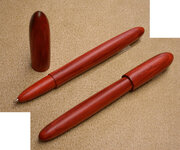
2. Cap - The Cap is friction fit. I was actually surprised at how solid a fit I could get with a simple friction fit, just by being careful with my measurements (love to hear that "POP"!).
3. Refill / Tip - The pen was made for a Hauser rollerball refill. As I noted earlier, I made my own tip, and on this first go, the tip is glued in place. To change out the refill, I incorporated a small threaded cap on the opposite end of the body (which also houses the spring). You might say then that this isn't REALLY a closed-end pen, but even though the end comes off, the process to make the body was the same as a closed-end pen (I tapped that end of the body, added the threads to the "body-cap" blank, screwed it in place and then turned the body and body-cap in one piece). I may find that this was actually harder than if I would have made the tip to screw in instead. The removable body-cap doesn't show up in the photo, but trust me - it's there!
Since I made my own tips, I played around with several (grip) sizes. I like a fatter pen, but wanted to see how thin I could go. The acrylic has the smaller nib.
4. Tooling - Other than my wood lathe, the only tooling I used on these pens was a 5/16" - 18 tap (for the body-cap threads and in the tip to hold it secure for turning). All the drilling was done on the lathe using a Jacobs chuck, with the parts held in long-nose jaws in my chuck. Although I was never a fan of drilling my pen blanks on the lathe, since I had to drill multiple holes in the blanks, I found it much easier to keep all the holes aligned on the lathe (because of the close tolerances, it was impossible to keep them centered on the drill press).
I made my own stepped mandrels to mount each of the parts for turning. The tip mandrel was threaded, with a pin on the very end to act as a "depth-stop" so the refill tip would have the proper exposure each time. The cap and body mandrels were "pin" style mandrels. I was again surprised at just how strong a pin-chuck can be - even with acrylics!
Next step - Next I want to work on adding a threaded cap and tip (and a clip if I can find a source other than buying a kit).
Comments are welcomed, just don't be too harsh. Like I said, this is only my first attempt!
Thanks...John
PS... Note about the arcylic pen photo - when you look at the photo of the acrylic pen, you may notice some small "specks". Those are NOT dings! The acrylic is a very dark green with subtle white streaks and specks in it (a discontinued Woodcraft color called Verde, original #148242 ).
Since these were my first, my main goal for these were to think through all the various parts and figure out how I could make a pen without any pre-made parts and a minimal amount of equipment (no special metal lathe, or tooling). The pens picture here are my first design attempt.
Design features:
1. Pen Type - Since I wanted to make all the parts, and don't even come close to having the equipment to make a fountain pen transmission assembly, I decided I'd start with a rollerball pen. I started out making the parts from hard maple stock, just to get the process and design elements down, then made a few others from wood, then went on to acrylic.
2. Cap - The Cap is friction fit. I was actually surprised at how solid a fit I could get with a simple friction fit, just by being careful with my measurements (love to hear that "POP"!).
3. Refill / Tip - The pen was made for a Hauser rollerball refill. As I noted earlier, I made my own tip, and on this first go, the tip is glued in place. To change out the refill, I incorporated a small threaded cap on the opposite end of the body (which also houses the spring). You might say then that this isn't REALLY a closed-end pen, but even though the end comes off, the process to make the body was the same as a closed-end pen (I tapped that end of the body, added the threads to the "body-cap" blank, screwed it in place and then turned the body and body-cap in one piece). I may find that this was actually harder than if I would have made the tip to screw in instead. The removable body-cap doesn't show up in the photo, but trust me - it's there!
Since I made my own tips, I played around with several (grip) sizes. I like a fatter pen, but wanted to see how thin I could go. The acrylic has the smaller nib.
4. Tooling - Other than my wood lathe, the only tooling I used on these pens was a 5/16" - 18 tap (for the body-cap threads and in the tip to hold it secure for turning). All the drilling was done on the lathe using a Jacobs chuck, with the parts held in long-nose jaws in my chuck. Although I was never a fan of drilling my pen blanks on the lathe, since I had to drill multiple holes in the blanks, I found it much easier to keep all the holes aligned on the lathe (because of the close tolerances, it was impossible to keep them centered on the drill press).
I made my own stepped mandrels to mount each of the parts for turning. The tip mandrel was threaded, with a pin on the very end to act as a "depth-stop" so the refill tip would have the proper exposure each time. The cap and body mandrels were "pin" style mandrels. I was again surprised at just how strong a pin-chuck can be - even with acrylics!
Next step - Next I want to work on adding a threaded cap and tip (and a clip if I can find a source other than buying a kit).
Comments are welcomed, just don't be too harsh. Like I said, this is only my first attempt!
Thanks...John
PS... Note about the arcylic pen photo - when you look at the photo of the acrylic pen, you may notice some small "specks". Those are NOT dings! The acrylic is a very dark green with subtle white streaks and specks in it (a discontinued Woodcraft color called Verde, original #148242 ).