Finished custom sterling silver pen.

Signed-In Members Don't See This Ad
See more from mredburn

mredburn

IAP Activities Manager
Staff member
Joined
Jul 5, 2009
Messages
8,753
Location
Fort Myers FL
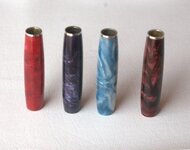
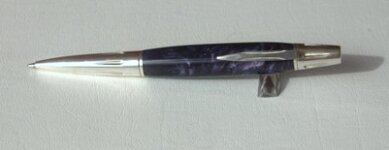
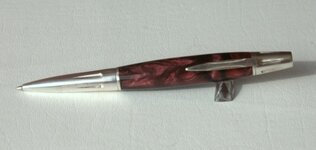
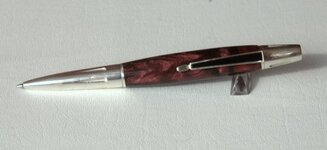
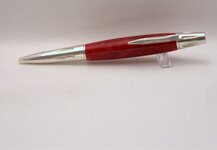
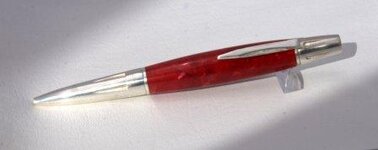
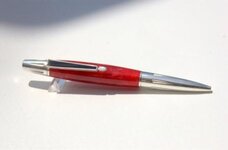
Well I have finished this pen .... sort of. I had a great idea the other night and made a change however the first 3 pictures are of the pen as I envisioned when I cast the parts oh so many months ago.

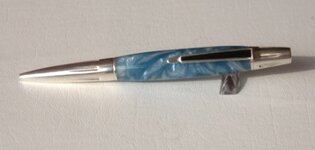
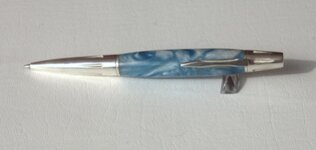
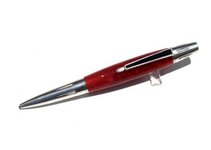
When I first assembled the pen for final fitting and before polishing I didn't like the clip assembly I had chosen. It looks a little short for the length of the pen. So I decided to make a different clip. However when I got the pen assembled and polished the original clip didn't look that bad at all. So Here Is the pen with both clips. The second clip rally grabs your attention.

I have a another Idea I'm working on for this pen and I will finish it up tonight and post the new pictures when I'm done.

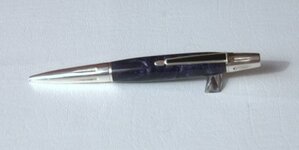
The blank is from Woodcraft "Ruby" I really liked the strong red that this blank has. the second clip uses a slice from a Black Knight blank from Exotics. Solid Sterling Hardware. the overall length is 5 5/8 inches. the lower silver assembly is no longer than a standard Wall Street II or SIerra

Comments welcome.

MIke
 

Attachments

  • rubypen8.jpg
    rubypen8.jpg
    26.9 KB · Views: 306
  • rubypen4.jpg
    rubypen4.jpg
    7 KB · Views: 170
  • rubypen5.jpg
    rubypen5.jpg
    9.3 KB · Views: 214
  • rubypen6.jpg
    rubypen6.jpg
    8.6 KB · Views: 199
  • rubypen7.jpg
    rubypen7.jpg
    8.3 KB · Views: 226
Last edited:
Signed-In Members Don't See This Ad

broitblat

Member
Joined
Feb 9, 2006
Messages
3,226
Location
Bellevue, WA, USA.
Nice looking result with each clip, but I think I prefer the all silver. I really like your component design -- having all the components in silver is a nice improvement on the kit, and the triangles on the finial, "lower barrel" and clip all tie together nicely.

-Barry
 

mredburn

IAP Activities Manager
Staff member
Joined
Jul 5, 2009
Messages
8,753
Location
Fort Myers FL
"And now for the rest of the story" I realized late one night that normally the Finial is pressed or glued into the upper tube. I decided to build this pen so that the upper tubes could be changed at the owners whim. I took and heated the Finial and removed the 8mm tube I had epoxied in and made a new one about 3/8 of an inch longer than the one I took out. I then epoxied and re-pinned the new tube in place. Because the 8mm tube grips the tranny and keeps the pen together as well as retracting and projecting the refill I wanted more surface contact in the tube to hold the pen together. I then made up 3 more blanks to fit the pen. It would be very easy to make a Pen Combo Kit where a client could have different tubes to switch out as they felt like. Match your purse, shoes, shirt, whatever.
In this case I also have 2 clips to interchange. Both clips are made with a notch to keep them from spinning in place when assembled on the pen.

Pictures are of the 4 tubes I made, the original one in Ruby, a Tanzinite from Exotics and 2 from Brooks803. All of them are 2.80 inches long. Also pictured are the different blanks assembled on the pen with different clips.

The solid silver clip goes with all of them better than the Black inlay clip, however I still like the black clip with the Ruby and Tanzanite.

Enjoy.
 

Attachments

  • 4tubes.jpg
    4tubes.jpg
    18.6 KB · Views: 147
  • bluepen1.jpg
    bluepen1.jpg
    27.9 KB · Views: 143
  • bluepen2.jpg
    bluepen2.jpg
    26.1 KB · Views: 134
  • tanzpen1.jpg
    tanzpen1.jpg
    15 KB · Views: 123
  • tanzpen3.jpg
    tanzpen3.jpg
    11.1 KB · Views: 114
  • winepen1.jpg
    winepen1.jpg
    31.6 KB · Views: 126
  • winepen2.jpg
    winepen2.jpg
    16 KB · Views: 123

mredburn

IAP Activities Manager
Staff member
Joined
Jul 5, 2009
Messages
8,753
Location
Fort Myers FL
Mike!!
Well done your work and pens look really good,
have you put the on the scales yet.

Thank you all, John Are you asking if I have weighed it? No I hadnt but I did now, it weighs 58grams THere is a large chunk of silver in the front.
 

BRobbins629

Passed Away Dec 28, 2021
In Memoriam
Joined
Mar 8, 2006
Messages
4,037
Location
Richmond, VA, USA.
Mike - these are really a nice concept and design. Your craftsmanship and silver work are wonderful. Without writing with them, it is hard to tell, but from a visual standpoint, personally I would prefer to see the curve of the body just a little shallower so there is a continuous arc from the nib section to the finial. Are there design reasons for the 2 curves? I could be all wet or maybe its just how it shows in the photos.
 

mredburn

IAP Activities Manager
Staff member
Joined
Jul 5, 2009
Messages
8,753
Location
Fort Myers FL
The double curve is a result of the lower end being 3 pieces soldered together. the upper piece which would form the center band on a regular Sierra is straight. If I remade the that piece, it could be made larger in diameter and a taper or curve could be turned blending it into a continous curve along the entire pen. I tend to make the tube and finishing silver band larger than that piece and round it ever so slightly or even cut a recess in the silver band to make it easier to achieve a finished joint.

The picture is of the piece i used to form the pen it had aready been turned to finish size before I decided to use it.

I do however like the little curve but its a personal thing, I have fairly large hands and the larger body fits me well. A person with a smaller hand might find it uncomfortable.

Mike
 

Attachments

  • 3017.jpg
    3017.jpg
    33.6 KB · Views: 95
Top Bottom