Rich L
Member
Details matter
This little exercise is one I've been wanting to do for a long time. It's a curious little application of ornamental turning using an engine turning machine adapted for the extra decoration ability. I'll go through the whole process so excuse me if I get a bit elementary for some.
First of all, the goal is eventually to do this in solid silver although this will work on just about any pen material, including wood (especially wood) but the differences would mostly be in threading the part and the end game of polishing (don't polish the wood).
I started off with a very good substitute for silver to get this off the ground - nickel silver. For those that don't know, this stuff is also called German silver and it has absolutely no silver in it. This stuff is also sometimes confused with cupro-nickel but that series of alloys has a different scheme of composites. The nickel silver I used is a common alloy referred to in the industry as 752 nickel silver or 65-18 nickel silver. The 65-18 refers to ~65% copper and the 18 is ~18% nickel. The rest is zinc and some trace metals for strength, workability, etc. In many cases it is not a particularly fun metal to work with because of the copper and nickel. Copper and nickel are a pain to machine and when mixed in this alloy you get mixed pain. But, ordinary turning with sharp tools is easy as long as you take a resonable cut. Surface finish, especially with coolant (WD40, etc.) is remarkable. When done it shines up just like silver - well, almost. So, enough about the material.
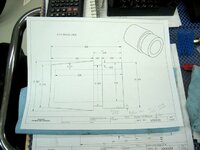
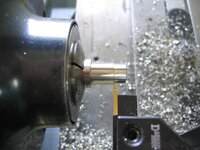
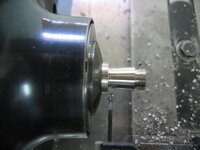
Here's the drawing of the part (which gets some changes 'cause there are a couple mistakes on it) - a barrel finial - and some 5/8" stock chucked up in a 5C arrangement. For those that care, the insert is a DCGT type. For exterior turning I used about 800 RPM and generally about .025 DOC. I think you can see the nice finish I'm getting.
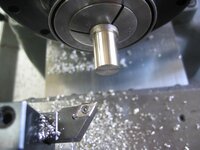
Next is boring the hole and since my drawing dimension (which isn't on the drawing!) just happened to match a 5/16 end mill, I used that to get the flat hole bottom. RPM drops to ~400 for that operation and feed is really slow because of the large surface area encountered by the plunge operation. Coolant was necessary for cutting and to cool - this stuff gets hot.
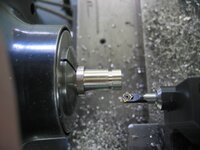
Next steps are turning down an area for threading and turning the thread relief groove. Back up to 800 RPM for that.
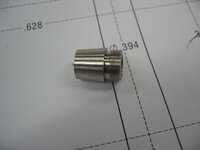
Now for threading - the pitch will be .5mm and the major diameter is .440 inches (sorry for the mix in units). Radial DOC will be .015 inches and I'll have to lightly sand off the thread crests as this material always produces burs. The threading tool is a full ISO form laydown type and I'm just doing a straight plunge. For these tiny threads I don't feel the need to do flank cutting.
Next step is to cut the angle (5º) so I just set the compound at 5º - nothing really critical.
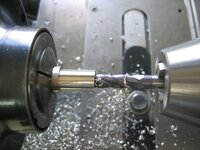
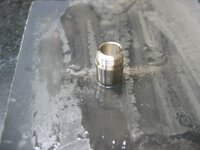
Cutoff follows, RPM back to ~400 using a standard carbide insert cutter with a .087 width. Again, this material needs coolant for cutting ease and heat dissipation. Heat management is critical here as this stuff creates hot chips that will weld themselves back on to the sides of the groove - and that's bad. The lube lets them slide out and cools them off. So, with copious squirting of WD40 I get the nice round curlies from this operation.
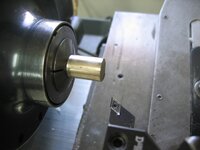
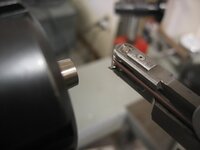
Here it is - all turned. Next I have to sand off the little tit left from cutoff and I'm doing this carefully with 600 grit paper and WD40 so that I retain the flat and perpendicular surface on the end that I want to play with.
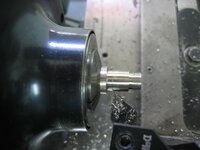
Tit gone and nice flat surface.
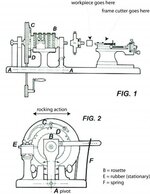
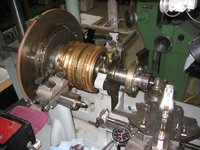
OK, this is the engine turning machine that has an ornamental turning overhead cutting frame drive system (this is a whole 'nother subject in itself so I apologize if I'm leaving some of you behind. Just post questions and I'll be happy to answer). The machine is a 96 year-old Lienhard Chaux de Fond rose engine. The nature of this machine, the rocking action it does, is key to this whole thing.
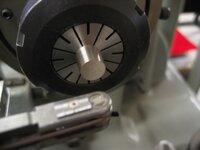
The business end of this machine has an ER40 collet chuck adapted to a centering apparatus for critical workpiece leveling and setting concentricity. The finial I just turned is held in the chuck- hand tight. The other little nose thing coming in from the left is the business end of the cutting frame. The overhead DC motor drive pulley system makes a little tiny carbide bit spin around and cut things.
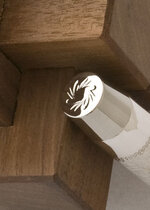
The close-up of the brass "rosettes" (by the way, that's where "rose" engine came from) shows a little wheel in the center that is fixed to the machine casting. The whole spindle that holds the rosettes and the ER collet rocks back and forth against that little wheel as the spindle turns. So, if you can imagine, a spinning bit and a rocking spindle might make an interesting design in the finial - and it does!!
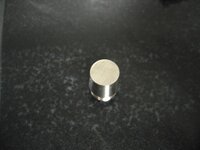
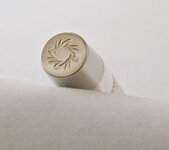
The final step is to polish it all up. I used 1500 grit paper all around before the polishing wheel and then did the polishing "cut" with ordinary white rouge and then followed by the "color" with ordinary red rouge. Put it on the end of a silve pen and as they say in France - Voilà! (Actually, the only not voilà is taking pictures of shiny objects … )
Cheers,
Rich
This little exercise is one I've been wanting to do for a long time. It's a curious little application of ornamental turning using an engine turning machine adapted for the extra decoration ability. I'll go through the whole process so excuse me if I get a bit elementary for some.
First of all, the goal is eventually to do this in solid silver although this will work on just about any pen material, including wood (especially wood) but the differences would mostly be in threading the part and the end game of polishing (don't polish the wood).
I started off with a very good substitute for silver to get this off the ground - nickel silver. For those that don't know, this stuff is also called German silver and it has absolutely no silver in it. This stuff is also sometimes confused with cupro-nickel but that series of alloys has a different scheme of composites. The nickel silver I used is a common alloy referred to in the industry as 752 nickel silver or 65-18 nickel silver. The 65-18 refers to ~65% copper and the 18 is ~18% nickel. The rest is zinc and some trace metals for strength, workability, etc. In many cases it is not a particularly fun metal to work with because of the copper and nickel. Copper and nickel are a pain to machine and when mixed in this alloy you get mixed pain. But, ordinary turning with sharp tools is easy as long as you take a resonable cut. Surface finish, especially with coolant (WD40, etc.) is remarkable. When done it shines up just like silver - well, almost. So, enough about the material.
Here's the drawing of the part (which gets some changes 'cause there are a couple mistakes on it) - a barrel finial - and some 5/8" stock chucked up in a 5C arrangement. For those that care, the insert is a DCGT type. For exterior turning I used about 800 RPM and generally about .025 DOC. I think you can see the nice finish I'm getting.
Next is boring the hole and since my drawing dimension (which isn't on the drawing!) just happened to match a 5/16 end mill, I used that to get the flat hole bottom. RPM drops to ~400 for that operation and feed is really slow because of the large surface area encountered by the plunge operation. Coolant was necessary for cutting and to cool - this stuff gets hot.
Next steps are turning down an area for threading and turning the thread relief groove. Back up to 800 RPM for that.
Now for threading - the pitch will be .5mm and the major diameter is .440 inches (sorry for the mix in units). Radial DOC will be .015 inches and I'll have to lightly sand off the thread crests as this material always produces burs. The threading tool is a full ISO form laydown type and I'm just doing a straight plunge. For these tiny threads I don't feel the need to do flank cutting.
Next step is to cut the angle (5º) so I just set the compound at 5º - nothing really critical.
Cutoff follows, RPM back to ~400 using a standard carbide insert cutter with a .087 width. Again, this material needs coolant for cutting ease and heat dissipation. Heat management is critical here as this stuff creates hot chips that will weld themselves back on to the sides of the groove - and that's bad. The lube lets them slide out and cools them off. So, with copious squirting of WD40 I get the nice round curlies from this operation.
Here it is - all turned. Next I have to sand off the little tit left from cutoff and I'm doing this carefully with 600 grit paper and WD40 so that I retain the flat and perpendicular surface on the end that I want to play with.
Tit gone and nice flat surface.
OK, this is the engine turning machine that has an ornamental turning overhead cutting frame drive system (this is a whole 'nother subject in itself so I apologize if I'm leaving some of you behind. Just post questions and I'll be happy to answer). The machine is a 96 year-old Lienhard Chaux de Fond rose engine. The nature of this machine, the rocking action it does, is key to this whole thing.
The business end of this machine has an ER40 collet chuck adapted to a centering apparatus for critical workpiece leveling and setting concentricity. The finial I just turned is held in the chuck- hand tight. The other little nose thing coming in from the left is the business end of the cutting frame. The overhead DC motor drive pulley system makes a little tiny carbide bit spin around and cut things.
The close-up of the brass "rosettes" (by the way, that's where "rose" engine came from) shows a little wheel in the center that is fixed to the machine casting. The whole spindle that holds the rosettes and the ER collet rocks back and forth against that little wheel as the spindle turns. So, if you can imagine, a spinning bit and a rocking spindle might make an interesting design in the finial - and it does!!
The final step is to polish it all up. I used 1500 grit paper all around before the polishing wheel and then did the polishing "cut" with ordinary white rouge and then followed by the "color" with ordinary red rouge. Put it on the end of a silve pen and as they say in France - Voilà! (Actually, the only not voilà is taking pictures of shiny objects … )
Cheers,
Rich
Attachments
-
 IMG_0004 go.JPG107.9 KB · Views: 241
 -
 IMG_0007 go.JPG90 KB · Views: 203
 -
 IMG_0008 go.JPG93.6 KB · Views: 232
 -
 IMG_0009 go.JPG96.8 KB · Views: 217
 -
 IMG_0003 go.JPG75 KB · Views: 216
 -
 IMG_0011 go.JPG90.7 KB · Views: 218
 -
 IMG_0012 go.JPG79.8 KB · Views: 228
 -
 IMG_0013 go.JPG81.8 KB · Views: 203
 -
 IMG_0014 go.JPG82.8 KB · Views: 234
 -
 IMG_0015 go.JPG57.5 KB · Views: 215
 -
 IMG_0016 go.JPG90.8 KB · Views: 210
 -
 IMG_0021 go.JPG65.5 KB · Views: 237
 -
 IMG_0020 go.JPG72.8 KB · Views: 240
 -
 IMG_0019 go.JPG134.7 KB · Views: 312
 -
 IMG_0018 go.JPG78.7 KB · Views: 231
 -
 IMG_0022 go.JPG70.1 KB · Views: 259
 -
 IMGP0017 finial.jpg34.7 KB · Views: 331
 -
 IMGP0019 finial.jpg43.4 KB · Views: 321
 :biggrin: