Exploding blanks

Signed-In Members Don't See This Ad

AZturner

Member
Joined
Mar 15, 2013
Messages
30
Hello,

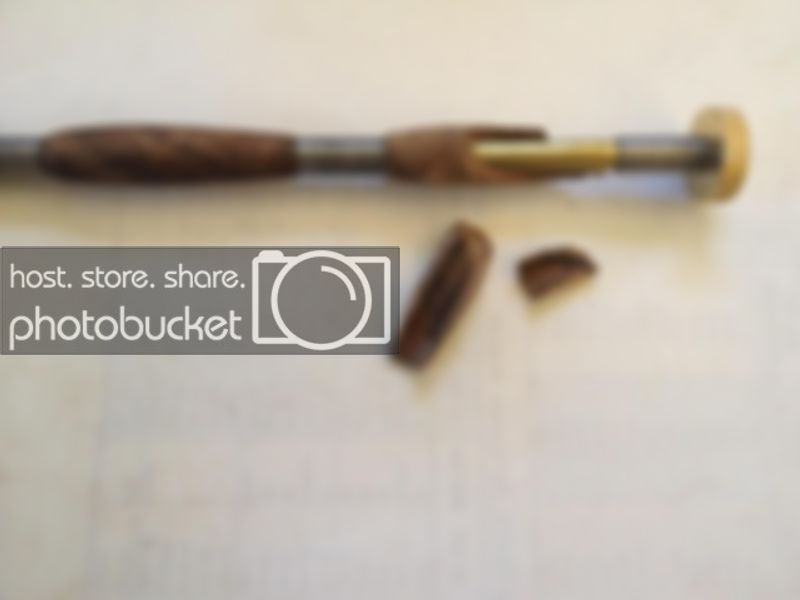
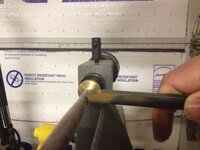
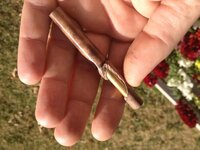
I'm new to wood turning and have finished 3 or 4 kits so far. I have already had 3 blanks 'explode' on me on the lathe. The first, a piece of figured walnut, second one was a piece of cocobolo, and another piece of walnut again this evening. This is getting frustrating!

The first two were assembled with CA, and it looked like part of the problem at least was due to incomplete glue coverage. I switched to epoxy on my latest ones, thinking it would solve that problem, but it doesn't seem to have. I am applying plenty of excess glue, it is oozing out as I spin it slowly to insert it.

Is there a trick to getting complete glue contact? Is this part/all of the problem, or is it something else that I'm doing wrong?

Thanks!

Here is a photo of the first one (walnut/CA)...I will try to take a shot of the epoxied one to post tomorrow.

 
Signed-In Members Don't See This Ad

1080Wayne

Member
Joined
Feb 5, 2006
Messages
3,344
Location
Brownfield, Alberta, Canada.
Cross cut or angle cut blanks are always prone to the type of failure you have experienced because the wood has lower shear strength parallel to the grain than across it . Make sure your tool of choice is super sharp and take very thin cuts . On porous woods it sometimes helps to apply thin CA and then turn it down . Several iterations of the process may be required .
 

plano_harry

Member
Joined
Jan 12, 2012
Messages
1,959
Location
Plano, TX 75093
CA and epoxy will generally work fine, but as Wayne noted, you are taking on some tough grain that wants to come apart. A couple of suggestions - try gorilla glue. Swab the hole with a damp q-tip and then insert your sanded tube covered with gorilla glue. It will expand to fill any voids where you have not been a good bond in the past. Suggestion two is to find a pen friend who can stabilize your blank before you turn it.

I was blowing up straight grained purple heart (from aggressive turning) until I switched from CA to gorilla. Later I blew up the first 2 of 12 highly figured amboyna blanks until I got a friend to stabilize them for me. No more problems - they turn like plastic!

Gorilla and stabilizing won't solve every problem, but it should put some satisfaction back into your turning.

Harry
 

jttheclockman

Member
Joined
Feb 22, 2005
Messages
19,150
Location
NJ, USA.
From the photo there is no glue on the blank or tube. I highly suggest using epoxy. I use System 3 epoxy and never had a failure. Also the tube does not look roughed up. Yes you need sharp tools but that blank should be no harder than any other to turn. I like to use a skew.
 

mrcook4570

Member
Joined
Mar 27, 2005
Messages
4,098
Location
Mason, WV, USA.
Regardless of which glue is used, spread glue on the tube AND inside the drilled hole. Then insert the tube (make sure one end is plugged). This will greatly increase the glue coverage.

Make sure your chisels are SHARP. If they slide across the thumbnail, then it is time to sharpen them.

Turning from the end to the center of the blank will also help to reduce blowouts because there will always be material to support the cut.
 

JohnGreco

Member
Joined
Dec 9, 2011
Messages
740
Location
Sewell, NJ 08080
Also make sure you are milling the ends flush. If you over tighten your brass wheel on the mandrel and there is excess wood hanging over the edge of the tube, it may begin to weaken or at least stress the glue.
 

nativewooder

Member
Joined
Feb 26, 2009
Messages
1,193
Location
Fort Pierce, Fl 34982
The core of your problem is probably too much heat. Do you properly sharpen your tools? If not, you will generate too much heat. Join a club, find a mentor to shorten the learning curve is the easy way.
 

jttheclockman

Member
Joined
Feb 22, 2005
Messages
19,150
Location
NJ, USA.
The core of your problem is probably too much heat. Do you properly sharpen your tools? If not, you will generate too much heat. Join a club, find a mentor to shorten the learning curve is the easy way.


Core of the problem is no glue. If he used CA the gap between the pen and the tube is too great so that means he used the wrong size bit, or the bit wobbled because the drill press was OOR or other things. That gap should not be that large. Use epoxy or some like to use Gollia glue which I do not. No glue is the key to this problem. Solve that then if you still have breakage look into the sharpness of tools, technique, condition of the blank to start with and so on.
 

AZturner

Member
Joined
Mar 15, 2013
Messages
30
OK, thanks for all of the feedback so far. A few comments:

1) The first 2 were glued with CA, the third was with epoxy...same issues and result. In all cases, excess glue was added, the tube spun slowly during insertion, and excess glue came out of the hole.

2) These were drilled on an inexpensive Craftsman table-top drill press, which is all I have to work with and probably part of the problem.

3) A brand new (or nearly so) 7mm pen making drill bit was used for all holes.

4) I did put CA inside the hole as well prior to inserting CA covered tube, but did not put epoxy inside first when using epoxy.

5) I am using a new'ish Easy Wood Tools carbide cutter for all turning.

6) The first one (or two), I was probably trying to cut too aggressively. I was going very slowly and carefully on this one.

I will be sending some wood off for stabilization soon, but prefer 'natural' wood when I can get away with it. Oddly (to me at least), the walnut was much harder to cut than the desert ironwood blank I turned afterwards.

Thanks again for the input! Here is a photo of the latest blowout (walnut w/ epoxy):
 

Attachments

  • IMG_0247.jpg
    IMG_0247.jpg
    56.7 KB · Views: 184

ed4copies

Local Chapter Manager
Joined
Mar 25, 2005
Messages
24,528
Location
Racine, WI, USA.
As you turn, stop and coat the blank with thin CA---it will reinforce the blank. Do this OFTEN!!! Keep the lathe speed high and your tool slightly above center. Remember, carbide tools are scrapers---the handle should be parallel to the ground, or slightly raised.
 

Haynie

Member
Joined
May 20, 2011
Messages
3,516
Location
Page Arizona
I was having the no glue issue. I use epoxy and brush some in the blank and put it on the tube then insert. Let it cure.
 
Joined
Feb 24, 2012
Messages
4,368
Location
Claremont NH
What insert are you using on your carbide cutter. I had a lot of trouble when I first used a carbide cutter with the cutter catching and thus blowing up blanks. Try tipping your cutter up to maybe 45 degrees so you get more of a sheering action instead of a scraping action. See if this helps you out. Try a round insert and you can sheer or scrape. This was suggested to me when I was having somewhat the same types of issues. As far as having a nice sharp tools this so important. When I have my skew sharpened correctly it sheers off the wood and is very efficient in cutting and slices off the material instead of tearing it off.
 
Last edited:

Dan Hintz

Member
Joined
Feb 16, 2011
Messages
477
Location
Columbia, MD
Try tipping your cutter up to maybe 45 degrees so you get more of a sheering action instead of a scraping action.
After his latest pic, I was going to ask how he was presenting the tool to the blank. Too often people think carbide means "cuts anything". Present the tool improperly and a catch can easily rip apart the blank, good glue job or not.
 
Joined
Feb 24, 2012
Messages
4,368
Location
Claremont NH
Try tipping your cutter up to maybe 45 degrees so you get more of a sheering action instead of a scraping action.
After his latest pic, I was going to ask how he was presenting the tool to the blank. Too often people think carbide means "cuts anything". Present the tool improperly and a catch can easily rip apart the blank, good glue job or not.

Ya Dan I agree but if you want to scrape you put the tool flat against the tool rest and just scrape away. If you want to cut you have to present the tool in such a way that it is about to slice the wood cleanly and efficiently. When you do this the effort you need to make a cut is greatly reduced and the cleanness of the cut really shines out. It means you use much less pressure and put less stress onto the wood that is being turned. It is more of a learning process. Once I learned to tip the carbide tool up on edge I was better able to use the radiused cutters better. Now I rarely use the carbide tool but it is there if I need it. I use almost always my skew.
 
Last edited:

low_48

Member
Joined
Jul 1, 2004
Messages
2,176
Location
Peoria, IL, USA.
I don't see any evidence of wood and glue getting together on that last blowup either. What epoxy are you using? Longer set epoxy is stronger than 5 minute. You should be seeing some bits of wood still stuck to the tube when you have a blow-out like that. Even some rough looking epoxy should show up. Your brass tubes almost look pristine. Use some 80 grit on the brass tube, use a Q-tip to get epoxy in the wood blank, swab some glue on the tube, rotate the tube as you slide it in, and also pull it back and forth. You have to get more epoxy around the brass tube. I hate Gorilla glue. Any gap is just bridged by a brittle foam that has almost no strength. I also suggest you speed up your lathe (what speed are you spinning it now?) and slow up your cutting. Spin it at something around 3000 rpm and take something like 10 minutes to turn it. Good luck!
 

AZturner

Member
Joined
Mar 15, 2013
Messages
30
Epoxy is 60 Minute Loctite, allowed to cure for about 24 hours prior to turning. I used 150x grit to rough up the tubes, and will try putting some epoxy in the whole before inserting the tubes and more coarse sandpaper next time.

The carbide cutter is the radiused-square shaped one, bought new recently for this new hobby. Is the round one a better choice?

I am spinning the lathe at the maximum speed (cheapie Harbor Freight variable speed model), not sure what the RPMs are, and since the first blowout have been trying to take very light gentle cuts. It's probably taking me at least 10 minutes to turn each piece.

I try to hold the tool parallel to the floor and cut at the centerline (per the EWT instructions.) The tool rest on my lathe is a bit too high though, and sometimes I find myself needing to slightly angle it down some to get the tool to cut. Angling it up would not be possible.

Thanks again!
 
Joined
Feb 24, 2012
Messages
4,368
Location
Claremont NH
Glue looks like good stuff.

Ok this is cutter is more difficult to handle and I blew up several blanks trying to use it. Try using a round insert it may help you out. You need to learn to see exactly where the wood is working on the tool. This is a real skill that is hard to get. If you get near the point on either end of the radius you will blow out the blank so fast you won't be able to react.

Speed seems perfect.

You are holding the too parallel to the floor so you are using it as a scraper. The trick it to as I said at in the point above is to keep the points of the tool from contacting the work. Try tipping your tool up to about 45 degree angle and keep the wood contact in the lower middle of the tool. It is much easier to use a round insert because it takes the points out of the equation. When you angle down on your rest you are changing the relationship from the tool to the work. I think try to turn the tool on edge and see how you make out with that. You should get a cleaner cut and see more of a chip come off the work instead of sawdust.
 

1080Wayne

Member
Joined
Feb 5, 2006
Messages
3,344
Location
Brownfield, Alberta, Canada.
I try to hold the tool parallel to the floor and cut at the centerline (per the EWT instructions.) The tool rest on my lathe is a bit too high though, and sometimes I find myself needing to slightly angle it down some to get the tool to cut. Angling it up would not be possible.

Thanks again!

I think you are saying that the centerline of the lathe is at or slightly below the top of the tool rest , and that the tool rest cannot be adjusted downwards . If so , I would hack about 1/2 inch off the tool rest post . The rest needs to be low enough to allow the tool/wood contact point to be close to or a bit above the lathe centerline , not below it .

If your lathe is too low relative to your height , you may be unconsciously dipping the tool downward . Angling up is best , for me , essential . I totally agree with Mike about using the carbide tool as a shear . The only time I use it as a scraper is to attain a precise final diameter at the blank ends .
 

AZturner

Member
Joined
Mar 15, 2013
Messages
30
Glue looks like good stuff.

Ok this is cutter is more difficult to handle and I blew up several blanks trying to use it. Try using a round insert it may help you out. You need to learn to see exactly where the wood is working on the tool. This is a real skill that is hard to get. If you get near the point on either end of the radius you will blow out the blank so fast you won't be able to react.

Speed seems perfect.

You are holding the too parallel to the floor so you are using it as a scraper. The trick it to as I said at in the point above is to keep the points of the tool from contacting the work. Try tipping your tool up to about 45 degree angle and keep the wood contact in the lower middle of the tool. It is much easier to use a round insert because it takes the points out of the equation. When you angle down on your rest you are changing the relationship from the tool to the work. I think try to turn the tool on edge and see how you make out with that. You should get a cleaner cut and see more of a chip come off the work instead of sawdust.

I'm unable to lower my tool rest enough to allow tipping the tool up unfortunately. What do you mean by turning the tool on edge?

I try to hold the tool parallel to the floor and cut at the centerline (per the EWT instructions.) The tool rest on my lathe is a bit too high though, and sometimes I find myself needing to slightly angle it down some to get the tool to cut. Angling it up would not be possible.

Thanks again!

I think you are saying that the centerline of the lathe is at or slightly below the top of the tool rest , and that the tool rest cannot be adjusted downwards . If so , I would hack about 1/2 inch off the tool rest post . The rest needs to be low enough to allow the tool/wood contact point to be close to or a bit above the lathe centerline , not below it .

If your lathe is too low relative to your height , you may be unconsciously dipping the tool downward . Angling up is best , for me , essential . I totally agree with Mike about using the carbide tool as a shear . The only time I use it as a scraper is to attain a precise final diameter at the blank ends .

I think the height of the machine is ok, it's the tool rest that is a problem. Due to the design I'm unable to trim the post to have it sit lower. Hopefully these photos show what I mean.
 

Attachments

  • image.jpg
    image.jpg
    91.3 KB · Views: 178

jttheclockman

Member
Joined
Feb 22, 2005
Messages
19,150
Location
NJ, USA.
Can I suggest you take a photo with your tool rest as low as it can go and have a pen tube, not a blank just a plain pen tube chucked up. Now take a photo from the side so that it shows the rest in relation to the center of the tube. I can not believe you can not get the rest low enough to use the carbide tool. If you want you can measure the top of the rest and then the center of the tube from the lathe plathform. This will give us an idea of how much difference you are talking about.

If all else fails, why don't you just switch to using a skew??? You will do a whole lot better if you can learn to use a skew. It will give you better finish results than any carbide. I know I sound like a broken record already when people ask about tools. But there honestly is no better tool suited for what we do than a skew. I do use a carbide tool but only for blanks that I have metal segments that are larger than thin flashing. I do this only because it saves on sharpening time. This again is just my opinion:)

One other thing, as far as the proper lathe height goes, it should be low enough so that your elbow at a 90 degree angle can operate a tool to the center of the head and tailstock.
 
Last edited:

AZturner

Member
Joined
Mar 15, 2013
Messages
30
Here you go, I think you can see how high the tool is positioned (worse than I even thought). I guess that's the cost of cheap tools.

I have no idea how to use a skew but I guess I could get one and learn. I walked into the local woodcraft a while back and they recommended the carbide tool for me as a beginner.
 

Attachments

  • image.jpg
    image.jpg
    50.9 KB · Views: 170
Last edited:

jttheclockman

Member
Joined
Feb 22, 2005
Messages
19,150
Location
NJ, USA.
Here you go, I think you can see how high the tool is positioned (worse than I even thought). I guess that's the cost of cheap tools.

I have no idea how to use a skew but I guess I could get one and learn. I walked into the local woodcraft a while back and they recommended the carbide tool for me as a beginner.


Is that your carbide tool and is that the way you present it to the blank??? Something just is not adding up. If that is the tool rest that came with the lathe it is too big to begin with. Did you replace the tool rest???
 
Last edited:

PeetyInMich

Member
Joined
Feb 19, 2012
Messages
358
Location
Monroe Michigan 48162
There's the problem, looks like the bottomed out tool rest is at the arbor centerline. Like others have said the carbide tool cutting edge needs to be presented flat (parallel to the floor, or slightly handle end down, and at the center height of the blank). your tool rest needs to be much lower, have you verified that the assembly is correct or looked at photos or the store demo model? I have blown up blanks with the carbide when the handle end is raised and it gets drawn under the rotating blank, with that setup it looks like you have no choice but to raise the handle and turn from the top.
 
Last edited:

plano_harry

Member
Joined
Jan 12, 2012
Messages
1,959
Location
Plano, TX 75093
No way that is going to work on a consistant basis. If you want to keep the lathe, change your tool post. Rherrell or Johnnycnc can fix that easily.
 
Joined
Feb 24, 2012
Messages
4,368
Location
Claremont NH
As others have said that is way too high. You want to be able to adjust that down so the tool is at or near center or even a bit below on your work. But you don't have to stop turning until you get a new tool rest! If you have a skew you can take this opportunity to give it a try. Your tool rest goes low enough for a skew from what I am seeing. Another thing that I would definitely do with that tool rest is to file/sand or otherwise smooth that surface. You really don't want any bumps dimples or other roughness on your tool rest. I use my stationary belt sander on mine and smoothed it up. I know it seem picky but it will make your turning so much more pleasurable you won't believe it. Now chances are that you could in fact grind that tool rest down but I am not suggesting that you do that but it could be done. I have drooled over those tool rests that are in the link in another post and the price isn't bad at all!
 

RMayoIII

Member
Joined
Feb 14, 2012
Messages
211
Location
Belmont, NH
If you have a grinder you can remove the tool rest base from the lathe and grind off the top a little to allow the tool rest to go lower. Plus it will save money on buying anything to replace it. You should definitely have some room for movement up and down as not all tools are the same height when presented to the work piece.
 
Last edited:

pianomanpj

Member
Joined
Sep 24, 2007
Messages
1,147
Location
Augusta, Maine, USA.
What viscosity is your CA? I didn't see any mention of that in this thread. If you're going to use CA to glue your tubes (which I did for a long time before switching to epoxy) you need to use THICK CA. I wouldn't recommend medium, and thin (like water) is totally useless to glue in your tubes.

That's not to say that using thin CA inside the drilled hole of your blank is a bad idea - it can be used to help stabilize the wood. Run some thin CA down inside your blank to coat all surfaces and let it soak in and cure. Do NOT use any accelerator as this can cause premature curing when you try and glue in your tube with thick CA! Once the thin CA has cured, make sure your tube still fits BEFORE you try gluing it in with thick CA. You may need to run your drill bit through the hole one more time.
 

WHSKYrvr1

Member
Joined
Aug 10, 2010
Messages
260
Location
Madison AL
When I looked at the pic you posted, I noticed something. Did you rough up the tubes before you glued them in? I usually take 80-120 grit sandpaper and sand the tubes to give them a tooth for the glue to hold on. That might help.

Doug
 

Mordi

Member
Joined
Dec 24, 2012
Messages
99
Location
San Diego, CA 92131
I am still new at this, but when I first starting turning pen blanks a few months ago, I blew up several really nice blanks that "exploded" just like yours. And I was using gorilla glue at the time and a carbide cutter - same as you :biggrin:. Someone suggested I switch to a 1" rouging gouge to take the blank from square to round and then use the carbide cutter to finish the rounding process. I followed this advice and have not blown up a single blank since then :). Of course, the possibility exists that my skiills/technique just got better along the way too...

Mordi
 
Joined
Feb 24, 2012
Messages
4,368
Location
Claremont NH
His problem is mostly in his tool rest height until that is resolved he won't be able to use that carbide cutter effectively. Most any other tool should be able to be used but the skew is definitely the best choice as John T. said.
 

jttheclockman

Member
Joined
Feb 22, 2005
Messages
19,150
Location
NJ, USA.
He definetly has a tool rest height problem. I do not think that was the original tool rest with that lathe. There is no room for the use of normal tools such as a roughing gouge. Something is definetly not right. From the photos it looks like that was a homemade rest or something close. Very crude welding. That may just be the beggining of his problems but until that is corrected he will continue to have problems.


I have used the round bar toolrests and in theory they work well because the tool has a round surface to ride on and the hardness of the bar makes for no denting but i found I can not control the tool well because there is no finger support area and I have big fingers. I used the cheap rests that came with the lathe but quickly got rid of them. Why do they even make those???

The tool rest that I have come to love and enjoy using is these Robust rests. http://turnrobustonline.com/shop/article_06-OW-SD/Mini-Rest----3_4%22-Post-6%22.html?sessid=zXa6rpn6EXwjseLAZfRvCQyd3OOGXeQSdRQVIrr8lGB4uDSRIYGUJmQFSony2P7S&shop_param=cid%3D5%26aid%3D06-OW-SD%26 They maybe a bit pricey but again you get what you pay for. The few things I like about these is you can rest you guide finger on the concave area and easily follow the rest. The stainless round bar on top is small enough it does not get in the way and is tough to resist dings. A few swipes with a steelwool pad and you are good to go. Plus the contour of the rest itself gets up and close to the work and yet keeps your fingers far enough away from the spinning blank. Well thought out and worth the money. This may sound like a commercial for them but i have no interest in them as a company. Just passing on what I think is one of the best tool rests out on the market and hopefully will help others to make a decission if need be to give them a try.
 
Last edited:

jimdude

Member
Joined
Jun 6, 2006
Messages
43
Location
Powder Springs, Georgia, USA.
I believe WHSKYrvr1 has a point. Did you rough up your tube? I rough up my tube, use Gorilla glue and let cure for 24 hours, and I am not too aggressive with my cuts. It keeps me from bending my mandrel and that opens up a few more issues. Hope you're able to find your problem.
 

AZturner

Member
Joined
Mar 15, 2013
Messages
30
Yes, I did rough up the tubes with 150x.

Glue was thin CA on first, medium CA on second, and 60 minute epoxy on third failure

Lathe was purchased brand new in box, cheapest of the cheap from HF.

I think it may be time to cut my losses and get a better lathe, although that will mean rebuying some accessories.

Thanks!
 
Joined
Feb 24, 2012
Messages
4,368
Location
Claremont NH
Yes, I did rough up the tubes with 150x.

Glue was thin CA on first, medium CA on second, and 60 minute epoxy on third failure

Lathe was purchased brand new in box, cheapest of the cheap from HF.

I think it may be time to cut my losses and get a better lathe, although that will mean rebuying some accessories.

Thanks!

All that is wrong with this setup is the height of the tool rest you are doing most of the rest just right. I would not use the thin ca for gluing in your tubes and stick with epoxy though. If you get that tool rest down it will be day and night different. I have no doubt in my mind that this is your problem. It is easily fixed and you will be happy. I am sure your HF lathe has lots of pens in it. Now if you want a new lathe that is a different story of course :biggrin:
 
Last edited:

walshjp17

Member
Joined
Jul 29, 2012
Messages
3,418
Location
Weddington, NC
By the way, Rick Herrell (rherrell) has a flat tool rest designed to work with the square bar stock of the popular carbide cutters. I bought one for each of my lathes and am quite happy. Check out his catalogue in the IAP Marketplace.
 
Signed-In Members Don't See This Ad

AZturner

Member
Joined
Mar 15, 2013
Messages
30
I sent rherrell a PM this morning to see if he can fix me up. I want to confirm that his tool rest's won't have the same problem with my particular model of lathe before ordering one.

I'm not dying to dump a bunch of money into a new lathe, but I also don't want to throw good money after bad with this one...
 
Top Bottom