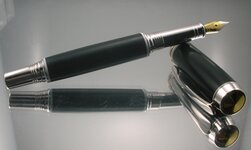
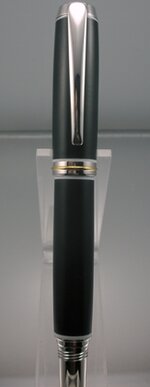
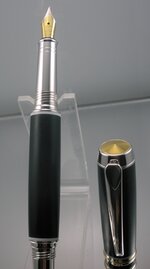
This seems to be an incredibly common question that spawns all sorts suggestions.
Ebonite is both a very forgiving material, as well as a very finicky one. Despite being born of heat and pressure, it isn't very tolerant of either when it comes to finishing and giving it a shine. If too much presure is used while sanding or polishing, you can actually scorch ebonite, causing tiny microbubbles to form, and ruining any chances of a good finish.
For years I've used the below process, and never had to resort to wet sanding, lacquer, shellac, or ren wax.
- If shaping on the lathe, use "scary sharp" tools. This alone will give a nice surface, but the main reason is to reduce the amount of pressure needed, and thus reduce the amount of heat generated. Dull tools and high pressure will abrade the surface, scorch it, and create those tiny microbubles that actually extend down under the surface quite a ways. As a side note, it's the scorching and microbubbles that are the source of extended outgassing of the sulphuric compounds. If you take care not to scorch, the smell only lasts an hour or less.
- Start sanding with 220/240 grit in a high quality paper. Take care to let the sand paper do its job and don't try to rush things by using lots of pressure.
- Finish sand with abralon, or micromesh. The abrasive used in both products is silicone carbide, an abrasive with a rectangular grain shape - as opposed to aluminum oxide's triangular grain shape. Using Abralon, I start with 180 (yes, after 220/240 in paper) and work my way up to 2000. Strictly speaking, using 2000 isn't necessary, and you can easily stop at 500 or 1000 if your buffing setup is up to snuff. However, since it only takes, literally, 15 seconds at 1000 and 2000, I've always done it.
- When you're finished sanding with the lathe on, stop the lathe and run the abralon or micromesh pad lengthwise down the barrel of the pen. Us long strokes from end to the other, do not stop halfway down the pen and reverse direction.
- When you've finished with your final grit, take the barrel off of the mandrel and bushings. Take it to the buffer and buff with brown tripoli - both along the circumference of the barrel and along its length. Use a light hand - tripoli can also scorch ebonite if you buff too hard. Worse, you can easily round over the sharp edges at the end of the barrel and create unsightly v-shaped gaps where the barrel meets the pen components.
- After brown tripoli, buff with white diamond. Again, along both the circumference and length. And again, use a light hand.
- Wipe the pen barrel off with a clean cloth. I like to use regular shop rags, but cloth diapers or 100% coton rags would work just as well.
- After you've got all the white diamond residue off, buff on a coat of carnuba. Prior to this, the pen barrel should already be really shiny. This is just used as a final coat for sparkle factor. Again, speed, heat, pressure, and friction wil come into play. I use an 8-inch buffing wheel, and set my speed at 1200 RPM - or about 2500 SFPM (roughly). Anything higher than that, and you may have trouble with applying the carnuba due to too much heat and speed. In this step, some folks have developed technique that lets them use an 8-inch buff at 1800 RPM, and some even buff at around 850RPM. Remember that duringthis step you're not trying to polish anything - your trying to apply something to the surface. A light hand and sparing application of wax to the wheel will go a long way.
- Once the carnuba is on, buff with a super soft buff at a much lower speed - say 1300SFPM (6 inch wheel at 850 RPM). At this point it's important to remember that you're not trying to apply anything to the surface, and you're not trying to polish the surface. You're buffing the carnuba that you applied in the previous step, smoothing out the surface, and homogenizing the entire thing. That layer of carnuba is super, super thin, so use a low speed, a clean buff, and a very light hand.
- If you don't have a buffer setup like a Beall system or a dedicated buffer, I highly suggest you get one. You can get buffing wheels from Delvies Plastics that are ideal of this type of work, and they're not expensive at all. Get buffing wheel arbors from your local hardware store. I find mine at both the big-box stores, as well as the mom-n-pop, so they're easy to come by.
- If you still don't have buffing wheels, you can get decent results by spinning the lathe and using EEE Ultra Shine. Follow the instructions on the container. The shine won't be as deep and liquid-like as using a buffing wheel, but it will be a good shine. I do not suggest using Shellewax or other friction polishes on ebonite - remember that it's sensitive to heat and pressure.
That's it in a nutshell. I'm actually headed to the workshop in a few minutes to make a Sierra with an ebonite barrel. I cut a piece too short to use as a pipe stem, and realized that it was the perfect length for a Sierra. I'll try to remember to snap pics of the process.