Double Trouble

Signed-In Members Don't See This Ad

Sandsini

Member
Joined
May 11, 2014
Messages
437
Location
Lake Arrowhead, California
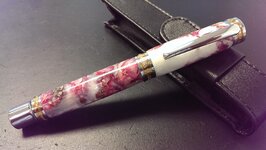
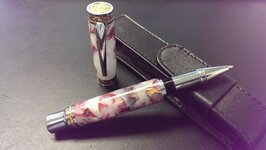
I was working on this pen this weekend and I had a couple of issues. The first is although I painted the inside of the blank after drilling, it looks like the lower half lost a good percentage of the paint when I glued the tubes in, while the top portion seems to have done better. I'm not sure if this is the case or if the problem is the difference in the thickness of the sections. This Monarch kit from WoodPenPro has such a huge cap tube that the section of material is very thin, while the lower section is abnormally thick.

The other issue is that the blank, from Ed, is an artisan made pearl white with Hibiscus flower petals, and I was warned that the blank could have some voids and bubbles that would need to be filled, which is what I experienced. My problem is that once it was turned down, I filled the voids in with CA, hit it with accelerator, then sanded them back down to level only to find that they were voids again. I ended up doing this over and over until I finally gave up and polished and assembled the pen. I wont' be able to sell it and luckily my wife loves it and will keep it for herself, but I am a bit concerned about my technique. Was my mistake in not letting the CA set up long enough and could the thickness of the material in the body cause the differences in appearance?
 

Attachments

  • hibiscus1.jpg
    hibiscus1.jpg
    202 KB · Views: 279
  • hibiscus2.jpg
    hibiscus2.jpg
    195.1 KB · Views: 213
Signed-In Members Don't See This Ad

Tim'sTurnings

Member
Joined
Aug 19, 2008
Messages
420
Location
Central Michigan
Very nice looking pen. I had to fill some voids in casted blanks now and then but didn't use accelerator and the CA worked good for me. Maybe the CA wasn't completely set up? That could have been your problem. Good luck on your next try.
Tim.
 

Sandsini

Member
Joined
May 11, 2014
Messages
437
Location
Lake Arrowhead, California
Steve,
I used Rustoleum white spray primer. I probably only gave it about an hour or so before I glued in the tubes. The bit that dribbled outside the blank was dry, but perhaps it wasn't fully set in just an hour. I am used to working with really fast drying spray paints and assumed that this, being a primer, would be the same. In the future I will probably try to use the Pactra Polycarbonate paints for RC Car bodies as that has good adhesion to plastics and dries very quickly.
 
Joined
Nov 20, 2012
Messages
38
Location
Nokesville, Virginia 20182
Nice pen, Eric!
At risk of asking a stupid question and offending you, what viscosity of CA did you use? Not saying how i know this, but if you used medium or thick it may have bridged the void rather than filling it. :rolleyes: If you used thin I would be inclined to agree with Tim ang suspect the accelerator had formed a skin but the CA in the void hadn't cured.
Garrett
 

1080Wayne

Member
Joined
Feb 5, 2006
Messages
3,344
Location
Brownfield, Alberta, Canada.
Usually best to let the paint dry for a day . If the tube does not go easily through the hole before painting , I use a rat tail file to open it up a bit .

Very small pinholes are the most difficult to fill , because of air trapped under the CA . Probing the hole through a small pool of thin CA with the point of a pin sometimes works . On larger holes medium or thick CA usually works better .
 

sbell111

Member
Joined
Jan 16, 2008
Messages
3,465
Location
Franklin, TN
Steve,
I used Rustoleum white spray primer. I probably only gave it about an hour or so before I glued in the tubes. The bit that dribbled outside the blank was dry, but perhaps it wasn't fully set in just an hour. I am used to working with really fast drying spray paints and assumed that this, being a primer, would be the same. In the future I will probably try to use the Pactra Polycarbonate paints for RC Car bodies as that has good adhesion to plastics and dries very quickly.

I think that this was your problem. The paint needs to be completely cured prior to gluing the tube in. I always let it sit for at least a day.
 

Sandsini

Member
Joined
May 11, 2014
Messages
437
Location
Lake Arrowhead, California
Nice pen, Eric!
At risk of asking a stupid question and offending you, what viscosity of CA did you use? Not saying how i know this, but if you used medium or thick it may have bridged the void rather than filling it. :rolleyes: If you used thin I would be inclined to agree with Tim ang suspect the accelerator had formed a skin but the CA in the void hadn't cured.
Garrett
Garrett,
I tried both thin and medium and I even used my gloved hand to press the glue into the void before hitting it with accelerator. I'm guessing that my biggest problem is my lack of patience. I probably should have let the glue sit longer just as I should have let the paint cure longer.

Well, I guess you have to really live the lesson sometimes to have it hit home!
 

Jim Burr

Banned
Joined
Feb 23, 2010
Messages
3,060
Location
Reno, Nv
Couple thoughts Eric...you noticed that the ends of the tube peeled and not the middle? It could be a drilling issue. The drill wobble is substantial at the ends and will peel the paint off a tube.
The other problem you mentioned was pitting. Sometimes this can be attributed to turning technique or lack of cure time for the CA. Special acrylics need special care in turning...slow cut rate, small depth of cut, so on. Accelerator is a different twist that also requires care with use. Fresh CA, accelerator form about 1' in short bursts...3-4 maybe.
Pen looks good, good questions...hope it works for you!
 

ed4copies

Local Chapter Manager
Joined
Mar 25, 2005
Messages
24,528
Location
Racine, WI, USA.
Hey Eric---I am not a patient person, either. And, I have experienced BOTH of the problems you encountered (not at the same time though).

Yes, I agree with using the primer and, unfortunately, I agree it should be allowed to cure for 24 hours before putting in tubes with CA. (I don't LIKE this answer, but I have come to accept it)

The pinholes are another "been there, done that". Again, puncturing the "bubble" with a needle and making sure the thin CA is actually IN the holes seems to be the only answer. And, in my experience with this, it only works on the top of the blank. So, you have to let it sit for several minutes before rotating to the next quadrant. Funny, but bigger holes are easier to fill than small ones!!

In short, what you experienced is "normal". The paint problem is easy to overcome--ignore your blanks for a day or so. The "tiny hole fill" happens one day---everything goes right and you can't see where they were---and you FEEL GREAT!!

One other thing I have tried that I THINK helps---clean the blank with BLO (Boiled linseed oil) before applying the thin CA. BLO is an accelerant and it seems to make the holes fill better (I am open to opposing opinions on this!!!!)

Pen looks nice, in the picture----glad your wife scarfed it!!!

Next one will go better!!
Ed
 

Sandsini

Member
Joined
May 11, 2014
Messages
437
Location
Lake Arrowhead, California
Jokker,I got the blank from Ed (exoticblanks.com), and I have to tell you, even with the problems I had I wish I had ordered 10 more (slight exaggeration). I have had more interest in this pen from the ladies who visit my Facebook fan page than anything else I've posted, I bet I could have sold it ten times over, even with the flaws!

Ed, thanks for the advice with the BLO, I will try that next time. And I will be sure to get more of this blank on my next order.
 
Last edited:
Top Bottom