
TurnaPen
Member
Up to today if anyone asked how to disassemble an Emperor or Statesman Style cap,(Jnr. Emperors, Jnr. Statesman and any other that uses the long black plastic insert), my answer would have been "good luck"; the only way I "dismantled" one was to wreck the tube and blank so I could salvage the kit.
Today, after much hard work, I assembled a Statesman I made for my SIL; and horror, I found that the blank did not sit flush with the kit; I had forgotten to fine trim the cap.
I did not want to lose the expensive blank or the decorating work that went into it, I looked at the thing and I said to myself, "let me try this!!??"
The removal of the end cap was the usual right size diameter metal bar'drill bit, and bang it on the table a few times and out it came, the threaded end now follows
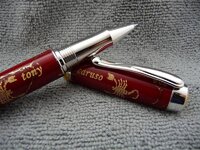
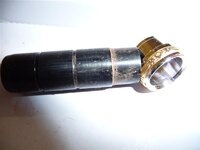
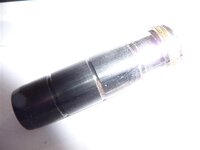
Photo 1 is the actual pen, so you can see the cap.
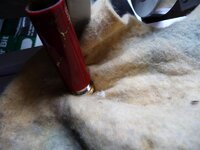
Photo1A I protected the end of the centre band with doubled over cloth
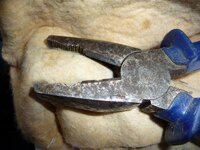
Photo 2 high technology pliers then go around the cloth and grip the centre band gently
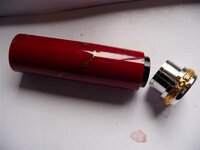
Photo 3 twist and pull gently, not too much pressure, just enough to grip the band and also pull outwards at the same time and off comes the metal portion of the centre band, leaving the plastic portion still in there.
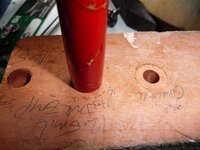
Photo 4 using expensive high quality red gum block as a jig, I drill a hole about 13.5 mil right through, I only had 13.3 mil so I just wiggled it to enlarge the diameter.(the inner portion is larger than the small portion that is showing.
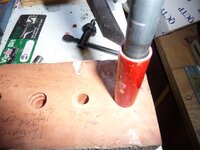
Photo 5 and 5A in the jig, use a metal/wood/corian insert that is the correct size, and start tapping firmly but gently. 5A shows the plastic portion starting to come out, put it back in jig and complete the tapping process,
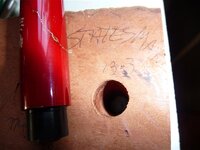
Photo 6 The plastic bit came out but becuase my jig was not perfect it got stuck in the jig, a slight tap from the other side and out it came.
Photo 7 successfully pulled apart
Photo 8 put back together ready for assembly.
If you are concerned with a bit of play in it, a small touch of CA will help.
Hope this has proved useful to you, as I mentioned, before this my only option in the past was to destroy blank to save kit, this has saved kit and blank. Amos
Today, after much hard work, I assembled a Statesman I made for my SIL; and horror, I found that the blank did not sit flush with the kit; I had forgotten to fine trim the cap.
I did not want to lose the expensive blank or the decorating work that went into it, I looked at the thing and I said to myself, "let me try this!!??"
The removal of the end cap was the usual right size diameter metal bar'drill bit, and bang it on the table a few times and out it came, the threaded end now follows
Photo 1 is the actual pen, so you can see the cap.
Photo1A I protected the end of the centre band with doubled over cloth
Photo 2 high technology pliers then go around the cloth and grip the centre band gently
Photo 3 twist and pull gently, not too much pressure, just enough to grip the band and also pull outwards at the same time and off comes the metal portion of the centre band, leaving the plastic portion still in there.
Photo 4 using expensive high quality red gum block as a jig, I drill a hole about 13.5 mil right through, I only had 13.3 mil so I just wiggled it to enlarge the diameter.(the inner portion is larger than the small portion that is showing.
Photo 5 and 5A in the jig, use a metal/wood/corian insert that is the correct size, and start tapping firmly but gently. 5A shows the plastic portion starting to come out, put it back in jig and complete the tapping process,
Photo 6 The plastic bit came out but becuase my jig was not perfect it got stuck in the jig, a slight tap from the other side and out it came.
Photo 7 successfully pulled apart
Photo 8 put back together ready for assembly.
If you are concerned with a bit of play in it, a small touch of CA will help.
Hope this has proved useful to you, as I mentioned, before this my only option in the past was to destroy blank to save kit, this has saved kit and blank. Amos
Attachments
-
 1 Picture of the cap (Medium).JPG94.6 KB · Views: 194
 -
 1A Protect with cloth (Medium).JPG58.7 KB · Views: 169
 -
 2. grap with pliers gently and twist and pull apart same time (Medium).JPG85.3 KB · Views: 172
 -
 3 here they are apart (Medium).JPG39.2 KB · Views: 174
 -
 4 put plastic bit in a jig (Medium).JPG70.2 KB · Views: 141
 -
 5 tap out gently (Medium).JPG65.3 KB · Views: 145
 -
 5A partially tapped out (Medium).JPG60.7 KB · Views: 146
 -
 6 fully tapped out (Medium).JPG68.2 KB · Views: 160
 -
 7 fully apart successfully (Medium).JPG40 KB · Views: 166
 -
 8 put together and ready for assembly (Medium).JPG29.7 KB · Views: 143
