Decals on a barrel shape

Signed-In Members Don't See This Ad

Rockytime

Member
Joined
Jun 3, 2014
Messages
1,074
Location
Arvada, CO 80003
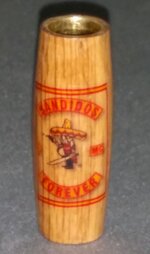
I am making a pen with a Jack Daniel blank. I am making the upper and lower barrels in a somewhat barrel shape. I am having difficulty placing a decal on the barrel because of it's shape. The decal is a difficult shape because it has fine rectangular border and decals don't want to fit irregular shapes. Decals do not lay flat on compound surfaces. Works fine on a straight round barrel. Perhaps I'm trying the impossible but hoping there might be a solution
 
Signed-In Members Don't See This Ad

plantman

Member
Joined
Jan 2, 2012
Messages
3,437
Location
Green Bay, Wi
Segmenting or darting, as in sewing, are usualy the chosen ways of adapting a two dimentional shape onto a convex or concave surface. I transfer many designs to eggs, balls, or odd shapes using these methods. The downside is that a solid deign will be deformed when you try to conform it to an odd shaped object. There are 3D cad programs that will copy your design or decal and fit it to the shape you need. When I transfer paterns to odd objects I can always pencil in designs to even them out. When I do transfers or decals, I center the design and smooth out north and south to the ends starting in the center and working outward. Next do east and west in the same manner. Do the 45 next, this should give you an idea what is going to happen to your design, and if it is going to work out or not. Some times you just have to cut to make it lay flat. Cut it evenly in 8 places ( 45 degrees ) so that the pattern is even all the way around. Jim S
 
Last edited:

Rockytime

Member
Joined
Jun 3, 2014
Messages
1,074
Location
Arvada, CO 80003
Thanks for your information. I will try the cutting technique. Another question. Do you make the 45 degree slits before wetting and applying the decal or make the cuts after it is still wet on the blank?
 

plantman

Member
Joined
Jan 2, 2012
Messages
3,437
Location
Green Bay, Wi
Thanks for your information. I will try the cutting technique. Another question. Do you make the 45 degree slits before wetting and applying the decal or make the cuts after it is still wet on the blank?

I make the cut while the decal is wet. I make the 45 cut, lay the decal over itself, and with a very sharp Exacto knife, recut the 45 taking a little off both sides. Remove the top decal waste, lift, and remove the bottom decal waste. This will give you a perfect joint line even if your cut is not perfect. To make a less noticeable pattern change, make your cuts at 22 1/2 degrees after you have smoothed out the 45's but not cut them. This will give you 8 equal pattern changes around your design. The same method is used for cutting joints on veneers, inlays and bandings. Hope this helps you out !!! Jim S
 
Last edited:

Rockytime

Member
Joined
Jun 3, 2014
Messages
1,074
Location
Arvada, CO 80003
Thanks. I'll give it my best effort. If I'm successful I'll post it. If not I'm just gonna quietly sneak away.

Thanks again for the info.
 

Rockytime

Member
Joined
Jun 3, 2014
Messages
1,074
Location
Arvada, CO 80003
Use Micro set, it softens the decal material after you have it in place and allows it to conform to slightly irregular surfaces. I've used it on plastic models for getting decals to lay into the details.

I had forgotten about Micro set. I used it years ago. I was into model railroads for about 40 years. Seems a long time ago. I'll look for it at Caboose Hobbies.

Thanks for the reminder.
 

plantman

Member
Joined
Jan 2, 2012
Messages
3,437
Location
Green Bay, Wi
Segmenting or darting, as in sewing, are usualy the chosen ways of adapting a two dimentional shape onto a convex or concave surface. I transfer many designs to eggs, balls, or odd shapes using these methods. The downside is that a solid deign will be deformed when you try to conform it to an odd shaped object. There are 3D cad programs that will copy your design or decal and fit it to the shape you need. When I transfer paterns to odd objects I can always pencil in designs to even them out. When I do transfers or decals, I center the design and smooth out north and south to the ends starting in the center and working outward. Next do east and west in the same manner. Do the 45 next, this should give you an idea what is going to happen to your design, and if it is going to work out or not. Some times you just have to cut to make it lay flat. Cut it evenly in 8 places ( 45 degrees ) so that the pattern is even all the way around. Jim S

Correction !! The last sentence should have read, cut between the 45's (22 1/2 degrees) to make 8 even slices. Jim S
 

Rockytime

Member
Joined
Jun 3, 2014
Messages
1,074
Location
Arvada, CO 80003
Well, I got it done with a few knife strokes and the assistance of Micro Set. Thanks for the suggestions. The attached photo is just a quickie with my phone but it is a photo so it did happen.
 

Attachments

  • 20141124_191755-1.jpg
    20141124_191755-1.jpg
    91.6 KB · Views: 196
Top Bottom