
You are using an out of date browser. It may not display this or other websites correctly.
You should upgrade or use an alternative browser.
You should upgrade or use an alternative browser.
cutting segs for herringbone
- Thread starter RAdams
- Start date
Signed-In Members Don't See This Ad
Signed-In Members Don't See This Ad
glycerine
Member
I used a bandsaw. But are you trying to do it with veneers pieces or the triangle method? What I did was take normal blanks and cut them lengthwise on the diagonal. So now you've got 2 long pieces that are triangular if looked at from the end. The put a stop (or fence) on the badsaw and cut slices off about 1/8 inch each. I used the miter gauge thing, whatever it's called, to keep my pieces perpendicular to the blade and cut them like a meat slicer. Does that all make sense? I think with a table saw, you'd have alot of waste and risk getting your fingers close to the blade...
I was trying to do it like the little scrabble pieces. small squares. I definately took a step back after just one little buscuit on the tablesaw. I don't have a bandsaw yet, so i guess i will have to put the tiny segmented pieces on the back burner for now. bummer..
mickr
Member
Do you have a mitre box? make a "sled" for that and enjoy making tiny items..I've made 100's of segmented items from a mitre boxI was trying to do it like the little scrabble pieces. small squares. I definately took a step back after just one little buscuit on the tablesaw. I don't have a bandsaw yet, so i guess i will have to put the tiny segmented pieces on the back burner for now. bummer..
glycerine
Member
I was trying to do it like the little scrabble pieces. small squares. I definately took a step back after just one little buscuit on the tablesaw. I don't have a bandsaw yet, so i guess i will have to put the tiny segmented pieces on the back burner for now. bummer..
I guess you could use squares. Are you planning on using squares for the entire blank or just for the base layer so that you have something to stack onto?
I would suggest just cutting the blank diagonally first and then you've got twice the material to work with. And you won't have to turn it down so much after you build the blank using triangles.
I've seen people use a long thin piece of wood and cut the triangles (or squares) from that, but if you're starting with a normal pen blank, I think the "slice" method will be the easiest... but maybe not with a table saw.
But the other way I've seen, you'd have a long piece of wood, think of a yard stick, and then just cut the sqaures off of it. For triangles set the mitre gauge at a 45 degree angle, cut a small triangle off the end so you have a 45 degree angle on the end of the wood. Then flip the wood and cut again, cutting a large triangle, then flip and repeat... or something like that!
KenV
Member
For small stuff, I often go back to a small exacto miter guide - slow, but precise and safe for tiny stuff. The exacto saws have a very very thin kerf, so the loss of materials is small. It gets nice sharp ends with minimal chipping.
glycerine
Member
I dont know the triangle way. When i say squares, They are more like little square shaped discs. the yard stick thing might work, and if not then i do indeed have a miter box!
If you are trying it the way I am imagining, then the triangle way is the same, you just use half the material you would if you were using squares.
Imagine that the triangle IS a square (just go with me here... pretend there's an invisible opposite side, making it square). When you position the pieces together, just always point the 90 degree angle to the CENTER, so that the "invisible" half is always to the outside of your design. You don't need the full square anyway, so you might as well cut it in half and have two triangles instead.
If it's easier to use squares though, by all means, do it that way.
Attachments
Last edited:
BigguyZ
Member
If you are trying it the way I am imagining, then the triangle way is the same, you just use half the material you would if you were using squares.
Imaging that the triangle IS a square (just go with me here... pretend there's an invisible opposite side, making it square). When you position the pieces together, just always point the 90 degree angle to the CENTER, so that the "invisible" half is always to the outside of your design. You don't need the full square anyway, so you might as well cut it in half and have two triangles instead.
If it's easier to use squares though, by all means, do it that way.
Very cool. That makes sense. Though unless you have a very fine tooth scroll saw or bandsaw- or you use the xacto miter box previously mentioned- I would think it'd be hard and/or dangerous to split such s small piece in half... I had thought about the xacto miter gauge, so that might be a good idea if I decide to go with that tool.
Thanks!
glycerine
Member
Very cool. That makes sense. Though unless you have a very fine tooth scroll saw or bandsaw- or you use the xacto miter box previously mentioned- I would think it'd be hard and/or dangerous to split such s small piece in half... I had thought about the xacto miter gauge, so that might be a good idea if I decide to go with that tool.
Thanks!
Yes, I'd be scared to try it with a table saw. I set my bandsaw table at a 45 degree angle and put the rip fence right next to the blade and then rip the blanks lengthwise diagonally. Then I take those and slice them like a loaf of bread, whcih leaves me with lots of tiny triangles.
But I guess going back to the orginal problem, without a bandsaw, Ron, I couldn't tell you how to do it safely/quickly/easily...
Do you know someone who has a bandsaw that you could use? Making the cuts shouldn't take all that long if you know what you're doing ahead of time. It's the gluing of the pieces that takes forever!
DurocShark
Member
I use this:
http://blog.woodscrub.info/2008/05/small-crosscut-sled.html
Very simple, but with a scrap of wood clamped to give consistent sized pieces it works great.
http://blog.woodscrub.info/2008/05/small-crosscut-sled.html
Very simple, but with a scrap of wood clamped to give consistent sized pieces it works great.
GaryMGg
Member
Cutting very small pieces on the table saw can be done easily using a sled with fixtures to hold the pieces OR make a vacuum fence
OR hold the piece down using a new pencil's ERASER.
To make triangular pieces, you'll need to make a 45-degree miter sled like one would use to make picture frames.
OR hold the piece down using a new pencil's ERASER.
To make triangular pieces, you'll need to make a 45-degree miter sled like one would use to make picture frames.
Glenn McCullough
Member
you could use a scroll saw to do the same if you have one of those. or put a thin, fine tooth blade in your jig saw, bolt it to a board with a kerf in it and flip it upside down and clamp it to saw horses and use it as you would a band saw. there's more than one way to skin a cat, so I've heard.
I was trying to do it like the little scrabble pieces. small squares. I definately took a step back after just one little buscuit on the tablesaw. I don't have a bandsaw yet, so i guess i will have to put the tiny segmented pieces on the back burner for now. bummer..
PTownSubbie
Member
Cutting sled
Ron,
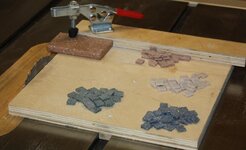
I created a very easy sled that rides in the miter slot. I put a hold down on it to be able to cut the small segments.
If you put your fence with a cutoff piece of wood clamped to it but don't extend it all the way past the saw blade. As the pieces are cut they fall into a pile next to the blade rather than getting shot at you like you spoke of. Never put the fence right against the cutoff piece. That is a sure way to get a projectile.
I hope the pictures help explain what I was talking of.
Ron,
I created a very easy sled that rides in the miter slot. I put a hold down on it to be able to cut the small segments.
If you put your fence with a cutoff piece of wood clamped to it but don't extend it all the way past the saw blade. As the pieces are cut they fall into a pile next to the blade rather than getting shot at you like you spoke of. Never put the fence right against the cutoff piece. That is a sure way to get a projectile.
I hope the pictures help explain what I was talking of.
Attachments
Jim15
Member
Thanks for the post Fred.
PTownSubbie
Member
More details for cutting
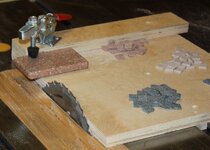
Some people have asked for some more details on how to get the same cut dimensions and do it safely. I think these pics will show a bit more on how to do it.....
You have to take your sled and place it next to your blade. Take a scap piece of wood and place it between your fence and your blade.

Next, move your fence and scrap wood to get the thickness that you want. Once you are there, lock your fence in that position. Mine is set for 1/8".

Now take your scrap piece of wood and move it backwards so that it is not next to your blade. This will allow you to make cuts and not pinch the cutoff piece between the blade and the fence. Make sure you clamp your scrap wood to the fence so that you get accurate cuts each time.


Take your material and push it against your scrap wood on your fence and clamp it in position. This will give you the 1/8" cutoff that you are looking for each time and the cutoff will fall next to the blade rather than becoming a projectile. You can continue to cut and the pieces will stack up between the blade and the fence area. MAKE SURE YOU TURN OFF YOUR BLADE BEFORE YOU EVEN THINK ABOUT REACHING TO RETRIEVE ANY PIECES!!!


A zero clearance insert is a must to prevent your pieces from falling through the opening.
Hopefully this clarifies an easy and safe way to cut these small segments. Key is keeping your fingers away from the saw blade and not pinching the cutoffs causing projectiles......
Good luck and be careful!!!
Some people have asked for some more details on how to get the same cut dimensions and do it safely. I think these pics will show a bit more on how to do it.....
You have to take your sled and place it next to your blade. Take a scap piece of wood and place it between your fence and your blade.
Next, move your fence and scrap wood to get the thickness that you want. Once you are there, lock your fence in that position. Mine is set for 1/8".
Now take your scrap piece of wood and move it backwards so that it is not next to your blade. This will allow you to make cuts and not pinch the cutoff piece between the blade and the fence. Make sure you clamp your scrap wood to the fence so that you get accurate cuts each time.
Take your material and push it against your scrap wood on your fence and clamp it in position. This will give you the 1/8" cutoff that you are looking for each time and the cutoff will fall next to the blade rather than becoming a projectile. You can continue to cut and the pieces will stack up between the blade and the fence area. MAKE SURE YOU TURN OFF YOUR BLADE BEFORE YOU EVEN THINK ABOUT REACHING TO RETRIEVE ANY PIECES!!!
A zero clearance insert is a must to prevent your pieces from falling through the opening.
Hopefully this clarifies an easy and safe way to cut these small segments. Key is keeping your fingers away from the saw blade and not pinching the cutoffs causing projectiles......
Good luck and be careful!!!
Jim15
Member
Thanks Fred, appreciate you taking time to post this.
Now it is clear as mud! No really, The part about the scrap board clamped to teh fence, and the use of only one side of the table had me cornfused until now! Being one of the askers of clarification, this was very appreciated! Now i have hope once again!
TBCbushings
Member
I get the way you cut them but how do you assemble them?? I have always wanted to see how its done....
Thanks,
Brian
Thanks,
Brian