egnald
Member
Greetings from Nebraska.
I think I have finally established a regimen for making custom finials for the Legacy, Upgraded Junior Gentleman kits.
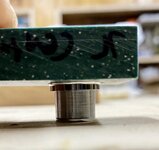
Turning: I started out by epoxying my leftover bit of blank to a 3/4-inch square dowel and holding it in my pen drilling jaws for turning. This worked out pretty good, but it made me a little nervous turning something so small up next to that big spinning chuck. About a week ago though I broke down and bought a collet chuck along with a set of ER32 collets. For the last couple of pens I have used hot melt glue to glue the leftover bit of blank to a 3/4-inch round dowel and holding it in the 3/4-inch collet. I think this has worked out really good.
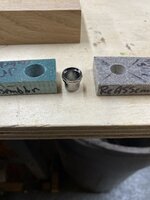
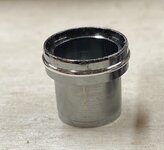
Turning: I started out using calipers to turn the finial down to size, but after doing a few measurements I found that the metal finial the is pressed out is just over 10mm in diameter, so I started using a 10mm open end wrench as my gauge for turning the tenon part of the finial. Even though they are a bit undersized, with the additional thickness of the CA and the tolerances of the parts, they fit very nicely.
Finishing: I started by using my standard CA finish along with wet sanding with MicroMesh before parting the finial off. I was not happy with how easy it was to sand through on the finial. For the past couple of kits, I still used a CA finish, but I cut the number of coats of both thin and medium in half and I have foregone the MicroMesh. I suppose it is because of the reduced number of coats and the fact that the finial is so small that the CA seems to go on very evenly and it dries very glossy. As long as they continue to look as good as the last few have I will forego the MicroMesh completely - time will tell.
Parting off: I started by parting the finial all the way off using a carbide parting tool, but after doing a few I started stopping when the tenon was about 5/32 of an inch and then sawing the part off with a fine tooth pull saw. The tenon fits easily in the hole where the commercial finial was.
I use a scratch awl to scuff up the metal in the cap before epoxying the finial in place.
Thank You to everyone who encouraged me to take this baby step into customizing. I am really hooked on this custom finial thing. Who knows, maybe some day I will get enough courage (and tools) to make something kit-less.
Regards,
Dave
PS I just finished the finial for a pen made from a Lacewood blank. I will post the finished pen to the "Show Off Your Pens!" forum when I get the rest of it completed.
I think I have finally established a regimen for making custom finials for the Legacy, Upgraded Junior Gentleman kits.
Turning: I started out by epoxying my leftover bit of blank to a 3/4-inch square dowel and holding it in my pen drilling jaws for turning. This worked out pretty good, but it made me a little nervous turning something so small up next to that big spinning chuck. About a week ago though I broke down and bought a collet chuck along with a set of ER32 collets. For the last couple of pens I have used hot melt glue to glue the leftover bit of blank to a 3/4-inch round dowel and holding it in the 3/4-inch collet. I think this has worked out really good.
Turning: I started out using calipers to turn the finial down to size, but after doing a few measurements I found that the metal finial the is pressed out is just over 10mm in diameter, so I started using a 10mm open end wrench as my gauge for turning the tenon part of the finial. Even though they are a bit undersized, with the additional thickness of the CA and the tolerances of the parts, they fit very nicely.
Finishing: I started by using my standard CA finish along with wet sanding with MicroMesh before parting the finial off. I was not happy with how easy it was to sand through on the finial. For the past couple of kits, I still used a CA finish, but I cut the number of coats of both thin and medium in half and I have foregone the MicroMesh. I suppose it is because of the reduced number of coats and the fact that the finial is so small that the CA seems to go on very evenly and it dries very glossy. As long as they continue to look as good as the last few have I will forego the MicroMesh completely - time will tell.
Parting off: I started by parting the finial all the way off using a carbide parting tool, but after doing a few I started stopping when the tenon was about 5/32 of an inch and then sawing the part off with a fine tooth pull saw. The tenon fits easily in the hole where the commercial finial was.
I use a scratch awl to scuff up the metal in the cap before epoxying the finial in place.
Thank You to everyone who encouraged me to take this baby step into customizing. I am really hooked on this custom finial thing. Who knows, maybe some day I will get enough courage (and tools) to make something kit-less.
Regards,
Dave
PS I just finished the finial for a pen made from a Lacewood blank. I will post the finished pen to the "Show Off Your Pens!" forum when I get the rest of it completed.