Correcting Segmenting Offsets

Signed-In Members Don't See This Ad

Krash

Member
Joined
Feb 10, 2014
Messages
1,259
Location
Albuquerque, NM
I was frustrated with the offset I got when my saw kerf didn't match my segmenting material. I envisioned the issue with the material removed and how I might correct it.

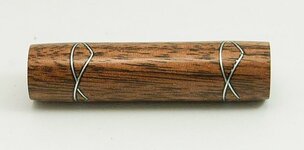
The first picture is a pen without the correction.


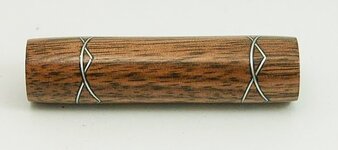
The second picture is my first attempt with the correction. It obviously isn't foolproof yet but it is closer. I probably should have chosen an easier design for my first attempt.


The third attachment is my correction writeup for anybody that is interested.

Let me know what you think.
 

Attachments

  • photo1.JPG
    photo1.JPG
    106.4 KB · Views: 432
  • red-orange heart.jpg
    red-orange heart.jpg
    295.1 KB · Views: 451
  • Offset realign.pdf
    142.6 KB · Views: 358
Signed-In Members Don't See This Ad

skiprat

Passed Away Mar 22, 2022
In Memoriam
Joined
Oct 19, 2006
Messages
7,812
Location
In a Skip in Wales
First off, I love the designs on both. Top class, even with what you think are faults.
I think there are a number of ways of dealing with it. Work with it and even accentuate it to look more deliberate. Even with errors, the design is cool, but they must look consistent. You can't have one side looking 'close' and the other being miles away.
For me, this is quite difficult to achieve when you use four different sides and an end of the blank as your references for each cut. Then you need to find the exact middle to drill the hole..
One trick is of course just to not cut all the way through. This keeps the blank aligned for each successive cut.
Some people think that means you can't cut a complete V cut through a blank. But you can....just needs a little thought. Perhaps a little bit of scrap thin mdf will help...:) 0

For me, the absolute best way is to use only the centre line of the blank for every cut and for the hole.

I've shown loads of pics where I do segmenting on my lathe.
Granted, not everyone has a metal lathe but I hope some folks have been able to adapt my ideas so they can make wooden jigs etc.

Search the site for how jtclockman used his lathe for segmenting too.

Accurate segmenting isn't impossible. The only things that are, are avoiding death and slamming a revolving door......:)
 

BSea

Member
Joined
Dec 28, 2009
Messages
4,628
Location
Little Rock, Arkansas
Is there a write-up for those of us who don't remember 40 years ago what we earned in geometry? :confused: What I got out of it was: Make sure your inset material is the same thickness as your kerf.:redface:

I really do like the results you're getting. Very Impressive.
 

Krash

Member
Joined
Feb 10, 2014
Messages
1,259
Location
Albuquerque, NM
First off, I love the designs on both. Top class, even with what you think are faults.
I think there are a number of ways of dealing with it. Work with it and even accentuate it to look more deliberate. Even with errors, the design is cool, but they must look consistent. You can't have one side looking 'close' and the other being miles away.
For me, this is quite difficult to achieve when you use four different sides and an end of the blank as your references for each cut. Then you need to find the exact middle to drill the hole..
One trick is of course just to not cut all the way through. This keeps the blank aligned for each successive cut.
Some people think that means you can't cut a complete V cut through a blank. But you can....just needs a little thought. Perhaps a little bit of scrap thin mdf will help...:) 0

For me, the absolute best way is to use only the centre line of the blank for every cut and for the hole.

I've shown loads of pics where I do segmenting on my lathe.
Granted, not everyone has a metal lathe but I hope some folks have been able to adapt my ideas so they can make wooden jigs etc.

Search the site for how jtclockman used his lathe for segmenting too.

Accurate segmenting isn't impossible. The only things that are, are avoiding death and slamming a revolving door......:)

Thanks Steve,
You make some amazing pens even if your equipment is a bit more advanced than mine. It causes me to want to refine my process to achieve the same, or close to the same, with more common equipment.
I will give wooden jigs some thought. Do you know of any posts up on the subject?
 

jfoh

Member
Joined
May 27, 2007
Messages
390
Here are a few of the things I have found needed to keep the lines straight and all the inserts lined properly. Insert material must be the same thickness of the saw kerf. Best to leave just a little material so the blank is intact and you are just inserting something to fill the saw kerf you just made. Do not over clamp and cause the joint to be starved for glue. Blanks need to be exactly square and all corners 90°. I mark the center line of all four sides and both ends to keep everything in perspective. Go slow and think before you cut the next segment. Take time to do it right the first time. Repairs are impossible to hide. I use slow set epoxy so I have a lot of working time. To be more efficient I do multiples of the same blank. Ever finish a long involved blank and want another one right away?

Failure is just another way to create you next inspiration.
 

Krash

Member
Joined
Feb 10, 2014
Messages
1,259
Location
Albuquerque, NM
Here are a few of the things I have found needed to keep the lines straight and all the inserts lined properly. Insert material must be the same thickness of the saw kerf. Best to leave just a little material so the blank is intact and you are just inserting something to fill the saw kerf you just made. Do not over clamp and cause the joint to be starved for glue. Blanks need to be exactly square and all corners 90°. I mark the center line of all four sides and both ends to keep everything in perspective. Go slow and think before you cut the next segment. Take time to do it right the first time. Repairs are impossible to hide. I use slow set epoxy so I have a lot of working time. To be more efficient I do multiples of the same blank. Ever finish a long involved blank and want another one right away?

Failure is just another way to create you next inspiration.

Thanks Jon.

My issue is with segmenting material thinner than my saw kerf. I have done some that matches the material to the saw kerf and they come out perfect. But I love to use aluminum and brass and unless I find a very thin blade, if I want the segments to match up, I need to intervene. My write up was my attempt to solve the issue. But, yours and Steve's suggestion to reference all cuts from the center line is a good one and one I will employ!
 

Krash

Member
Joined
Feb 10, 2014
Messages
1,259
Location
Albuquerque, NM
Is there a write-up for those of us who don't remember 40 years ago what we earned in geometry? :confused: What I got out of it was: Make sure your inset material is the same thickness as your kerf.:redface:

I really do like the results you're getting. Very Impressive.


Well, I was kind of hoping my write up would intice people to try another procedure if your material is not the same thickness as your kerf. Matching the thicknesses is well known to be an accurate way to get the inserts matching so no additional steps would be needed.

But, if you are just wanting a very slim accent, matching the segmented material to your kerf can tend to garner more attention, i.e. be thicker, than desired. So, your choices are to either cut some segments that do not intersect or put up with the offset. Now, as Steve said, the offset can be beautiful also so there is no intent to disparage the work or final products of those using the intersecting cuts currently. I will still use them also because they have their own appeal. But, this forum is famous for pushing the limits by not always accepting the status quo. I saw it posted many times that it is impossible to avoid these offsets. My write up shows that this is an incorrect statement.

So, as with any other posted suggestion or procedure, the wood artists here will attempt to employ the idea if they think it will make their product better or more appealing. Usually, if the idea has merit and is employed to gain experience, some amazing results are achieved that make others say, "How'd you do that?" which points them back to the original idea or procedure to start their own journey of trial and error to gain the critical experience. Hopefully my write up will serve that purpose in the future.

... and thanks for the complement!
 

jfoh

Member
Joined
May 27, 2007
Messages
390
Krash what are you using to make your cuts? You can get very, very thin table saw blades, even thinner band saw blades but thin is expensive. I have made several table saw and band saw table jigs to hold work exactly for each cut. You need accuracy as well as reproducible cuts when doing segmented blanks. Be off more than a 1/64" and it can show when turning pens. Small things are very unforgiving.
 

Jim Burr

Banned
Joined
Feb 23, 2010
Messages
3,060
Location
Reno, Nv
Couple of thoughts Kelly...there is more than one way to make a cut. A more suitably sized blank may be helpful...trying to make a Euro style from a Slim may not be a good idea. Sierra Vista, Cigar, Jr Gent are some beefy blanks to practice on...and you only need the tubes! If it sucks, try again and you save a kit.
 

Krash

Member
Joined
Feb 10, 2014
Messages
1,259
Location
Albuquerque, NM
Krash what are you using to make your cuts? You can get very, very thin table saw blades, even thinner band saw blades but thin is expensive. I have made several table saw and band saw table jigs to hold work exactly for each cut. You need accuracy as well as reproducible cuts when doing segmented blanks. Be off more than a 1/64" and it can show when turning pens. Small things are very unforgiving.

I used a bandsaw. And, yes, I need to figure out some jigs to make my cuts more accurate if I am going to try to do more of this complexity. I am just getting my feet wet, actually drowning right now, so I need to do some engineering to get better. If you have some pictures of your bandsaw jigs, I would be very interested in what you came up with. No use reinventing the wheel!
 

Krash

Member
Joined
Feb 10, 2014
Messages
1,259
Location
Albuquerque, NM
Couple of thoughts Kelly...there is more than one way to make a cut. A more suitably sized blank may be helpful...trying to make a Euro style from a Slim may not be a good idea. Sierra Vista, Cigar, Jr Gent are some beefy blanks to practice on...and you only need the tubes! If it sucks, try again and you save a kit.

Very true Jim!
 

Krash

Member
Joined
Feb 10, 2014
Messages
1,259
Location
Albuquerque, NM
I am preparing this write up for submittal to the IAP library thru Wayne. One of the things he wants is more pictures. I had always intended to do a blank with identical segments, one with my offset correction and one without so that the difference would be obvious for comparison.

So, I set out Friday last to do just that. I didn't try to match up any segments but just followed my own instructions to see where I ended up. Attached is the result. Normal on the left, correction on the right.

My goal is to write up a procedure that is easy to follow and apply since many of the reactions to my original write up were ones of confusion. I admit that the math can be intimidating so I want to downplay having to understand why it works and just provide the steps how to apply it. I have a lot of photos ready that show exactly how I did this test blank as an example for anyone wanting to try the process. Be looking for the library submission soon.

Please feel free to provide feedback and suggestions, especially any that you think would make the write up more user friendly. I would really appreciate your involvement in this process.

Thanks,
 

Attachments

  • image.jpg
    image.jpg
    46.8 KB · Views: 164

mark james

IAP Collection, Curator
Joined
Sep 6, 2012
Messages
12,772
Location
Medina, Ohio
The corrections are easy to see - Good job fixing the problem.

I look forward the the Library Addition as I am just starting to play with segmenting.

For Father's Day I got the Incra Miter Gauge 1000 HD from my 3 kids!!!:biggrin:
 
Top Bottom