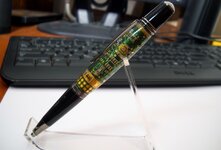
Computer chip

Signed-In Members Don't See This Ad
See more from lyonsacc

lyonsacc

Member
Joined
Aug 31, 2012
Messages
1,615
Location
Cincinnati, OH
This pen did not want to be made, but I finally completed it last night. I had a customer ask for a green computer chip pen with a gun metal finish. So, I ordered a blank, which I promptly screwed up on the lathe (my fault), and a pen kit - which was the wrong finish (again, my fault). Ordered the right kit and picked up a new blank. Turned it down to the right size and set it down on my work table. Got up to get some sandpaper and bumped into a saw horse, which made my dust collector hose slide off, which hit a spare piece of wood on my table, which fell onto the freshly turned pen blank, knocking it over, which caused it to roll onto the hard cement basement floor. I've dropped plenty of blanks and never had a problem. Well, this one hit the floor just right a cracked. I tried to fix it with CA, but you could still see the cracks when it was polished up. Finally picked up another blank last weekend. Had a few moments last night to turn it and finish it up. I think it turned out OK. Not the happiest with the curve of the blank on the writing end, but had to get it down to size without catching any of the fun little computer things on the blank. I ended up spending more on blanks and kits than I sold the pen for, but the customer will be happy. I will add, it was very relaxing to turn and finish this one last night. I don't have much extra time right now (work is pretty busy), but it really enjoyed the time in the turnery.

Dave
 

Attachments

  • 3-5-14 044.jpg
    3-5-14 044.jpg
    142.3 KB · Views: 429
Signed-In Members Don't See This Ad

Edgar

New Member Advocate
Staff member
Joined
Feb 6, 2013
Messages
6,900
Location
Alvin, TX 77511
The shape of the blank looks just fine to me & the finish is great.
Nice job - congratulations on overcoming the shop gremlins.
 

Edward Cypher

Member
Joined
Feb 8, 2011
Messages
1,901
Location
Denver, Colorado
Old murphy does show up when you least want him too. The combination of events you probably cannot dublicate in a hundred attempts. It happens to all of us. Glad you got the pen done. Looks nice and I am sure he will like it.
 

gimpy

Member
Joined
Mar 10, 2012
Messages
2,585
Location
Danville, Pa
Great looking pen,
fit looks good,

When I have finished
blanks , I always lay the
on a cotton bath towel
Thus, stopping them from
rolling
 

Jim Smith

Member
Joined
Jul 27, 2008
Messages
1,962
Location
Lakeland, FL
I find that those blanks in particular seem to chip or crack very easily. Like others, I have a few standing by that need repairs because the PR they use is so brittle. Not to make light of your experience, but I had to chuckle a bit when you described the Rube Goldberg effect that took out your last blank. We've all had stuff like that happen, but I'm usually trying to grab stuff to prevent an accident so I never get to track everything that precedes the blanks hitting the floor. BTW, you pen looks great and I'm sure the customer will be pleased and show it off to all of his friends.

Jim Smith
 

larryc

Member
Joined
Oct 2, 2009
Messages
1,135
Location
Mableton, GA (Near Atlanta)
Looks great.
I've made and sold quite a few of those and I find that if you make it for the Sierra Vista you have more material to work with. Also I never let a metal tool touch that blank. It's flap disc sanding wheel to take off the corners and then sandpaper down to size.

We've all had our run ins with the infamous Murphy.
 

Lenny

Member
Joined
Jan 6, 2009
Messages
3,475
Location
Searsport, Maine
The circuit board pens can be repaired pretty easily with a little Polyresin. I had some chips on the end of one and fixed it by recasting. Turned a tapered plug to keep the resin out of the tube, stuck it into the end of a short piece of 3/4 pvc pipe (just enough to cover the chipout) that i stick into a hole in a piece of 2x4. .... mixed up a little resin to pour around the blank. Worked pretty well with no sign of where the patch was after turning.
 

lyonsacc

Member
Joined
Aug 31, 2012
Messages
1,615
Location
Cincinnati, OH
The circuit board pens can be repaired pretty easily with a little Polyresin. I had some chips on the end of one and fixed it by recasting. Turned a tapered plug to keep the resin out of the tube, stuck it into the end of a short piece of 3/4 pvc pipe (just enough to cover the chipout) that i stick into a hole in a piece of 2x4. .... mixed up a little resin to pour around the blank. Worked pretty well with no sign of where the patch was after turning.

Lenny,

I don't cast - yet. But I am saving the chipped ones just in case I do start to cast some day.

Dave
 

eranox

Member
Joined
Sep 12, 2012
Messages
322
Location
Killeen, TX
Glad you didn't let unfortunate events get the better of you. Your customer will certainly be appreciative. That's a beauty!
 

Quality Pen

Member
Joined
Feb 2, 2014
Messages
1,403
Location
Lumberton, Texas
This pen did not want to be made, but I finally completed it last night. I had a customer ask for a green computer chip pen with a gun metal finish. So, I ordered a blank, which I promptly screwed up on the lathe (my fault), and a pen kit - which was the wrong finish (again, my fault). Ordered the right kit and picked up a new blank. Turned it down to the right size and set it down on my work table. Got up to get some sandpaper and bumped into a saw horse, which made my dust collector hose slide off, which hit a spare piece of wood on my table, which fell onto the freshly turned pen blank, knocking it over, which caused it to roll onto the hard cement basement floor. I've dropped plenty of blanks and never had a problem. Well, this one hit the floor just right a cracked. I tried to fix it with CA, but you could still see the cracks when it was polished up. Finally picked up another blank last weekend. Had a few moments last night to turn it and finish it up. I think it turned out OK. Not the happiest with the curve of the blank on the writing end, but had to get it down to size without catching any of the fun little computer things on the blank. I ended up spending more on blanks and kits than I sold the pen for, but the customer will be happy. I will add, it was very relaxing to turn and finish this one last night. I don't have much extra time right now (work is pretty busy), but it really enjoyed the time in the turnery.

Dave


Haha, that is quite the ordeal! I am not laughing at you -- with you in a relieving sort of way :wink:

It looks great. I bet the customer will love it. Be sure to let them know it means a lot to you and you worked 2, 3 times? as hard on it lol.
 

Tom T

Member
Joined
May 12, 2012
Messages
1,883
Location
Sanford Florida
Great looking pen for sure. They are killer to turn.
I have repaired many with CA glue as I do not cast either. It takes a while to learn as some one else has said, sand only. I have cut several but now I sand only.
Take the flat side off on a small bench top disk sander. Then put it on the lathe and sand it down. That may be cheating but after repairing 10 or so that's what I do. If I turn them I use a roughing gouge on edge and cut with the blank.
Keep up the great work.
 

OZturner

Member
Joined
Aug 5, 2013
Messages
6,662
Location
Sydney. NSW. Australia
Dave, Your story reads like a script for "The Three Stooges"
As Edward said a true Murphy moment.
The finished item, looks Great.
I can't see any problem with the diameter at the Nib end.
Your Fit and Finish is Excellent.
Congratulations on an expensive lesson.
Brian.
 
Top Bottom