Rich L
Member
This is my first large post on this forum - let's see how it goes ... jes' sharing.
I've been thinking a long time about trying to make some kind of tassie for the finials on my pens and I wanted to keep it in silver and I wanted to do it myself. Stubborn me. So, I have this pantograph and I have Adobe illustrator and I have a bunch of other things in the shop that will come into play.
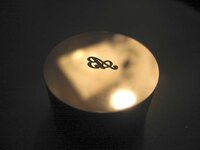
First I drew up my Argent Blue logo in Illustrator and with considerable malice aforethought I did it at the proper size. It was 8 times bigger than the desired final size. With a pantograph reduction of 8 to 1 I get an 8mm logo final size.
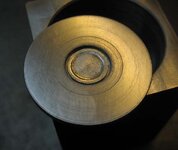
Second I made the master pattern for the copy side of the pantograph (picture attached). It's made of two layers of white plexiglas cemented together by letting capillary action acetone do its thing. The "islands" were carefully placed and cemented the same way. Virtually any imperfection in smoothness of the lettering or placement of the islands is reduced to imperceptibility at the final size. The pattern was all cut out by hand using the old Dremel for roughing and files for finishing. It looks like there are rough edges in the picture but it's just residue - an artifact of the cementing process at the bottom of the pattern layer.
Next I cut off about a .75 inch chunk of 1.25 inch diameter W1 steel to make the die. I ground flat both sides of the W1 die blank, clamped the plexiglas pattern down on the copy table and the die on the work table. Now the delicate part.
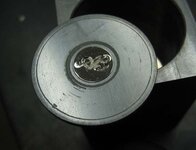
To make the copy milling process work with the logo I have and the reduction ratio I had to use, it required a 1/64" (!) diameter end mill. After about two hours of careful milling taking off only .001 at a time and going through two of those suckers (you look at them cross-eyed and they break) I had my copied impression in the die. The depth is .010" That's plenty to make a raised "coining" on a silver surface and even at that shallow a depth it requires a good smack. I had to polish the surface of the die so that I automatically get a polished recessed surface on the coined surface. I wrapped the die in stainless foil, heat treated it to 64 HRC (1450ºF for 1 hour 30 minutes, quenched in water) and then tempered it back to ~59 HRC (500ºF for 2 hours) and polished it again.
This is still work in progress and I need to make a "smacking" jig to hold either the finials themselves or some disks that I will inlay into the finials. I wish I had about a 20T press instead but I think this will work.
Fast forward 2 days ...
Whackeroo jig...
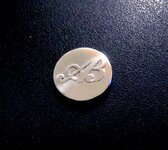
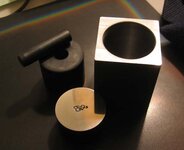
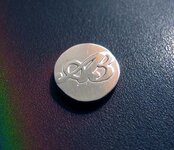
Here's the complete system and a test on a piece of scrap silver .060 thick. All pieces are hardened except for the square container. The main punch (the 3/8 piece sticking up was made out of O1 quenched in cottonseed oil. The punch guide was made from W1 quenched in water. All tempered back to around 59 - 60 HRC. I whacked it once with a 2 lb hammer and got a pretty good result, I thought.
The next thing is to make a thin guide bushing to hold and center the buttons I'll coin. I think I'll use 10mm blanks so the bushing will have a centered 10mm hole. After striking the blank the bushing will ensure a consistent final size.
Cheers,
Rich
I've been thinking a long time about trying to make some kind of tassie for the finials on my pens and I wanted to keep it in silver and I wanted to do it myself. Stubborn me. So, I have this pantograph and I have Adobe illustrator and I have a bunch of other things in the shop that will come into play.
First I drew up my Argent Blue logo in Illustrator and with considerable malice aforethought I did it at the proper size. It was 8 times bigger than the desired final size. With a pantograph reduction of 8 to 1 I get an 8mm logo final size.
Second I made the master pattern for the copy side of the pantograph (picture attached). It's made of two layers of white plexiglas cemented together by letting capillary action acetone do its thing. The "islands" were carefully placed and cemented the same way. Virtually any imperfection in smoothness of the lettering or placement of the islands is reduced to imperceptibility at the final size. The pattern was all cut out by hand using the old Dremel for roughing and files for finishing. It looks like there are rough edges in the picture but it's just residue - an artifact of the cementing process at the bottom of the pattern layer.
Next I cut off about a .75 inch chunk of 1.25 inch diameter W1 steel to make the die. I ground flat both sides of the W1 die blank, clamped the plexiglas pattern down on the copy table and the die on the work table. Now the delicate part.
To make the copy milling process work with the logo I have and the reduction ratio I had to use, it required a 1/64" (!) diameter end mill. After about two hours of careful milling taking off only .001 at a time and going through two of those suckers (you look at them cross-eyed and they break) I had my copied impression in the die. The depth is .010" That's plenty to make a raised "coining" on a silver surface and even at that shallow a depth it requires a good smack. I had to polish the surface of the die so that I automatically get a polished recessed surface on the coined surface. I wrapped the die in stainless foil, heat treated it to 64 HRC (1450ºF for 1 hour 30 minutes, quenched in water) and then tempered it back to ~59 HRC (500ºF for 2 hours) and polished it again.
This is still work in progress and I need to make a "smacking" jig to hold either the finials themselves or some disks that I will inlay into the finials. I wish I had about a 20T press instead but I think this will work.
Fast forward 2 days ...
Whackeroo jig...
Here's the complete system and a test on a piece of scrap silver .060 thick. All pieces are hardened except for the square container. The main punch (the 3/8 piece sticking up was made out of O1 quenched in cottonseed oil. The punch guide was made from W1 quenched in water. All tempered back to around 59 - 60 HRC. I whacked it once with a 2 lb hammer and got a pretty good result, I thought.
The next thing is to make a thin guide bushing to hold and center the buttons I'll coin. I think I'll use 10mm blanks so the bushing will have a centered 10mm hole. After striking the blank the bushing will ensure a consistent final size.
Cheers,
Rich
Attachments


Last edited: