Chinese Laser Engraver

Signed-In Members Don't See This Ad

BRobbins629

Passed Away Dec 28, 2021
In Memoriam
Joined
Mar 8, 2006
Messages
4,037
Location
Richmond, VA, USA.
At 1W, paper and perhaps cardboard are possible, at 5W, it should be able to cut balsa wood and perhaps some other materials.

Not sure if the gearbest laser will support a router, but if you do want a dual machine, you might consider a CNC for the main machine and run a laser as the alternative. Not sure how strong the stepper motors are on the larger gearbest machine, but on the small one, they are merely parts from a CD drive.

I am not really interested in cutting things with the laser so based on your input I would be just as well off with the 2.5 as the 5 if all I really want is the engraving/burning capabilities.

As far as the stepper motors they do look to be beefier than the small unit although I have no domain experience here. Are you able to deduce anything from the many pictures shown at the link? Based on mass alone I would not think that the mass of the laser unit was much different to a dremel so I would guess it could handle that. A small router would be heavier but not sure how to gauge if the motors could cope. The gantry looks to be plenty sturdy enough.

2500mw A5 Mini Laser Engraving Machine-178.92 | GearBest.com

Yes, the stepper motors and support should be able to handle a dremel or a Foredom type spindle. Actually for that price, not a bad deal. The only thing you will have to work out is how to talk to the control board which may be proprietary. There are ways around that with a different board, but then you are into wiring, etc. Very doable, but you will have to do some electronics.
 
Signed-In Members Don't See This Ad

WWorkman

Member
Joined
Jun 14, 2016
Messages
54
Location
Madison Indiana
Security question

I see that some have said they had to turn off their security software to install the Chinese laser. Being that the Chinese are so adept at writing malware into their installs, how can one be sure that your pc does not get infected. My concern is because I just purchased a new one and I don't want to get any sneaky malware on it. So in the end has anyone had any "known" problems after the install ?


Added: I was specifically looking at this model which uses Benbox software:

http://www.gearbest.com/3d-printers-3d-printer-kits/pp_290388.html
 
Last edited:

ssalvage

Member
Joined
Mar 10, 2016
Messages
61
Location
SoCal
I see that some have said they had to turn off their security software to install the Chinese laser. Being that the Chinese are so adept at writing malware into their installs, how can one be sure that your pc does not get infected. My concern is because I just purchased a new one and I don't want to get any sneaky malware on it. So in the end has anyone had any "known" problems after the install ?


Added: I was specifically looking at this model which uses Benbox software:

1600mw A5 Mini Laser Engraving Machine-169.67 | GearBest.com

This was my concern as well, which is why I opted to go with a really old, air gapped laptop that I had laying around. I'll never have to worry about what may or may not be included in the software. The double bonus is that it now makes the entire system portable as well. :good:

I realize this is not an option for everybody, so I think the next best option is to make sure you have a good AV software running (at all times), and only make an exclusion for the necessary software files. An even safer approach (may be overkill for some) would be to disable your network connection then allow the exclusions only while you are running the software. When you are done, remove the AV exclusions, and then re-enable your network connection.

While I am at it, I'll also mention the critical nature of having backupS of your important data! (yes the last S was capitalized on purpose. you should have (a) backup(s) of your data, and also (a) backup(s) of your backup). I can't begin to tell you how many hearts I've broken over the years because someone got a virus, or had a hard drive crash, or whatever... and they had no backups. Data gone!

OK, I will get off my soapbox now. Sorry for drifting off topic, but that's what almost 25 years in IT networking & security will do to you. :biggrin:
 

duncsuss

Member
Joined
Jun 29, 2012
Messages
2,160
Location
Wilmington, MA
I opted to go with a really old, air gapped laptop that I had laying around.

That's what I did too. It was on the net for the length of time it took to download the software installer, then I turned the WiFi off *before* running the installer.

It will not be connected to my home network again -- I'm treating it as if it has been infected with virus/trojan/malware even if it hasn't.
 
Last edited:

duncsuss

Member
Joined
Jun 29, 2012
Messages
2,160
Location
Wilmington, MA
As far as the stepper motors they do look to be beefier than the small unit although I have no domain experience here ... Based on mass alone I would not think that the mass of the laser unit was much different to a dremel so I would guess it could handle that ...

Remember that a rotary tool generates mechanical forces, so there's more than its mass to consider. You know what happens if you touch a Dremel bit to a workpiece and you aren't holding tight :rolleyes:

There's really no way of knowing whether the gantry and stepper motors will handle those forces without trying it. I hope it works for you -- let us know how it goes :biggrin:
 

BRobbins629

Passed Away Dec 28, 2021
In Memoriam
Joined
Mar 8, 2006
Messages
4,037
Location
Richmond, VA, USA.
As far as the stepper motors they do look to be beefier than the small unit although I have no domain experience here ... Based on mass alone I would not think that the mass of the laser unit was much different to a dremel so I would guess it could handle that ...

Remember that a rotary tool generates mechanical forces, so there's more than its mass to consider. You know what happens if you touch a Dremel bit to a workpiece and you aren't holding tight :rolleyes:

There's really no way of knowing whether the gantry and stepper motors will handle those forces without trying it. I hope it works for you -- let us know how it goes :biggrin:
Forgot to mention you will also need a z axis to do CNC. Another reason to get a CNC and convert to laser for a dual machine.
 

kentonjm

Member
Joined
Jul 12, 2016
Messages
149
Location
Phoenix, AZ
Forgot to mention you will also need a z axis to do CNC. Another reason to get a CNC and convert to laser for a dual machine.

For this specific application I was thinking of having a 'manual' z axis such that one could do relatively simple things such as carved lettering rather than burned. For more complex image carving a working computer controlled z axis would be essential.

I have accesses to a large 4'x8' CNC rig but its rather overkill for small work. Starting with the $80 pricetag of the small unit that kicked off this thread I am very interested to see what I can achieve on a low budget. If I go for this 5x7 unit I am now at either $160 or $315 depending on the power of the laser I pick. I would guess that the budget CNC rigs are still going to be more than this, do you have any pointers as to where I should look as all the stuff I have seen at retails starts way over $1K.
 

TonyL

Member
Joined
Mar 9, 2014
Messages
8,916
Location
Georgia
With respect to the 1w (1000mw) engraver, what distant between the head of the laser and surface of the wood do you all maintain? Or is that something that you control with burn time? Thank you.
 

mecompco

Member
Joined
Apr 24, 2015
Messages
1,607
Location
Fairfield, Maine
With respect to the 1w (1000mw) engraver, what distant between the head of the laser and surface of the wood do you all maintain? Or is that something that you control with burn time? Thank you.

The physical distance between the bed and the laser head is right about 2". Probably the tallest item I've done is .75" or so (a wooden pen box). IDK if the laser will focus with really tall items. Basically, one focuses the laser for the smallest spot on the item being engraved. I don't think the burn time really cares much about the distance (it's light, after all) but the focus must be more-or-less correct.
 

wood-of-1kind

Member
Joined
Jul 10, 2005
Messages
4,115
Location
Toronto, ON, Canada
With respect to the 1w (1000mw) engraver, what distant between the head of the laser and surface of the wood do you all maintain? Or is that something that you control with burn time? Thank you.

The physical distance between the bed and the laser head is right about 2". Probably the tallest item I've done is .75" or so (a wooden pen box). IDK if the laser will focus with really tall items. Basically, one focuses the laser for the smallest spot on the item being engraved. I don't think the burn time really cares much about the distance (it's light, after all) but the focus must be more-or-less correct.

So far the "tallest" item that I have been able to laser with good "clear" results (font) is just under 1 inch. I have been playing with the silver ring both in a clockwise and counter-clockwise but no luck. This small unit has it's limitations but I still maintain that it is a bargain at this price point.
 

TonyL

Member
Joined
Mar 9, 2014
Messages
8,916
Location
Georgia
I was very pleased with my first few tries. I hoping you all can answer some questions:
Did load the drivers and application from the SD card or from the website?
Is there a way to adjust the focus of the laser?
Do you where the protective glasses?
Did yours come with an AC adapter (I ordered mine from GearBest)?

Thank you for reading!
 

mecompco

Member
Joined
Apr 24, 2015
Messages
1,607
Location
Fairfield, Maine
I was very pleased with my first few tries. I hoping you all can answer some questions:
Did load the drivers and application from the SD card or from the website?
Is there a way to adjust the focus of the laser?
Do you where the protective glasses?
Did yours come with an AC adapter (I ordered mine from GearBest)?

Thank you for reading!

Tony, here's my take on your questions:

1. I turned off my AV and ran the software from the micro SD card. Once installed, I turned the AV back on and let it clean the Trojan that it thinks (or really is) there. The software continues to function, and multiple scans with AVG, MalwareBytes, SuperAntiSpyware, etc. come up clean.

2. The focus is adjusted by turning the chrome ring on the laser head.

3. I do not wear them as I can't see the dimmed-down dot to focus with them on. Once the laser is burning, I put something in front of it to block the light--once the novelty wears off, there's really no reason to watch it, anyway.

4. It is USB powered, so no. One could run it off a standard USB charger if one was short of USB ports on the computer.

Regards,
Michael
 

Stefanino

Member
Joined
Feb 22, 2015
Messages
4
Location
Sardinia
Jig for the engraver?

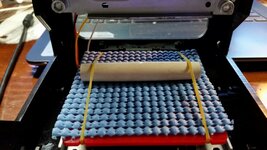
Hi, I'm using it about two weeks. It's fantastic. But for me it is difficult to go straight. Has someone built any jig or are using only the rubber bands on the plate of the carver?
 

TonyL

Member
Joined
Mar 9, 2014
Messages
8,916
Location
Georgia
Thank you Michael. I watched an unboxing video and it indicated an ac adapter, but I'm fine without it. I did overcome the virus alert problem the same way you did (and I'm using window10 with Nortons AV)
Thanks for the help with the focusing . After 6 burns, the novelty has worn off lol. Thank you.

Stefanino, I have been lucky; mine have been straight. However, I was thinking the same thing. There should be something better than just estimating straightness. Thanks guys.
 
Last edited:

Akula

Member
Joined
May 27, 2007
Messages
1,036
Location
seabrook, texas, USA.
To get things straight, I took a piece of graph paper and put it on the bed under the rubber bands. It works ok.

I took two square "chop sticks" LOL from a leftover meal and use them to keep small items held in place while burning. I just slide them in/out to whatever I need to hold.


Really, the only issue I have, is sometimes when I send the image to the laser, then use it to check the burn area...when I return it to center, it seems it has moved off the burn area. That has required me to adjust in my mind where the new burn area will actually be. I just use the arrows to move it up or down a few spots. This is a pretty big deal for me as I need the burn area to be spot on. I might be doing something wrong but a 1/8" in one direction off is important since I'm doing small items that must be centered. Because of this, I have to check the burn area 3 or 4 times to make sure it has not moved from center. I can see where this would be a serious flaw if you tried a pen.
 

TonyL

Member
Joined
Mar 9, 2014
Messages
8,916
Location
Georgia
Which font and pitch (character size)?

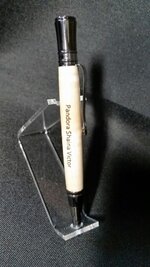
I've been playing with burn depth on the little NEJE, and since I don't fill my engravings on wood pens, I'm liking the burn setting of 75 to produce a nice depth on the engraving. This is recent Curvado in Olive that I made as a gift for a retiring coworker. Thanks for looking.

And thanks again to Michael (the OP) for bringing this little gem to my attention. :)

This is one of the best that I am seen! Which font and pitch did you use please? Did you set the pixels to 500 x 500 (I have not found that to matter so far)? Thank you.


I just noticed that you answered this question. Thank you.

The font is "Constantia", size 40, in MS Paint.
 
Last edited:

mecompco

Member
Joined
Apr 24, 2015
Messages
1,607
Location
Fairfield, Maine
I drew this in Sketchup and printed it. It works pretty well for keeping pens aligned. I use the rubber bands and center the jig on the bed using a machinists rule. I do like the idea of a grid on the bed, and may do that as well.


Anglesachse

Member
Joined
Dec 29, 2014
Messages
154
Location
Rhauderfehn, Germany
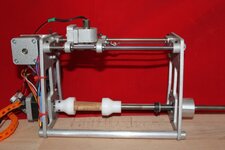
Here`s what I have been trying. The design is based on the "EggBot" from Evil mad scientists.

The Original EggBot: Deluxe Edition

The laser diode (1w) is moved by a stepper motor along the axis of the pen body, which is in turn rotated by a 2nd Stepper.

At the moment I still have software issues, but when it is finished I wit put it as Open Source on the internet.
 

Attachments

  • IMG_6223.jpg
    IMG_6223.jpg
    139.3 KB · Views: 205

Curly

Member
Joined
Nov 20, 2010
Messages
4,851
Location
Saskatoon SK., Canada.
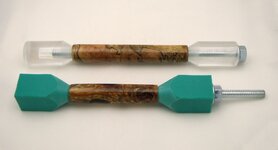
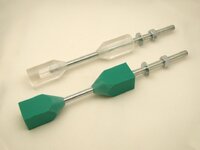
When Marla was getting a local guy to engrave pens I made him a couple barrel holders. The green one was for use flat on the table. The clear was to fit in his rotator. Maybe the green one would work on these lasers. Naturally the engraving is done before assembly. :wink:

attachment.php


attachment.php
 

Attachments

  • Laser holder 1.jpg
    Laser holder 1.jpg
    92.1 KB · Views: 540
  • laser holder 2.jpg
    laser holder 2.jpg
    117.9 KB · Views: 547

TonyL

Member
Joined
Mar 9, 2014
Messages
8,916
Location
Georgia
First attempt. I was pretty pleased with the exception of engraving more for a lefty. I also added rubber padding to the table.

Thanks for answering all my questions and experimenting so I didn't have to.
The pitch was 50, the font was Corbel, and burn rate was 52, It was finished with Pens Plus, but I had tested CA on another blank and it worked fine. I also used the recarving function an another and that worked out well too.
 

Attachments

  • table padding.jpg
    table padding.jpg
    164 KB · Views: 361
  • PSV Corbel.jpg
    PSV Corbel.jpg
    167.6 KB · Views: 377

Stefanino

Member
Joined
Feb 22, 2015
Messages
4
Location
Sardinia
Thank you TonyL, mecompco and Curly :rolleyes:! Good idea those jigs. I think that the barrel holder is ok for me, but we could improve the precision together with the graph paper as said by Akula on the bed under the rubber band.
 

mecompco

Member
Joined
Apr 24, 2015
Messages
1,607
Location
Fairfield, Maine
Thank you TonyL, mecompco and Curly :rolleyes:! Good idea those jigs. I think that the barrel holder is ok for me, but we could improve the precision together with the graph paper as said by Akula on the bed under the rubber band.

I think you're right! The machinists rule goes down to the 64th, but it is a pain. I think graph paper on the bed would speed up calibration considerably. I will say, though, that one can get pretty close with eyeballing it and using the keyboard to move the preview area as necessary.
 

BRobbins629

Passed Away Dec 28, 2021
In Memoriam
Joined
Mar 8, 2006
Messages
4,037
Location
Richmond, VA, USA.
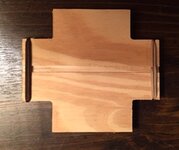
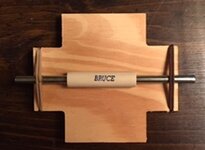
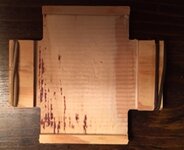
Here's a holder I made from 3/8 plywood. Alignment is just about perfect. On top, blank sits in groove, rod goes through blank and is secured with bands. The bottom is routed out to perfectly fit the red table - can't move up, down or sideways. Although I did this on my CNC, no reason why strips couldn't be glued to the bottom to achieve the same effect. No need to rubber bands that come with unit.

attachment.php


attachment.php


attachment.php
 

Attachments

  • Top holder.JPG
    Top holder.JPG
    39.3 KB · Views: 600
  • Holder with blank.JPG
    Holder with blank.JPG
    28.3 KB · Views: 531
  • Bottom holder.JPG
    Bottom holder.JPG
    35.7 KB · Views: 502
Joined
Nov 29, 2010
Messages
205
Location
Buena Park, California, USA
Thank you TonyL, mecompco and Curly :rolleyes:! Good idea those jigs. I think that the barrel holder is ok for me, but we could improve the precision together with the graph paper as said by Akula on the bed under the rubber band.

Couldn't you just burn the graph lines into the base?

I tried this, and it worked ok, but not great. The base is plastic and glossy, and I was probably too conservative with the burn time. I was able to use some black paint as infill for the grid. I'm thinking of printing a grid on clear, adhesive-backed sheet and putting that on...
 

nodrogs

Member
Joined
Dec 17, 2015
Messages
13
Location
Northern Ireland
Apologies if this has already been answered but would the 1000 mw version burn deep enough to allow me to fill the engraving afterwards? I need to do an engraving on a dark coloured wood.
 

mecompco

Member
Joined
Apr 24, 2015
Messages
1,607
Location
Fairfield, Maine
The 2.5W is now on sale for $159. The url should show you the flash sale price.

2500mw A5 Mini Laser Engraving Machine-180.67 | GearBest.com

It looks like quite an erector set of DIY assembly parts, plus sourcing a table. Might be fun to put together. It's funny that all these low powered lasers list pretty much the same materials that can be engraved/cut. I suppose it would be faster, and the size of the table is significantly larger.
 

TonyL

Member
Joined
Mar 9, 2014
Messages
8,916
Location
Georgia
I don't want to assemble, but I like the larger table and cutting dimensions. I am going to stay with what I have. when it breaks; I will get the bigger one.
 

TonyL

Member
Joined
Mar 9, 2014
Messages
8,916
Location
Georgia
Has any installed the software on a Dell ChromeBook?

I have a Dell notebook, but not a Chromebook, and I had no problems with my notebook (even with Windows 10). I am asking on behalf of a non-local friend - otherwise, I would just walk/drive over to his home and give it a shot.

Thank you.


Separately, perhaps you have tried the following already. It seems like you can take a photo, remove the color and change the picture temperature and make your own engravable images. I would think I am late to the "party" with this idea.

Anyone, any experience with the drivers/application on a Chromebook would be greatly appreciated.

Thank you again.
 

mecompco

Member
Joined
Apr 24, 2015
Messages
1,607
Location
Fairfield, Maine
I have a Dell notebook, but not a Chromebook, and I had no problems with my notebook (even with Windows 10). I am asking on behalf of a non-local friend - otherwise, I would just walk/drive over to his home and give it a shot.

Thank you.


Separately, perhaps you have tried the following already. It seems like you can take a photo, remove the color and change the picture temperature and make your own engravable images. I would think I am late to the "party" with this idea.

Anyone, any experience with the drivers/application on a Chromebook would be greatly appreciated.

Thank you again.

Well, you can't really install software on a ChromeBook--it runs Google's "Chromium" OS. All you can really do is Internet based applications. There are some extensions and apps you can install, but it is not going to run Windows applications. If one had had the software on another Windows machine, I guess it might be possible to set up a remote desktop, log into the Windows machine to run the software. I think a better solution would be to find a free/cheap Windows machine and just use that.

I have taken colored or grey scale images and converted them to black and white and engraved them. I used Photoshop Elements.

Regards,
Michael
 
Signed-In Members Don't See This Ad

TonyL

Member
Joined
Mar 9, 2014
Messages
8,916
Location
Georgia
A friend and fellow IAP member ordered the 1 watt engraver and DHL says his shipment is being held until he provides his social security number. He ordered it from GearBest as I did. He is not gong to provide he SS number, but did anyone else get that email with pdf docs attached?
 
Top Bottom