
You are using an out of date browser. It may not display this or other websites correctly.
You should upgrade or use an alternative browser.
You should upgrade or use an alternative browser.
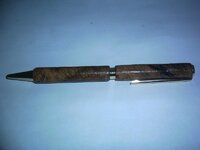
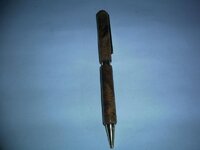
Cherry Burl
- Thread starter kinggabby
- Start date
Signed-In Members Don't See This Ad
See more from kinggabby


Ninja, you ain't gotta clue, tell me about it next week. Wimpboy I mean animefan finished one yesterday and I did some slutting it up.
Now I'm goin down town an do some chicken huntin.

Wimpboy?? Man he is gonna hang sewing thread from the ceiling and drip poison down it and silently take you out!
Slutting it up huh??!! Since you quoted the part of the thread that i was talking about tool presentation, I can only guess you are talking about one thing... AAAAARRRRGGGGGGGGHHHHHH....... I am dying over here!
I got a little something speshul for Andrew... It is in the pressure pot right now in fact!

Nice pen! Good looking timber.
Just a question. What do you sand the wood to before applying CA?
Signed-In Members Don't See This Ad
Recognizing that you are new to penturning, you have quite a bit of work to do. First, go back to simple woods, rather than starting with something complicated like a burl. Try maple. It will make your learning curve less steep. Second, you need to turn the pen much closer to the bushings. The dramatic step between the wood and the metal components is stark and will not appeal to many. Third, your pre-finish needs some attention. The blanks should be as smooth as a baby's bottom before you even think about starting to apply finish. This is a decent first step and I am certain you will progress nicely if you get and follow good advice.
Alexanderpens
Member
Great shot, but might've missed the target a hair. I agree with DC on a few points, but I would start with aromatic cedar. Easy to turn, easy to sand/finish, and cheap! Burls run quite high in price sometimes and can get a little wild on you. Baby steps grasshopper. You'll get there, no worries.
Pretty harsh review but a very accurate one. Keep in mind when you ask for opinions around here, opinions you will get. :wink: I agree with the need for much more turning work followed by much more sanding before beginning the MM. Keep that pen around so you can compare it to your vastly improved ones you will have down the road.Recognizing that you are new to penturning, you have quite a bit of work to do. First, go back to simple woods, rather than starting with something complicated like a burl. Try maple. It will make your learning curve less steep. Second, you need to turn the pen much closer to the bushings. The dramatic step between the wood and the metal components is stark and will not appeal to many. Third, your pre-finish needs some attention. The blanks should be as smooth as a baby's bottom before you even think about starting to apply finish. This is a decent first step and I am certain you will progress nicely if you get and follow good advice.
David Keller
Member
You'll get there. There's not a person on this site that isn't still learning and refining... It's just that some are a little further along the journey than others.
If you like the look of a fatter pen, I'd go with a larger kit. The cigar is my daily carry pen, and they're easy to make and quite affordable(as long as you don't buy them at WC). Another option down the road would be to modify the slimline by leaving out the center band.
Just keep turning...
If you like the look of a fatter pen, I'd go with a larger kit. The cigar is my daily carry pen, and they're easy to make and quite affordable(as long as you don't buy them at WC). Another option down the road would be to modify the slimline by leaving out the center band.
Just keep turning...
That is some pretty darn solid advice right there! Sounds alot like what i heard from everyone at my first IAP chapter meeting, Only it was more about paint, glue coverage, sanding, and polishing, and the drool trail i left all over Roy's back yard. Like we talked about on the phone.. It is form and function, and the constant struggle for balance and perfection.
I think our friend forgot to mention that he was going for a "rustic" look and feel for this pen. I had a long talk last night with him on the phone and he was very interested to listen to me ramble about "structural integrity" of an ink pen, and form versus function, and blah blah blah.
And i want to add that this Fine Gentleman that posted this pen's learning experience consists of a handfull of voice lessons on Skype. I only recently learned this, and was quite impressed with his skills with just some voice lessons. It is impossible to understand tool angles and techniques over the phone, and almost as hard to learn from video. This is why i am working on a get together with me and Kinggabby so he can have some one on one with someone in person at least. I may not be the best teacher, but i do understand how to present the tools for maximum effect....... kinda.
bitshird
Member
but i do understand how to present the tools for maximum effect....... kinda.
Ninja, you ain't gotta clue, tell me about it next week. Wimpboy I mean animefan finished one yesterday and I did some slutting it up.
Now I'm goin down town an do some chicken huntin.
Ken, wee's goin chikin huntin too:biggrin:!! Guess I need to hunt sum chikin's down byse you's to get me one of them thingy's:biggrin:.
Ninja, you ain't gotta clue, tell me about it next week. Wimpboy I mean animefan finished one yesterday and I did some slutting it up.
Now I'm goin down town an do some chicken huntin.
Wimpboy?? Man he is gonna hang sewing thread from the ceiling and drip poison down it and silently take you out!
Slutting it up huh??!! Since you quoted the part of the thread that i was talking about tool presentation, I can only guess you are talking about one thing... AAAAARRRRGGGGGGGGHHHHHH....... I am dying over here!
I got a little something speshul for Andrew... It is in the pressure pot right now in fact!
JBCustomPens
Member
Well this pen just sold. Customer said he liked the look and feel of the pen.
Nice pen! Good looking timber.
Just a question. What do you sand the wood to before applying CA?