Celtic knot question

Signed-In Members Don't See This Ad

RyanNJ

Member
Joined
Jan 31, 2010
Messages
780
Location
Burlington, New Jersey
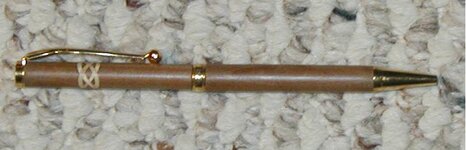
I read the article in the latest wood and I have read the tutorials on here about making a Celtic knot. What I don't understand is what people use to
Fill the cuts in

What I gather is cut on a 45 with a 1/8 to the end the label 1324 and cut the 2 side and fill, then 3 and 4 is that true?
 
Signed-In Members Don't See This Ad

daveeisler

Member
Joined
Nov 25, 2007
Messages
199
Location
Washington, DC, USA.
Brass, aluminium, truestone,pickguard, and some even use contrasting wood, or a combination of all the above, just experiment with what you already have.
 

skiprat

Passed Away Mar 22, 2022
In Memoriam
Joined
Oct 19, 2006
Messages
7,812
Location
In a Skip in Wales
What I gather is cut on a 45 with a 1/8 to the end the label 1324 and cut the 2 side and fill, then 3 and 4 is that true?

Yes, that's what I do, opposite sides.
The only trick ( if you could call it that) is to make sure your blanks is square and the piece you stick in, FILLS the kerf ( slot)

There are many complex jigs for cutting, but the hardest part is glueing them back together accurately. I find that the best way to overcome this problem is not to cut all the way through the blank. Of course your blank may need to be a bit bigger, depending on the pen.
Practice on rubbish blanks first.:wink:
 

skiprat

Passed Away Mar 22, 2022
In Memoriam
Joined
Oct 19, 2006
Messages
7,812
Location
In a Skip in Wales
Before you go out and buy pickguard....

....decide what machine you are going to use to make the cuts ( table saw, chopsaw etc)
Now make a bunch of cuts across half way through on one side of a piece of material ( wood, pr etc) with all the various blades you have.
(I have a cut blank that I keep in my car so that I can try stuff I come across when I'm out and about.)

Now is the time to find all the goodies that are a nice fit in each of the different thickness cuts. You will be amazed at what you already have laying around.:biggrin:

....or you can buy pickguard and then hunt for a blade to match it's thickness:rolleyes:
 

RyanNJ

Member
Joined
Jan 31, 2010
Messages
780
Location
Burlington, New Jersey
I don't know how to cut them my only saw that will cut on a 45 is the bandsaw unless you have ideas of how to make something to hold them on a 45 for the table saw
 

Nate Davey

Member
Joined
Jan 17, 2010
Messages
120
Location
Fayetteville, NC
I use my band saw to cut my kerfs, then have a sled made for my table saw to cute repeatable, thin inlay material. I like the thin celtic knot and this makes a nice tight knot. Skiprats got it right, figure out what blade you think you will primarily use and go from there.
 

IPD_Mrs

Member
Joined
Jun 27, 2007
Messages
2,048
Location
Zionsville, Indiana
The other trick that has not been mentioned is to make sure you drill center. Any drift will make the knot look goofy. This is best to drill on the lathe. Also make sure that the material you use to fill the voids is not so tight is speads the wood causing your blank to no longer be square.
 
Last edited:

soligen

Member
Joined
May 11, 2010
Messages
1,085
Location
Sterling Heights, Michigan
Here are a few tips I figured out that I didn't see in the tutorials that helped me keep thigns in perfect alignment. I've used slices of contrasting wood (maple) as the fill on a 3/32 table saw kerf.

As someone else mentioned, get the blank perfectly square. Not just right angles - not at all rectanguar either.

When you slice the material for the fill pieces, do so from a blank smaller than the pen blank. since you want to not cut all the way through, size the fill piece so it does not overhand the blank when glued in. Saves sanding/trimming and the inaccuracies that can introduce. Using a blank 1/8 smaller is about right if you are leaving 1/16 uncut. Quickly Wipe off excess glue with paper towel.

Have the stop for postioning the pen blank contact the center of the end of the blank (where you would make a center for turning). This elimiantes inaccuracies from positioning using corners.

Make a clamping jig to hold the blank as glue sets. Its just anything longer than the blank with a perfect right angle. clamp on both sides of the cut to hold the blank perfectly straight while the glue sets. Use wax paper to avoid glueing to the jig. This can be real basic. Here is mine made from scrap MDF, setting on the simple sled I made for accurate slice cutting. You want a sawdust relieve in the inside corner. The part with the screw is the guage I use to position a blank to cut the filler slice. The guage is removed when making the cut.
 

soligen

Member
Joined
May 11, 2010
Messages
1,085
Location
Sterling Heights, Michigan
The pic for above
 

Attachments

  • IMG_0109.jpg
    IMG_0109.jpg
    51.1 KB · Views: 315

darrin1200

Member
Joined
Mar 17, 2010
Messages
1,856
Location
Lyn, Ontario, Canada
I plan on trying another knot using his technique. The way he uses the bandsaw to adjust the width of the kerf, allows you to use just about any material.

Darrin
Timber Elegance
 

Dan26

Member
Joined
Sep 1, 2009
Messages
550
Location
Cincinnati, Ohio
Ditto with what Nate and Mike said. I use a bandsaw and find it works best for me. Make a simple sled for repeatability and make sure you drill dead center otherwise the rings in the celtic knots will be different sizes.
 

MobilMan

Member
Joined
Mar 30, 2008
Messages
676
Location
Safford, Arizona, USA.
Darrin, he's not adjusting the width of the kerf with the bandsaw, he's just cutting it. You can tilt the table as he has or add a length of wood to you're miter to accomodate the cutting. Fix a stop so as to reposition the blank the same each time. I stop my cut just shy very little then wet [lick] the leftover part so the kerf will open and not break away. Then glue and clamp with a quik clamp for about 20 minutes.`
 

hkstroud

Member
Joined
Feb 1, 2009
Messages
9
Location
Alexandria, VA
I did a few Celtic knots in small goblets and thought that was fun. Then I decided to do a pen. That's when I found out two things.

1. The smaller the turning the greater the accuracy required.
2. The hole in the blank must not only be in the exact center of the blank. It also has to be perfectly parallel to the sides of the blank.

In my world those two things are never going to happen at the same time.

My solution was to drill the hole in the blank first and then saw the sides of the blank parallel and equal distance from the hole.

Here is the jig I made to do that. The blank is drilled, a brass tube is run through it and it is clamped in the jig. Jig is made of 3 parts, base, fence and hold down.

Base runs against my saw fence. The brass tube of the pen blank is positioned against the jig fence and blank protrudes over the edge of the base just slightly. I start with the side closest to the brass tube and saw all 4 sides.

I then have a blank with the hole perfectly centered. All four sides are perfectly parallel to the hole.
 

Attachments

  • Jig.JPG
    Jig.JPG
    61.5 KB · Views: 337
  • Base.JPG
    Base.JPG
    60.5 KB · Views: 279
  • fence.JPG
    fence.JPG
    75.8 KB · Views: 286
  • Hold down.JPG
    Hold down.JPG
    58 KB · Views: 265
  • Blank in jig.JPG
    Blank in jig.JPG
    72.9 KB · Views: 436
  • Blank in jig with hold down.JPG
    Blank in jig with hold down.JPG
    62.5 KB · Views: 372
  • pen.JPG
    pen.JPG
    27.9 KB · Views: 294
Last edited:

soligen

Member
Joined
May 11, 2010
Messages
1,085
Location
Sterling Heights, Michigan
My solution was to drill the hole in the blank first and then saw the sides of the blank parallel and equal distance from the hole.

Here is the jig I made to do that. The blank is drilled, a brass tube is run through it and it is clamped in the jig. Jig is made of 3 parts, base, fence and hold down.

Very nice solution. Can I patent that? :biggrin:
 
Top Bottom