castle in the sky

Signed-In Members Don't See This Ad
See more from plantman

plantman

Member
Joined
Jan 2, 2012
Messages
3,437
Location
Green Bay, Wi
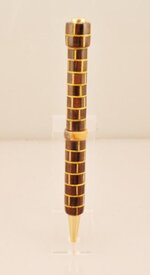
:hammer::hammer: How do you build a castle ?? Simple, you just put one block on top of the other, right?? Well, this being the first castle I have tried to build, I found that there is a little more to it than that !!! I have gained a LOT of respect for those of you that can put these things together perfectly. It takes a lot of pre-planing and prep work before you can stack the blocks one on top of the other, not to mention the precession needed to cut the blocks. My hat is off to anyone that does segmented pens, and thank you for the instructions to do so !! My attempt is far from perfect, but is was quite a learning experience along the way. I managed to build several jigs, buy a new blank holding vice, and retuned my band saw. All needed to achieve uniform cuts and drilling. My castle is built on a PSI Funline Pen kit in a Satin Gold finish. The woods are African Ziricote and Yellow Canary Wood with a Molten Bronze center ring Finished in CA. Yes the top barrel is smaller than the bottom. This gave more detail to the turret and added balance to the pen that is now 3/4 " longer on top. Give it your best shot !! good, bad, or whatever. At 69, it's hard to learn new tricks !! The hands don't always do what the mind wants them to. Pease !! Jim S
 

Attachments

  • DSCF0023 (350x640).jpg
    DSCF0023 (350x640).jpg
    9.7 KB · Views: 450
Signed-In Members Don't See This Ad

BRobbins629

Passed Away Dec 28, 2021
In Memoriam
Joined
Mar 8, 2006
Messages
4,037
Location
Richmond, VA, USA.
Looks pretty nice on my screen. Only critique I would give is it would look better on a little bigger kit. Other than that, I think you nailed it.
 
Joined
Feb 24, 2012
Messages
4,368
Location
Claremont NH
Nice job. I just glued up a blank to try something like this from an earlier post. I need to cast it to make sure any little gaps are filled. It is a bear to make that is for sure!
 

76winger

Member
Joined
Aug 30, 2009
Messages
2,784
Location
Lebanon Indiana
Congratulations on the patience and determination to make that blank. I think a bigger, nicer kit would be appropriate for it. Especially after all that work you put into one blank. None the less, it looks nice!
 

firewhatfire

Member
Joined
Mar 7, 2011
Messages
3,813
Location
Columbiana, Alabama
I built one of those blanks. I do recommend drilling a hole in a clamp and making a dowel rod to stack your blocks on then do your glue up and set them. They are fun to build.

Phil
 

OOPS

Member
Joined
Feb 6, 2010
Messages
674
Location
Spokane, WA
That is a very clever idea, and an excellent pen. When I first saw the photo, I hadn't read the posting yet and it looked like a chess piece--the rook. Dare I ask when you plan on making the knights? Anyway, thanks for posting this, and it sure looks like your hands are still capable of doing outstanding work.
 

plantman

Member
Joined
Jan 2, 2012
Messages
3,437
Location
Green Bay, Wi
That is a very clever idea, and an excellent pen. When I first saw the photo, I hadn't read the posting yet and it looked like a chess piece--the rook. Dare I ask when you plan on making the knights? Anyway, thanks for posting this, and it sure looks like your hands are still capable of doing outstanding work.

:tongue::tongue: Funny you should ask !! I am in the process of turning a chess set at the moment. I had bought a duplicating attachment for one of my lathes many years ago and never had a reason to use it. Last month I set it up and made some 1/8" brass templates from the plans in an old Shop Smith book on my scroll saw. I haved turned the Kings and Queens so far and made several boards. The Rooks would look great made out of a blank like this one. Thanks for the idea !! Jim S
 
Last edited:

Sataro

Member
Joined
Mar 15, 2009
Messages
3,104
Location
Mexia, TX
Nice job of segmenting Jim! That looks like that really took some time & patience to finish that one. But the time/effort invested payed off. Great job!!!
 

plantman

Member
Joined
Jan 2, 2012
Messages
3,437
Location
Green Bay, Wi
Looks pretty nice on my screen. Only critique I would give is it would look better on a little bigger kit. Other than that, I think you nailed it.

:rolleyes::rolleyes: Bruce; I think the photo is a little misleading without something to compare it to. Although I used a funline kit, the pen is much larger then you would think. The barrels are over 1/2" wide, with the turret slightly wider, and the pen itself is over 5 1/2"s long. Thats the same size as a Magnetic Vertex with a 10.5 mm tube. This being my first try, I didn't realy want to use a costly pen kit to start. Also I intend to make some kind of unique holder for it someday. Thanks for the kind words and honest critique. Thats the only way we learn !! Jim S
 
Last edited:

plantman

Member
Joined
Jan 2, 2012
Messages
3,437
Location
Green Bay, Wi
Nice job of segmenting Jim! That looks like that really took some time & patience to finish that one. But the time/effort invested payed off. Great job!!!

:hypnotized::hypnotized: Thank you Billy for the kind words !! I was told a long time ago by an old Master Craftsman. "Never look at a project as a whole, always break it up into small pieces and work on it one piece at a time. Then when it comes time to put the pieces together it doesn't seem like such a big job after all" Peace !! JIm S
 
Joined
Jan 22, 2012
Messages
307
Location
Laurens,SC
Great advise there Jim.That is the way I built my 3300' house with help from my 8-12 year old son and 2 brother inlaws("No" experiance) a several times in the first year.Yes 4 years.But "lots"of fun.
 

WHSKYrvr1

Member
Joined
Aug 10, 2010
Messages
260
Location
Madison AL
That's a great looking pen. Also a unique approach, something that we see on a daily basis that was applied to pen making.
 

plantman

Member
Joined
Jan 2, 2012
Messages
3,437
Location
Green Bay, Wi
Well done!! Think the finial made the entire pen!!


Scott (without a castle a king is....me) B

:yin-yang::yin-yang: Thanks Scott!! I took the general idea from The Pen Turner's Bible by Richard Kleinhenz and added the turent and trim ring. Turned the pen larger and longer than the kit called for to make it more ballanced. To anyone out there, new or not so new to turning, this book is worth getting. Great photos, easy to understand explanations, and something for everybody. Best price is on Amazon.com. Many thanks to Richard. Good reading !! Every man is either the King or the Joker of his castle. It depends on how he treats his Queen !! Jim S
 
Last edited:

plantman

Member
Joined
Jan 2, 2012
Messages
3,437
Location
Green Bay, Wi
I built one of those blanks. I do recommend drilling a hole in a clamp and making a dowel rod to stack your blocks on then do your glue up and set them. They are fun to build.

Phil

:bananen_smilies104:phil; I read your thread more than several times, and thought it covered the process very well !! Being a tool colector I have this " thing " about drilling holes in any of my tools. You would not beleive the number of planes I come across with holes drilled in the soles so thay can be hung on the wall. What I did was to take two pieces of 6 x 6 MDF and drill a 7mm hole in the center of each. Draw lines from corner to corner to find the center. This will also give you the 90* marks to line up the corners of your squares. I used a spare extra long tube to put in the hole of one square to hold my pieces and keep them in order as I cut them. On the second square, insert a longer tube than is needed for the blank, punch a hole in a piece of waxed paper, and slip it over the tube to keep the pieces from sticking to the MDF. Now you can transfer, glue, and adjust your pieces together on the tube . The reason I put my parts directly on the tube itself, is now I don't have to deal with removing the dowel. After the glue gets tacky, I use two mini clamps to apply even pressure. You can now turn on centers or use bushings. Whatever method you are comfortable with. Also having the two bases, it's a lot easier to transfer your pieces and keep them in odrer as you go from the drillpress, to the band saw, to the sander, to the work bench. You get the idea !! Thank you for the informative thread and photos !! Peace to all !! Jim S
 
Last edited:
Top Bottom