Casting Problems, need your help!

Signed-In Members Don't See This Ad

teamtexas

Member
Joined
Apr 24, 2013
Messages
147
Location
Gatesville, Texas
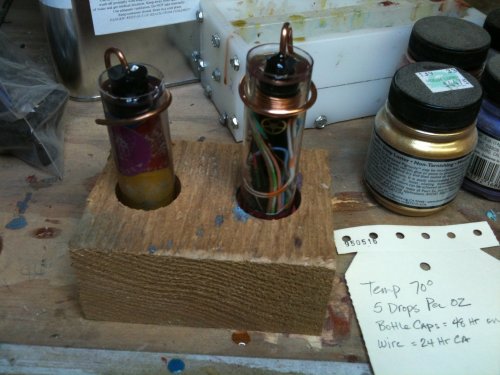
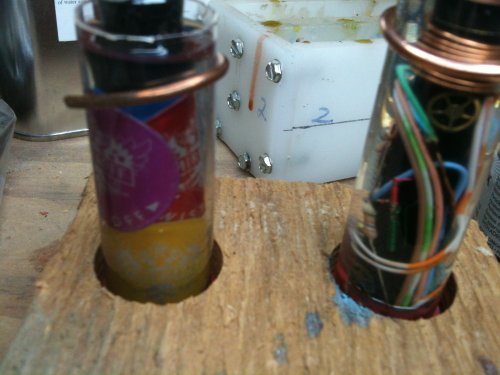
Let me lay this out so you know what the circumstances are. I'm new to casting (on my second quart of "Clear Casting Resin"). I was working in my shop in about 110 degree heat. I borrowed an image and reworked it a bit to fit my needs. I resized the image and printed it on glossy postcard paper on my inkjet (Canon) printer. I used the best settings for ink color. This dried for a few hours before I cut it out and glued it to the sanded tube with some thick CA. It dried for about 15 minutes while I set up the tube with plugs and blocks to hold it up in my casting mold. I sprayed it with a aresol matte finish spay made for photos about 10 minutes before casting it. I poured the resin in while it was still a bit thin, pouring to the side of the tube. The seam of the picture was positioned upward to help stop air bubbles from forming.
1_joker3.JPG

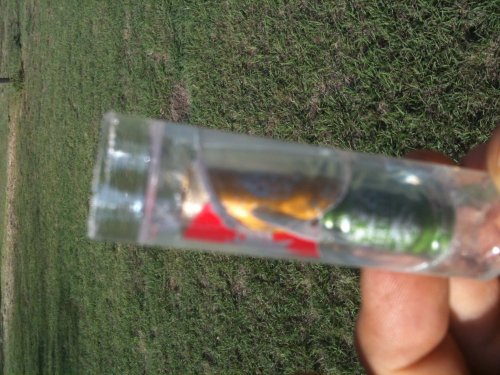
In this photo you can see the green square is CA that squeezed out while I rolled the photo onto the tube. The red circle looks like an air bubble??
2_joker.JPG

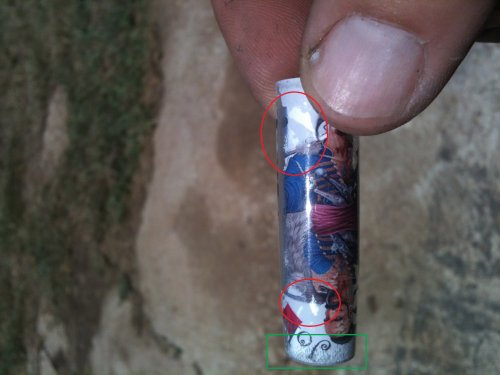
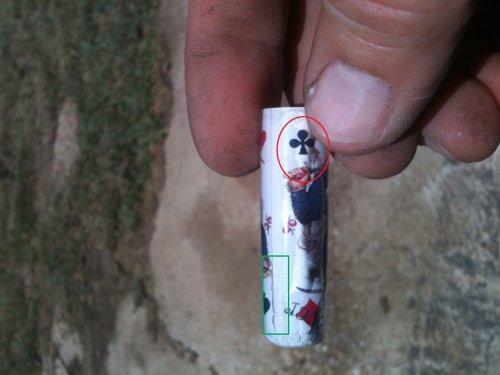
In this photo the green square shows what I think might be chatter, but for some reason I can't seem to sand it out. The red circles show more air (or is it moisture from the matte finish spray ??).

Comments would be very helpful, thanks!

Dan
 
Signed-In Members Don't See This Ad

theidlemind

Member
Joined
Mar 13, 2010
Messages
506
Location
Berea, Kentucky 40403
Decals go on top of resins, stickers get cast into blanks. What you are trying to do probably should not be done with decals. They just don't hold we'll enough. As resin cures it shrinks and moves around. That usually causes it to come loose on places.
And ca needs a couple of days to "off-gas" before it gets cast or you will run into bubbles also.
I hope that makes sense and helps.....
I just re read your post and realized you didn't use decals after all. Still looks like a loss of adhesion. Might be from resin too hot causing excess shrinkage too.
 
Last edited:

JeremyLP

Member
Joined
Jan 23, 2013
Messages
51
Location
Calgary, Canada
Hi Dan,

I am having the same issue. I have been casting for a while and all of a sudden I am having this issue. Have you had any success in finding the solution?
Jeremy
 

teamtexas

Member
Joined
Apr 24, 2013
Messages
147
Location
Gatesville, Texas
Jeremy, the ambient temperature of the shop was too hot for casting. Both the good folks here and the rep. from where I bought the resin said that. The rep. said it would be best to keep the ambient temp below 85 degree. I've been waiting for cooler weather to try again.

Dan
 

JeremyLP

Member
Joined
Jan 23, 2013
Messages
51
Location
Calgary, Canada
Makes sense. My shop is below that, so no worries there. I can make 4 pens exactly the same and they all turn out perfectly, then I make the 5th and it has those air pockets. But the air pockets don't show up for several hours into the curing process.

I use CA to seal my blanks (paper and stickers and such) I know that people say to let them off gas for a few days, but I have made lots of stamp and maps and such and never had an issue with just a few hours, and then all of a sudden...

I know there is only little tiny element that I am missing... just cant quite figure it out. Is there something else that is better than CA to seal stuff?
 

crokett

Member
Joined
Dec 4, 2012
Messages
610
Location
Mebane, North Carolina
Jeremy, the ambient temperature of the shop was too hot for casting. Both the good folks here and the rep. from where I bought the resin said that. The rep. said it would be best to keep the ambient temp below 85 degree. I've been waiting for cooler weather to try again.

Dan

odd... I cook all my castings in a crock pot. I got it for 5 bucks at Goodwill. I try to keep temps between 130 and 150. In summer, it warms up much faster and I have to watch the temps more than winter, but generally heat is good for casting. What brand resin do you use? I use one from U.S. Composites.
 

seamus7227

Member
Joined
Mar 18, 2009
Messages
6,220
Location
Wichita Falls, TX
Dan,
here are my conclusions:
I cast my blanks in the garage where the temps can reach 110 as well. My question for you is, where do you store your resin prior to casting? Is it in the shop, or in the house. Are you heating your resin up in a bath? With those temps, i wouldnt recommend that.
In regards to the "postcard" designs you are creating, you should help yourself a bit and use Avery shipping labels. Create and print your design on them and then wipe a light layer of Medium CA over it and let it outgas for 24-48 hours.
My next question is: how many drops of catalyst per ounce are you using. With the ambient temp where you are working, you definitely do not want to add too much catalyst to the resin. What that does is create more heat and heat is typically what creates failures,due to the resin shrinking, giving you many of the "air spots" you describe in your pictures.
 

NewLondon88

Local Chapter Leader
Joined
May 15, 2008
Messages
5,077
Location
Claremont NH
patience, patience, patience!
Casting and making a pen is not a single day affair.
Some do it and don't see a problem.. but may come
back later and wonder why they have issues, dismissing
the quick turnaround as the culprit because .. well, they've
done it before without problem. Yet something was not
the same.. the time, the brand of CA, of the label, of the
resin .. who knows?

The most important thing to keep in mind is that
'dry to the touch' and cured are two different things.
CA will off-gas for days. So will sprays. And inklet inks
may dry on the surface of a print quickly, but inside the
paper (or stickers) it is still wet. Resin can heat that
moisture enough to steam it.. trapped inside your blank.

The advice on casting below 85° .. I'm not so sure of that,
since the resin will heat up far more than that on it's own.
Many of us cast in higher temps than that. In fact, cold is
your enemy here .. not heat.

It sounds to me like your CA and your sprays are both
chemically reacting with the resin, so that tells me that
they are not cured yet and you are casting them too soon.

And even when it comes to casting.. leave the blanks for
a few days before turning. Just because they're ready to
come out of the mold, that doesn't mean they're cured yet.
They might be OK to the touch, but they're still soft. And when
you put them on the lathe and then take a chisel to them, you
'torque' the resin, pulling it away from the tube or the
sticker/paper or what have you. That gives you an air pocket
which shows up like bubbles or white/silvery areas.

Seamus is also right about the water bath. At 100°F, there is
no need to warm the resin. It is already warm enough, so there's
no need to add another variable to the mix.

OK, that's my know-it-all input.. :tongue:
 

seamus7227

Member
Joined
Mar 18, 2009
Messages
6,220
Location
Wichita Falls, TX
Dan,
here are my conclusions:
I cast my blanks in the garage where the temps can reach 110 as well. My question for you is, where do you store your resin prior to casting? Is it in the shop, or in the house. Are you heating your resin up in a bath? With those temps, i wouldnt recommend that.(provided you are storing it in your shop/garage)
In regards to the "postcard" designs you are creating, you should help yourself a bit and use Avery shipping labels. Create and print your design on them and then wipe a light layer of Medium CA over it and let it outgas for 24-48 hours.
My next question is: how many drops of catalyst per ounce are you using. With the ambient temp where you are working, you definitely do not want to add too much catalyst to the resin. What that does is create more heat and heat is typically what creates failures,due to the resin shrinking, giving you many of the "air spots" you describe in your pictures.

edit in above red
 

ironman123

Member
Joined
Dec 8, 2011
Messages
1,817
Location
Central Texas
ref: Casting problems

Sorry to hear about your problems but you have to wait for some things.

Seamus do you use the full sheet white #8165 Avery labels?

Sorry Dan.

Ray
 

Kenny Durrant

Member
Joined
Sep 11, 2012
Messages
2,512
Location
Sachse Tx. 75048
Hi Dan. I just thought I'd throw in my 2 cents. I am no means an expert at this as I still have all kinds of problems. There are times something good comes out of the pot then it all seems worth while. I think all the responses are good advice but for me when I have the most trouble it's because I'm in a hurry. I would suggest putting patients
at the top of the list. I also believe different products work differently for different people. Don't be afraid to try different products or ideas. Good Luck.
 

teamtexas

Member
Joined
Apr 24, 2013
Messages
147
Location
Gatesville, Texas
I use the clear casting resin from Douglas Sturgess. I keep it in the shop (so stored at summer temps around 100+ degree). On the casting shown here, I did rush the clear spray. I will try it again and give more time (48 hr.) to cure. I have had several other failures with the same type problem though and they didn't all use the clear spray. I will be trying some more soon.
Dan
 

its_virgil

Member
Joined
Jan 1, 2004
Messages
8,127
Location
Wichita Falls, TX, USA.
I've started using the 58163 avery labels and prior to that I was using 8163 avery labels. I cast year round. In the summer I do not heat the resin. The temps in my shop/garage can be hot as we Texans know. As mentioned, CA, fixative, ink, and even the label adhesive needs a couple of days each to fully cure. Painted tubes need a couple of days. Hurrying and impatience are not good for casters. Seems like there have been quite a few "problems" posted with regards to "decals under resin." I have no problems with labels so I see no reason to try decals. They do have their uses and there are some really nice pens posted with decals but most of them have the decals on top and not cast in resin.
Do a good turn daily!
Don
 

Kenny Durrant

Member
Joined
Sep 11, 2012
Messages
2,512
Location
Sachse Tx. 75048
Dan one other thing that I just thought of. It might not be a part of your problem but on the ends if you use a barrel trimmer and it's not sharp the pressure and the heat build up will also cause separation.
 

JohnU

Member
Joined
Jan 31, 2008
Messages
4,970
Location
Ottawa, Illinois
All great advice! Even when you have everything worked out you will still have those days where things don't always work out. Now that the season is changing here in IL, I've had problems with a few blanks in the last two pours I've cast, and Ive been casting for years. Its the nature of the beast. Good Luck, and Stick with it and you'll find what works for you.
 

teamtexas

Member
Joined
Apr 24, 2013
Messages
147
Location
Gatesville, Texas
Dan one other thing that I just thought of. It might not be a part of your problem but on the ends if you use a barrel trimmer and it's not sharp the pressure and the heat build up will also cause separation.
Thanks Kenny, I did have a dull trimmer that I just resently sharpened. I will watch it for heat build up.

Its cooled down here a bit this week and I casted some waste wood blanks with PR in my verticle tubes, so far they look ok although they are not curing very fast. I'm going give them some extra time before turning.

Dan
 

teamtexas

Member
Joined
Apr 24, 2013
Messages
147
Location
Gatesville, Texas
So I waited for the shop to cool down before trying to cast again. It was a nice cool 70 degree when I poured these. The one to the left is a bottle cap pen with the caps CA glued onto a painted tube. It sat for 48 hours to cure before casting. The one on the right was a tube made for a control mechanic and it also had items glued to a painted tube, but only cured for 24 hours before the pour. The resin was mixed at 5 drops per ounce (same ratio as some waste wood blanks I poured that turned out great).

1_bottle_cap_fail.JPG

1_bottle_cap_close_up.JPG


Results, both failed. The complete tube and glued on items were covered with an air pocket. So I took the bottle cap blank to the lathe and cut all the resin and caps off to reclaim the tube. I then sanded the tube a bit and bent new bottle caps for it. I repoured the casting with resin at the same mix rate and temps. No CA glue or paint on the tube. The result was a new problem :bulgy-eyes:. This is a fuzzy picture, but if you look close you can see the cracks in the resin. It has about 5 cracks that appeared at the edges of the bottle caps. The only thing I can this of is that the resin is sticking to the plastic tube and pulling away from the pen tube and attached items?
1_bottle_cap_cracks.JPG


I am trying to turn this down and fill the voids with CA :confused:
Dan
 

joefyffe

Passed Away Aug 19, 2018
In Memoriam
Joined
Mar 29, 2010
Messages
1,316
Location
Indianapolis (almost Zionsville) Indiana
Well, I just don't know!!! Mine always come out perfect!!! NOT! :crying::curse: I have yet to try casting anything under my resin, but I'm planning to, and this is certainly an enlightening thread. I have a snake skin glued to the tube and have had it setting for about 3 days. You see, I too am prone to impatience. :wink: Thanks to all!
 
Last edited:

TBCbushings

Member
Joined
Nov 7, 2009
Messages
931
Location
Hampton, Va.
When I cast my bottle caps I dont use any glue. I bend them to a snug fit to reduce any air. I use 4 drops per oz. I found out if I use CA i have problems. I have had the resin seperate from the tube at time but I think its from the barrel trimmer..Just my .02!
 
Top Bottom