buffing wheel?

Signed-In Members Don't See This Ad

JoeOCNJ

Member
Joined
Jan 5, 2011
Messages
113
Location
Ocean City, NJ
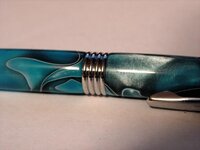
Been doing a lot of acrylic, and I watched Barry Gross's video on working with acrylic. I am noticing some sanding marks even after using PSI's finishing polish.

I sand with 250g paper, then use the 6-grit system from PSI, sorry, i don't remember what grits they are.. But after im done with the highest grit, and using the one-step polish, I still have some marks on the acrylic from the finishing. No matter how careful I try to be or thorough they are still there.

Does anyone know of a buffing wheel(s) that I could use on my existing pen mandril to work on those marks. In the video Mr. Gross swears by the buffing wheel. I believe he uses a cotton and flannel wheel, with a purple color compound. Not sure what it is. He designed one for sale at PSI, and it won't help me (i don't think... unless someone know's different.. ) because it uses a #2 MT and my HF lathe is a #1MT. So I thought maybe I could buy a couple wheels and the compound and "make my own" since they tapers are different.

any suggestions are greatly appreciated :)

Thanks
Joe
 
Signed-In Members Don't See This Ad

hunter-27

Passed Away Aug 14, 2013
In Memoriam
Joined
Oct 17, 2007
Messages
4,608
Location
Chadron, Ne, USA.
Not a direct answer to your question but the 250 grit is your problem not the lack of buffing. You need to learn your tool to get a better finish and start at 320-400 or higher before you go to the polishing steps. 220-280 just puts too deep of a scratch pattern to remove cleanly (at least without substantial time working at it).
 
Last edited:

Padre

Member
Joined
Dec 2, 2009
Messages
1,841
For acrylics, I would suggest sanding from 220 to 600. Then go to the micromesh 9 step (colored, goes from 'rust' up through 'gray," but use them wet.

By the time you get done with the MM, you most likely won't have any scratches. Then use some polish and you will have a great pen!
 
Last edited:

DozerMite

Banned
Joined
Jun 26, 2007
Messages
1,568
Get a buff motor and the wheels. You only need two wheels and two compounds and no wax.

You can stop sanding at 220 and buff the rest. Comes out like glass if done properly.
I turn it and only touch it with 320 to ensure it is level, then buff.
 
Last edited:

DozerMite

Banned
Joined
Jun 26, 2007
Messages
1,568
For acrylics, I would suggest sanding from 220 to 600. Then go to the micromesh 9 step (colored, goes from 'rust' up through 'gray," but use them wet.

By the time you get done with the MM, you most likely won't have any scratches. Then use some polish and you will have a great pen!

You will still have scratches after MM. You can spend all day with the MM and there will still be scratches.
 

Padre

Member
Joined
Dec 2, 2009
Messages
1,841
For acrylics, I would suggest sanding from 220 to 600. Then go to the micromesh 9 step (colored, goes from 'rust' up through 'gray," but use them wet.

By the time you get done with the MM, you most likely won't have any scratches. Then use some polish and you will have a great pen!

You will still have scratches after MM. You can spend all day with the MM and there will still be scratches.

I don't.
 

Akula

Member
Joined
May 27, 2007
Messages
1,036
Location
seabrook, texas, USA.
I start with 400 on acrylics. I'm just really making sure everything is level. Go up to 600 and MM some and finally buff with white diamond
 

JoeOCNJ

Member
Joined
Jan 5, 2011
Messages
113
Location
Ocean City, NJ
So I should go 320-600 with regular paper (wet or dry here??) then use the MM pads.. Are the MM pads for acrylic the same as you would use with wood. I was told there was a difference other than using the MM pads wet, they feel more gritty at the lower grits.. Or are they the same as the wood?
 

Gregf

Member
Joined
May 22, 2010
Messages
603
Location
Richwood, OH
I've finished a few PR blanks using Barry's method and they came out with absolutely no scratches.

Maybe you had deeper tool marks that you didn't get out with the 220?
I sand a longer than he does in the videos also.
 

Padre

Member
Joined
Dec 2, 2009
Messages
1,841
Use dry up to 600, then the wet MM pads. There are also MM sheets, but don't use those.
 

DozerMite

Banned
Joined
Jun 26, 2007
Messages
1,568
For acrylics, I would suggest sanding from 220 to 600. Then go to the micromesh 9 step (colored, goes from 'rust' up through 'gray," but use them wet.

By the time you get done with the MM, you most likely won't have any scratches. Then use some polish and you will have a great pen!

You will still have scratches after MM. You can spend all day with the MM and there will still be scratches.

I don't.

Do you have a close-up shot of a pen you can post? I guarantee there are scratches if you don't go farther than the MM.
Put your best finish on a blank and send it to me. Make a detailed description of your process with times for each step.
With the process you described, I promise I can improve your finish in 30 seconds. Then I'll send it back.
 

Padre

Member
Joined
Dec 2, 2009
Messages
1,841
Doz my friend, I sand, I MM, I use HUT, then I assemble, then I buff after assembling. Then I wipe with a lint free micro-fiber towel.

And really, unless under very large magnification, scratches are not noticeable. At least to me.
 

DozerMite

Banned
Joined
Jun 26, 2007
Messages
1,568
That still will not leave a fine finish and it takes you how long?
I'm sure you are getting a finish that is acceptable to you but, could you improve it?


This is the clearest pic I can find and this took me 30-45 seconds. No wet mess, no MM, no Hut, just 320 and buff/polish. I didn't even wipe it off.

Look at the entire blank, including the shine lines.


Close-up.jpg


Can you post yours?
.
 

witz1976

Member
Joined
Jun 28, 2009
Messages
2,144
Location
Bucksport, Maine, USA
Get a buff motor and the wheels. You only need two wheels and two compounds and no wax.

You can stop sanding at 220 and buff the rest. Comes out like glass if done properly.
I turn it and only touch it with 320 to ensure it is level, then buff.

Care to share which two compounds? I know you posted your pics plenty of times, but you never (at least I don't remember) what you use.
 

Padre

Member
Joined
Dec 2, 2009
Messages
1,841
Wow. That is very impressive. Looks absolutely great!

Can I improve? Absolutely. I am in no way an expert at turning or finishing. I know that for me, using the dry sandpaper and then going with MM, hut, buff, that I get a great finish. I use the Barry Gross dual cotton(?) wheel to buff with his blue compound on the first, plain wheel 2nd.

I don't have any pictures of anything that close, and to be honest with you, I don't plan to. I really don't want to get into a "mine is bigger/better" back and forth.

So yes, that is a very nice blank, and I don't see any scratches. If you would like to share your process with us, that would be great too. What do you turn with? Carbide? Skew? Gouge? What are the types of buffing compounds you use and what kind of buffer? What speed do you turn, sand and buff at? Do you use any polish at all?
 
Last edited:

DozerMite

Banned
Joined
Jun 26, 2007
Messages
1,568
Get a buff motor and the wheels. You only need two wheels and two compounds and no wax.

You can stop sanding at 220 and buff the rest. Comes out like glass if done properly.
I turn it and only touch it with 320 to ensure it is level, then buff.

Care to share which two compounds? I know you posted your pics plenty of times, but you never (at least I don't remember) what you use.


You can get by with a quality tripoli and white rouge. I use German compounds from my employer. There are several places that carry descent compounds.
Just remember... the compounds can only do so much. The rest is proper technique, practice and the correct wheel for the compound. Buffing will heat up a blank very quickly and that can ruin the blank.
Light touch, cut and color strokes, don't overload the wheels and more importantly--- avoid a catch.

Hope that helps you.
 

DozerMite

Banned
Joined
Jun 26, 2007
Messages
1,568
Wow. That is very impressive. Looks absolutely great!

Can I improve? Absolutely. I am in no way an expert at turning or finishing. I know that for me, using the dry sandpaper and then going with MM, hut, buff, that I get a great finish. I use the Barry Gross dual cotton(?) wheel to buff with his blue compound on the first, plain wheel 2nd.

I don't have any pictures of anything that close, and to be honest with you, I don't plan to. I really don't want to get into a "mine is bigger/better" back and forth.

So yes, that is a very nice blank, and I don't see any scratches. If you would like to share your process with us, that would be great too. What do you turn with? Carbide? Skew? Gouge? What are the types of buffing compounds you use and what kind of buffer? What speed do you turn, sand and buff at? Do you use any polish at all?


Thanks. Not getting into the bigger/better debate either. It's just that I have tried all the different ways and products that are commonly used and nothing beats buffing. For finish quality and time invested.

I have posted my process many times, it may be around here somewhere. I can't type for crap and it takes a while to type it out but, it's easier than it would read.
The tool you use to cut with is irrelevant, whatever works for you and you are comfortable with. I don't use carbide though.
I use an industrial buff jack but, the buff motor from HF works great. Some of my friends have them.
My lathe stays on 1800 rpm, I drill, turn and sand at that speed.
Buffing speed depends on your buffer rpm and the wheel size. My small buffer runs approx. 3000 sfpm and the big one approx. 5000 sfpm.
No polish, just compounds and absolutely NO WAX. Wax will dull the finish and it just wears off anyway.

I think I've covered your questions, if not, let me know.:wink:
 

hunter-27

Passed Away Aug 14, 2013
In Memoriam
Joined
Oct 17, 2007
Messages
4,608
Location
Chadron, Ne, USA.
I am no photographer and will never be, just to give the best comparison I could photo, I give this. I'm not saying my way is best or even correct but it works for me. I would love to save a little time as you say but it seems when I try I wind up with a glass finish with fine scratch marks underneath.
 

Attachments

  • acrylic pics1.jpg
    acrylic pics1.jpg
    40.9 KB · Views: 135
Top Bottom