
AlanZ
Member
I'm traveling a bit this week, meeting up with some former team members from work... kind of a first team reunion since a recent reorg.
I like giving gifts to the team. They're great people and it's nice to share what you're up to when not at work.
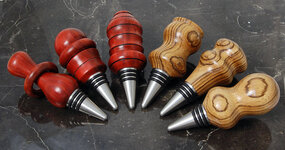
I've given pendants to most of the ladies, but there are a few people that I haven't seen for a while, so I thought I'd give them bottle stoppers. They all enjoy wine, so I think they'll appreciate these.
Besides, it was an excuse to try a 3/8" Sorby beading tool and a Pinnacle captive ring tool. The stopper on the left was my first try at a captured ring.
Wood is redheart and zebrawood. Just playing around with shapes and tools...
I made a quick photo, as they'll have new homes in a few days.
I like giving gifts to the team. They're great people and it's nice to share what you're up to when not at work.
I've given pendants to most of the ladies, but there are a few people that I haven't seen for a while, so I thought I'd give them bottle stoppers. They all enjoy wine, so I think they'll appreciate these.
Besides, it was an excuse to try a 3/8" Sorby beading tool and a Pinnacle captive ring tool. The stopper on the left was my first try at a captured ring.
Wood is redheart and zebrawood. Just playing around with shapes and tools...
I made a quick photo, as they'll have new homes in a few days.
Attachments
Last edited: