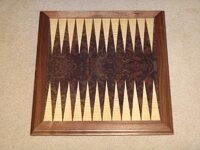
HAHA, every backgammon player that has seen it has mentioned the missing bar in the middle and the alternating colors...The design goal was to keep it simple and I agree the missing bar does involve extra attention when trying to offload pieces. I will probably add an inlay or paint a reference between positions 6 & 7 on the boarder.
I didn't want a vertical divide on the board because I like having room to roll the dice and hate picking up the stones to move them...Moreover, this was a test board to see if I had the patience and precision for veneering...the next board will most likely have alternating colors and I may add a thin piece of veneer (~1/4") between 6 & 7...
@ tkbarron
The veneers all came book-matched...no re-sawing on my part...
@ glycerine
Yes, Woodcraft in Leesburg.
Some advice they shared was to soften the veneer if it has ripples by misting the veneer with water...they sell a product that achieves the same result, but said water is just fine. Thus, I misted each piece, pressed for 15 minutes to flatten and then cut my pieces.
Secondly, they said when cutting the pieces, hold knife to a slight angle (not at 90 degrees) so that you do not see the joints...(think of crown molding)...
Third, tape the ENTIRE piece with painters tape before applying glue. This prevents bleed-through, which was concerning since I was using burl...in fact, I had to place the triangles around some voids in the burl.
Lastly, they told me to use Titebond Cold Press Veneer Glue because it gives you more working time and is formulated to prevent bleed through. Contact cement is for the pro...not me. Place wax paper over piece before you clamp, don't want your press boards to adhere to your project.
Once you have it all taped, I recommend misting the entire piece and press it for a few minutes. This will help flatten the piece before you glue and you get a good preview of what it will look like.

")