Amboyna Burl with Sapwood

Signed-In Members Don't See This Ad
See more from wizard

wizard

Member
Joined
Aug 27, 2009
Messages
3,569
Location
Houston, Texas
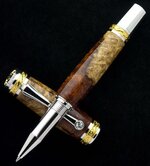
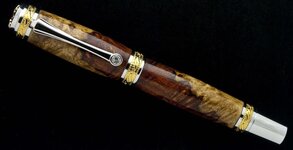
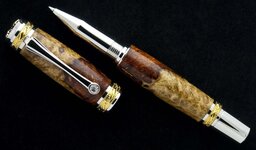
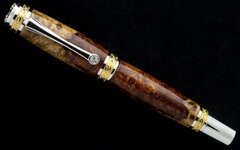
Made it this A.M. Have off today from work.:). So I thought I'd work on pens and catch up on reading while everyone is gone. So..this is my first one for today:wink:. It Amboyna Burl with Sapwood/Two tone on a 22K/Rhodium Majestic Rollerball. Had fun making it. Comments welcome but most of all thanks for just looking. Doc:)
 

Attachments

  • Amboyna Burl with Sapwood Majestic Rollerball_2.jpg
    Amboyna Burl with Sapwood Majestic Rollerball_2.jpg
    33.9 KB · Views: 481
  • Amboyna Burl with Sapwood Majestic Rollerball.jpg
    Amboyna Burl with Sapwood Majestic Rollerball.jpg
    28.9 KB · Views: 244
  • Amboyna Burl with Sapwood Majestic Rollerball_1.jpg
    Amboyna Burl with Sapwood Majestic Rollerball_1.jpg
    43.3 KB · Views: 218
  • Amboyna Burl with Sapwood Majestic Rollerball_3.jpg
    Amboyna Burl with Sapwood Majestic Rollerball_3.jpg
    34.4 KB · Views: 337
Last edited:
Signed-In Members Don't See This Ad

DJ2759

Member
Joined
Dec 12, 2007
Messages
71
Location
Fredericksburg, VA, USA.
Finish

Very nice pen and finish, I'm guessing it is a CA finish. If CA, did you have any issues with not waiting 24 hours or so for the CA to cure and degas? What was your process?
Dale
 

wizard

Member
Joined
Aug 27, 2009
Messages
3,569
Location
Houston, Texas
Very nice pen and finish, I'm guessing it is a CA finish. If CA, did you have any issues with not waiting 24 hours or so for the CA to cure and degas? What was your process?
Dale

Dale, Thank you for the kind comment. Yes, it is a CA Finish. I usually sand the wood to 600 grit then clean with a rubbing alcohol pad and let dry. Following that, I place the turned blanks on the mandrel with a set of finishing bushings (Delrin) made by John Goodin (johnnycnc). They are great! Next, with the lathe at low speed, I began a process of wiping on a coat of CA alternating with using NCF accelerator aerosol. I typically use two coats of thin and eight coats of medium CA and a final spray on top of the NCF accelerator. I usually wait five minutes and begin sanding with MM (wet) and progress to 12000 grit followed by two applications of HUT Plastic Polish and buffing after each application. The whole process takes about fifteen minutes. No degassing needed. I hope that helps. Regards, Doc
 

Brooks803

Member
Joined
Sep 13, 2009
Messages
5,632
Location
Aiken, South Carolina
Absolutely Beautiful Doc! I love how you have sapwood on both ends.

I've been doing my CA like that for a while now as well. No problems with degassing.
 

SCR0LL3R

Member
Joined
May 19, 2011
Messages
390
Location
NS, Canada
Another gorgeous pen! and a great photo too!

I haven't had any problems with CA degas yet and I use very much the same technique. I hope I don't get a nasty surprise someday.
 

BSea

Member
Joined
Dec 28, 2009
Messages
4,628
Location
Little Rock, Arkansas
Not to hijack the thread, but what is the problem with de-gassing? I know that CA needs 24 hours to fully cure, but what would be the problem with assembly before the 24 hr period? I've never had a problem with CA cracking or clouding after assembly. But if there is a chance, I'll sure wait in the future. Especially on a pen like this one.
 
Joined
Jun 28, 2010
Messages
1,830
Location
Pineville, Louisiana
Very Very nice. I think the sapwood adds tons of character to any pen. Your pen just happens to look outstanding compared to many others.
It sounds like you do your CA the same as I do but I just start off and stay with med CA with a spritz of accelerator about every 4th coat or so. I get paper towels at the dollar store. They are not very good but they are cheap and are GREAT for CA.
 

darcisowers

Member
Joined
Sep 7, 2009
Messages
352
Location
San Jose, CA
BEAUTIFUL! I just love the two-toned Amboyna. It's one of my favorites.

we have done the finish both ways - both waiting for the CA to "cure" and also jumping right into sanding/polishing. We haven't really noticed a procedural problem with either method. Although it's nice to not wait so long to figure out if you have to re-finish them!! (we've had issues with our finishes of late, so most end up getting refinished)

another "how do you do it" question: do you glue up your tubes in the morning before you turn them, or do you "plan ahead" and glue them up the night before?? Do you use CA to glue in tubes?

(We tend to do ours in batches, drilling out a bunch then gluing up a bunch, and turning them when we get the chance.... which for me hasn't been that often - my youngest daughter has been off her schedule for naps for a while, but today she took a 3 hour nap, so I guess I could have done something more productive.....but it's HOT in my garage, so I didn't. :biggrin:)
 

wizard

Member
Joined
Aug 27, 2009
Messages
3,569
Location
Houston, Texas
BEAUTIFUL! I just love the two-toned Amboyna. It's one of my favorites.

we have done the finish both ways - both waiting for the CA to "cure" and also jumping right into sanding/polishing. We haven't really noticed a procedural problem with either method. Although it's nice to not wait so long to figure out if you have to re-finish them!! (we've had issues with our finishes of late, so most end up getting refinished)

another "how do you do it" question: do you glue up your tubes in the morning before you turn them, or do you "plan ahead" and glue them up the night before?? Do you use CA to glue in tubes?

(We tend to do ours in batches, drilling out a bunch then gluing up a bunch, and turning them when we get the chance.... which for me hasn't been that often - my youngest daughter has been off her schedule for naps for a while, but today she took a 3 hour nap, so I guess I could have done something more productive.....but it's HOT in my garage, so I didn't. :biggrin:)

Darci, I usually drill and glue my tubes in the mornings right before I make the pen. I use thick CA glue and allow enough drying time to finish a rather large cup of coffee:rolleyes:...about 15 minutes and I'm good to go. Never had a problem doing it that way. If I am reverse painting something..I usually drill and paint the tubes and the blank the night before but still glue in the A.M. with a thirty minute wait. Hope that helps.
When it got hot in the garage in the summer....108 or so in the garage, I was as productive as a block of cement with regard to pen making and was going through withdrawal. I finally got an air-conditioner, an appliance..lol, for my birthday last year. I think my wife got it for me so I would quit whining..:rolleyes:. Regards, Doc
 

JRKirsch

Member
Joined
Apr 27, 2011
Messages
15
Location
South Florida
Here is the $64,000 question. How do you avoid CA swirls that occur in the lower layers without sanding between coats? I can get a beautiful final finish with mm and buffing, but I find defects lower that I can't get to. Thanks for your input. JR
 

JRKirsch

Member
Joined
Apr 27, 2011
Messages
15
Location
South Florida
JR, Do you use BLO with your CA finishes? Doc

I have tried several methods. I usually put a fine layer on first, and then multiple layers of CA at about 800 RPM. After 2 or 3 layers, I notice the swirling and use 600 grit with the grain to remove them. It's time consuming and still not perfect.I have not had success with the alternating BLO/CA method. It seems to dull in some spots.
 

wizard

Member
Joined
Aug 27, 2009
Messages
3,569
Location
Houston, Texas
Here is the $64,000 question. How do you avoid CA swirls that occur in the lower layers without sanding between coats? I can get a beautiful final finish with mm and buffing, but I find defects lower that I can't get to. Thanks for your input. JR
JR, I just need to ask you some questions to give you an answer. Do you use BLO with your CA finishes? What type of CA (thin, medium or thick) do you use for your finishes.Also, what brand of CA do you use? Do you wipe each application so there is a thin layer left to cure. Do you apply with the lathe turning..at low speed ? Do you cure following each application with accelerator before the next application and if you do, do you you use a spray bottle or an aerosol such as NCF? That information may help in answering your question. Doc
 
Last edited:

JRKirsch

Member
Joined
Apr 27, 2011
Messages
15
Location
South Florida
Usually, I put a fine layer of BLO on first (I've evolved into this habit. It also coats the bushings to help them release without damaging the blanks). 10 coats of Hot stuff medium CA (sanding as needed to remove swirls). I use NCF between coats. Lathe is at number 2 setting on my jet 1014 (I thiink around 840 RPM)
 

wizard

Member
Joined
Aug 27, 2009
Messages
3,569
Location
Houston, Texas
Usually, I put a fine layer of BLO on first (I've evolved into this habit. It also coats the bushings to help them release without damaging the blanks). 10 coats of Hot stuff medium CA (sanding as needed to remove swirls). I use NCF between coats. Lathe is at number 2 setting on my jet 1014 (I thiink around 840 RPM)

JR, First, a disclaimer..There are many others on the site that could give you better answers and/or suggestions. Below is just the way I do it. I've just learned by trial and error and reading about the properties of BLO and CA and mechanisms of curing of CA..

I would make several suggestions to you to eliminate the swirling.

1. Consider not using the BLO on the wood to start with. It has a different rate in accelerating curing CA as compared to NCF leaving a less cured CA layer in between the wood and the first layer of CA. The heat of the CA curing also causes the BLO to affect the initial layers of CA. You can use auto polish/wax on the bushings to prevent the CA finish from sticking to the bushings. Even better if you use the Delrin finishing bushings by John Goodin (johnnycnc) at Penturners Products along with auto wax/polish. I used to have cloudy spots and optical distortion under the CA when using the BLO. Then again, I may have been applying the BLO incorrectly.

2. Sand the wood to 600 grit and consider wiping it clean of most dust and residue with an alcohol gauze pad and allow to dry. Takes less than a minute or two. At this point, start with the two thin coats of thin CA with NCF between coats. The thin CA with its low viscosity allows penetration into the wood. At this point you have a thin highly cured flat surface to apply the remainder of the coats on. I use NCF accelerator spray about 6-10 inches from the turning lathe between coats so that it is a fine aerosol mist when it hits the uncured CA coat. I wipe on thin coats of medium CA to ensure thorough curing between coats. If you sand with 600 grit at any point after the initial application of CA coats you have to thoroughly clean the sanded surface and micromesh to at least 4000 + grit before you apply any more coats of CA finish or you will also end up with swirls from sanding under the remaining CA coats. I learned this from experience the hard way:rolleyes:)

I hope this helps...probably more than you want to want to know. At times I teach med students..and get carried away at times.:rolleyes:.
Regards,
Doc
 
Top Bottom