You are using an out of date browser. It may not display this or other websites correctly.
You should upgrade or use an alternative browser.
You should upgrade or use an alternative browser.
A couple tops
- Thread starter hilltopper46
- Start date
Signed-In Members Don't See This Ad
See more from hilltopper46


Those are real nice.
Excellent segmentation and turning and finish.
I have always wondered how that type of top works. I have made hundreds of spin tops that you just twist between thumb and a finger but never one of the style you have shown.
I am guessing that a string is pulled in the top part and then the whole top part is extracted from the bottom part to allow it to spin on its own.
Am I correct in assuming this?
If not could you please describe in as much detail as possible how it works..
Sure would like to see a video of one showing how it is put into motion . Checked utube but came up dry for that particular type of top .
Actually - the tops feature is that it is 'self-winding'. It works like this:
I've made four or five of these now, and these are the first that have run really well - because I have more mass in the top body. One thing that will slow the top down with a smaller body is if centrifugal force begins to unwind the string - you can hear the string whistling in the air and it will slow down quite quickly. I don't know why, but this seems to be less of a problem as well with the larger body.
Probably more than you wanted to know....
Thanks for the explanation.
So the ring at the top remaims as part of a complete assembly at all times then. I guess I was imagining that the ring would be making it top heavy unless it was lifted out of a hole from the main body once the string was pulled to get it spinning .
I HAVE to see one of those in a video so will keep searching.
Not that I would be making any for sale because the hardware at $5.00 per top is more than I sell my all wood spin tops for and my particular market would not support the price of that hardware added to it..
It was mainly a matter of curiosity to know how that style of top works.
I make 25 to 50 of this style at a time and they sell real good . There are 30 in this basket but I have had it heaped up to hold 50 at times.

Thanks Tony for doing this and also for alerting me to it via PM as well.
Pictures are worth a thousand words.
Videos are worth a million words :wink:

Yep :biggrin: .A little on the muddy side") . I don't understand metric but a picture would put it into perspective.
. I don't understand metric but a picture would put it into perspective.
Looking forward to your pictures when you get another one done :wink:


See how this translates...
Thanks a bunch for the translation.
Unfortunately here in the good old USA we are still pretty much turned in to feet and inches. I work as a technical editor for a global manufacturer so "sort of" get them both, but I used a conversion program for this just to be sure.
What is really amusing to see now that my company has gone "metric" is to see a print that calls out a hole that is specified to be 12.7 MM in diameter, 19.05 MM from the edge of the material (1/2" diameter 3/4" from the edge).

ISTR some city's zoning requirements specifying a walkway slope in centimeters of rise over feet of run.
Oh Dear! Didn't do the Attachments, Hopefully, here they are. Sorry!
Signed-In Members Don't See This Ad
ed4copies
Local Chapter Manager
I'll bet they look cool when they spin!!
I could never get them to work---didn't try long--quickly frustrated.
But, they LOOK Great!!!
I could never get them to work---didn't try long--quickly frustrated.
But, they LOOK Great!!!
hilltopper46
Member
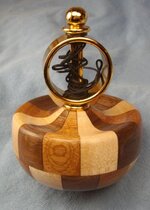
These actually run quite nicely because they have sufficient mass. I had been making them smaller and they would only spin for a few seconds - these will spin for a minute or more.
SamThePenMan
Member
Wow nice. Making tops is pretty fun I think. I tried making a top/yoyo combo once, only problem was that half of the yoyo tended to come off because when I made the handle for the top it was just slightly too small to fit in the other half of the yoyo. I'm sure could do something to make it work I just haven't really tried yet.
W.Y.
Member
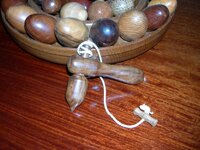
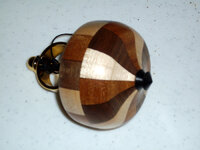
PSI self-winding tops - walnut, maple and (I think) lyptus segmented.
Those are real nice.
Excellent segmentation and turning and finish.
I have always wondered how that type of top works. I have made hundreds of spin tops that you just twist between thumb and a finger but never one of the style you have shown.
I am guessing that a string is pulled in the top part and then the whole top part is extracted from the bottom part to allow it to spin on its own.
Am I correct in assuming this?
If not could you please describe in as much detail as possible how it works..
Sure would like to see a video of one showing how it is put into motion . Checked utube but came up dry for that particular type of top .
hilltopper46
Member
I am guessing that a string is pulled in the top part and then the whole top part is extracted from the bottom part to allow it to spin on its own.
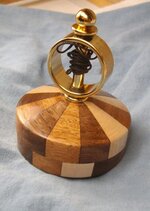
Actually - the tops feature is that it is 'self-winding'. It works like this:
- You hold the ring with one hand and pull the string as hard as you can with the other- the more mass there is in the top body the slower it will accelerate.
- When the string is pulled all the way out, you let go of it (or let it slip out of your fingers) and it winds back around the stem in the opposite direction
- At this point you are holding a spinning top by the ring.
- Now you let go of the the ring, and the ring quickly accelerates up to the speed that the top is turning.
I've made four or five of these now, and these are the first that have run really well - because I have more mass in the top body. One thing that will slow the top down with a smaller body is if centrifugal force begins to unwind the string - you can hear the string whistling in the air and it will slow down quite quickly. I don't know why, but this seems to be less of a problem as well with the larger body.
Probably more than you wanted to know....
Last edited:
ed4copies
Local Chapter Manager
Actually, it helps explain why mine never worked for me!!
That and lack of patience!!
That and lack of patience!!
W.Y.
Member
Actually - the tops feature is that it is 'self-winding'. It works like this:
I've made four or five of these now, and these are the first that have run really well - because I have more mass in the top body. One thing that will slow the top down with a smaller body is if centrifugal force begins to unwind the string - you can hear the string whistling in the air and it will slow down quite quickly. I don't know why, but this seems to be less of a problem as well with the larger body.
- You hold the ring with one hand and pull the string as hard as you can with the other- the more mass there is in the top body the slower it will accelerate.
- When the string is pulled all the way out, you let go of it (or let it slip out of your fingers) and it winds back around the stem in the opposite direction
- At this point you are holding a spinning top by the ring.
- Now you let go of the the ring, and the ring quickly accelerates up to the speed that the top is turning.
Probably more than you wanted to know....
Thanks for the explanation.
So the ring at the top remaims as part of a complete assembly at all times then. I guess I was imagining that the ring would be making it top heavy unless it was lifted out of a hole from the main body once the string was pulled to get it spinning .
I HAVE to see one of those in a video so will keep searching.
Not that I would be making any for sale because the hardware at $5.00 per top is more than I sell my all wood spin tops for and my particular market would not support the price of that hardware added to it..
It was mainly a matter of curiosity to know how that style of top works.
I make 25 to 50 of this style at a time and they sell real good . There are 30 in this basket but I have had it heaped up to hold 50 at times.
hilltopper46
Member
Okay - thanks to William's encouragement I have a video on YouTube - see if this link works ok....
http://www.youtube.com/watch?v=fSIok7z55GA
http://www.youtube.com/watch?v=fSIok7z55GA
W.Y.
Member
Okay - thanks to William's encouragement I have a video on YouTube - see if this link works ok....
http://www.youtube.com/watch?v=fSIok7z55GA
Thanks Tony for doing this and also for alerting me to it via PM as well.
Pictures are worth a thousand words.
Videos are worth a million words :wink:
dontheturner
Member
When I do tops, I use a block about 6cm square about 13cm long. Make the bottom half, a nice round Top shape, with an Upholstery stud in the base tip. Then reduce the top half to a parallel spindle about 2cm diameter. Now take a second piece, say 15 cm long, and about 5cm square, and turn to round, with half shaped as a small wood chisel handle. the other half, needs two flat faces, with a hole drilled through to accomodate the upper top section. All that remains to complete this project, is to put a hole through the top shaft, for a suitable cord, to pass through and be wound around the spindle, with a pull toggle in the open cord end. Clear as mud? I will get one finished, for you if in doubt! dontheturnerThose are real nice.
Excellent segmentation and turning and finish.
I have always wondered how that type of top works. I have made hundreds of spin tops that you just twist between thumb and a finger but never one of the style you have shown.
I am guessing that a string is pulled in the top part and then the whole top part is extracted from the bottom part to allow it to spin on its own.
Am I correct in assuming this?
If not could you please describe in as much detail as possible how it works..
Sure would like to see a video of one showing how it is put into motion . Checked utube but came up dry for that particular type of top .
dontheturner
Member
Hill topper, That particular style of top, was called a @@Gyroscope'' when I was a boy!Okay - thanks to William's encouragement I have a video on YouTube - see if this link works ok....
http://www.youtube.com/watch?v=fSIok7z55GA
W.Y.
Member
When I do tops, I use a block about 6cm square about 13cm long. Make the bottom half, a nice round Top shape, with an Upholstery stud in the base tip. Then reduce the top half to a parallel spindle about 2cm diameter. Now take a second piece, say 15 cm long, and about 5cm square, and turn to round, with half shaped as a small wood chisel handle. the other half, needs two flat faces, with a hole drilled through to accomodate the upper top section. All that remains to complete this project, is to put a hole through the top shaft, for a suitable cord, to pass through and be wound around the spindle, with a pull toggle in the open cord end. Clear as mud? I will get one finished, for you if in doubt! dontheturner
Yep :biggrin: .A little on the muddy side
. I don't understand metric but a picture would put it into perspective. Looking forward to your pictures when you get another one done :wink:
bitshird
Member
The only bad thing about having tops on your table at a show is the children play with all of them. and 1 out of 20 buys one.
hilltopper46
Member
When I do tops, I use a block about 2-3/8 inch square about 5 inches long. Make the bottom half, a nice round Top shape, with an Upholstery stud in the base tip. Then reduce the top half to a parallel spindle about 3/4 inch diameter. Now take a second piece, say 6 inches long, and about 2 inches square, and turn to round, with half shaped as a small wood chisel handle. the other half, needs two flat faces, with a hole drilled through to accomodate the upper top section. All that remains to complete this project, is to put a hole through the top shaft, for a suitable cord, to pass through and be wound around the spindle, with a pull toggle in the open cord end. Clear as mud? I will get one finished, for you if in doubt! dontheturner
See how this translates...
W.Y.
Member
See how this translates...
Thanks a bunch for the translation.
artme
Member
Very cool looking pieces.
dontheturner
Member
Jesus! Hilltopper, I had to TRANSLATE my dimensions to type that for you! I am 79 years of age, and cannot easily change things to metric , but I did, 'cos I thought everyone bar me, had done with imperial! dontheturner
hilltopper46
Member
Hilltopper, I had to TRANSLATE my dimensions to type that for you! I am 79 years of age, and cannot easily change things to metric , but I did, 'cos I thought everyone bar me, had done with imperial! dontheturner
Unfortunately here in the good old USA we are still pretty much turned in to feet and inches. I work as a technical editor for a global manufacturer so "sort of" get them both, but I used a conversion program for this just to be sure.
What is really amusing to see now that my company has gone "metric" is to see a print that calls out a hole that is specified to be 12.7 MM in diameter, 19.05 MM from the edge of the material (1/2" diameter 3/4" from the edge).
dontheturner
Member
Wowee! dontheturner
TellicoTurning
Member
Throw tops
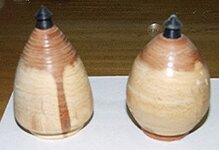
When I first started turning, I saw the kits for these throw tops in the PSI catalog... I bought 5 kits and made these two tops... they're rough and not well done as I was just starting turning, but they work great....... I still have a box full that belonged to my dad and some he bought me when I was in school. We played battling tops with these in my early years in school 3 & 4 grade...
When I first started turning, I saw the kits for these throw tops in the PSI catalog... I bought 5 kits and made these two tops... they're rough and not well done as I was just starting turning, but they work great....... I still have a box full that belonged to my dad and some he bought me when I was in school. We played battling tops with these in my early years in school 3 & 4 grade...
Attachments
KD5NRH
Member
What is really amusing to see now that my company has gone "metric" is to see a print that calls out a hole that is specified to be 12.7 MM in diameter, 19.05 MM from the edge of the material (1/2" diameter 3/4" from the edge).
ISTR some city's zoning requirements specifying a walkway slope in centimeters of rise over feet of run.
dontheturner
Member
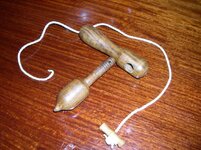
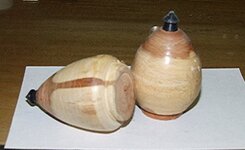
Spinning
I am amazed that anyone, was buying kits, for tops! - never were an option in the UK -
Design, and make them for yourself, out of wood offcuts! Here was my original sample- which I thought had long since been lost,
Particularly since moving around the world 12,000 miles, as I have - But found it yesterday!
Later ones, I created were much bigger, and fatter.
So perhaps Hilltopper, will notice, too
Happy new Year, to All
dontheturner.
When I first started turning, I saw the kits for these throw tops in the PSI catalog... I bought 5 kits and made these two tops... they're rough and not well done as I was just starting turning, but they work great....... I still have a box full that belonged to my dad and some he bought me when I was in school. We played battling tops with these in my early years in school 3 & 4 grade...
I am amazed that anyone, was buying kits, for tops! - never were an option in the UK -
Design, and make them for yourself, out of wood offcuts! Here was my original sample- which I thought had long since been lost,
Particularly since moving around the world 12,000 miles, as I have - But found it yesterday!
Later ones, I created were much bigger, and fatter.
So perhaps Hilltopper, will notice, too
Happy new Year, to All
dontheturner.
dontheturner
Member
I am amazed that anyone, was buying kits, for tops! - never were an option in the UK -
Design, and make them for yourself, out of wood offcuts! Here was my original sample- which I thought had long since been lost,
Particularly since moving around the world 12,000 miles, as I have - But found it yesterday!
Later ones, I created were much bigger, and fatter.
So perhaps Hilltopper, will notice, too
Happy new Year, to All
dontheturner.
Oh Dear! Didn't do the Attachments, Hopefully, here they are. Sorry!