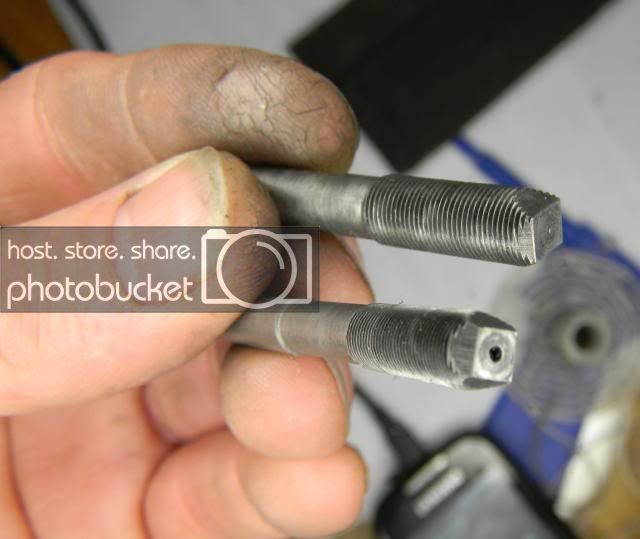
6.6 x 0.5 Tap from drill rod (Silver Steel)

Signed-In Members Don't See This Ad

mototrev

Member
Joined
Oct 12, 2013
Messages
20
Location
Melbourne

Tap to suit a #6 Bock triplet Below tap to suit a Schmidt 6.4x0.4

My guess this method has been posted in the past.

I once worked in a tool room where we had to make our own taps for those *propitiatory *(commonly known as bastard threads.)
You can use water hardened drill rod or oil hardened drill rod.
I used water hardened as thats all I have on my steel rack.

With such fine threads we use for fountain pens accurate machining is required as a few thou. can make a lot of difference.
1-2 thou. over the major dia. of the thread or improper form to the thread can result in an unusable tap.
You also have to make allowance for expansion and contraction during hardening and annealing.

Where only talking about 0.4 p or 0.016 thou depth of thread so care must be taken and constant checking with the loupe to see how the threads are forming whilst being screw cut

Turning between centers is critical as any flexing of the work piece can result in the work ending up in the bin.

I used a single pointed tool to cut the threads then a thread chaser to form the threads properly at the root diameter.

The section behind the thread is then turned down to 1-2 thou below the tapping drill size....this aids in remembering what drill is to use for taping

Finally the flutes are ground or filed on to the cutting point.
An old tradey showed me this method back in my apprenticeship days.
Two opposing sides should be deeper than the opposing sides forming a rectangle at the point.
This is enough fluting to clear the chips.....but should be cleared constantly to avoid clogging.

The hardening process is quite simple. Heat to a cherry red.
and then quench the tap in a bucket of *water. *(This is also the point where the work piece is no longer magnetic.)

I then clean the threads with a small wire brush disk on a Dremal tool.
This is so it is no longer black from quenching but shinny.
Lastly the item needs to be annealed because after hardening the tap is very hard but also very brittle.
Reheat the item starting at the opposite end so the heat runs towards the important part of the work piece threads and when it gets to the dull straw colour its time to STOP and let it cool down.
If it does start to turn dark straw or blue keep heating it up and start back at the beginning.

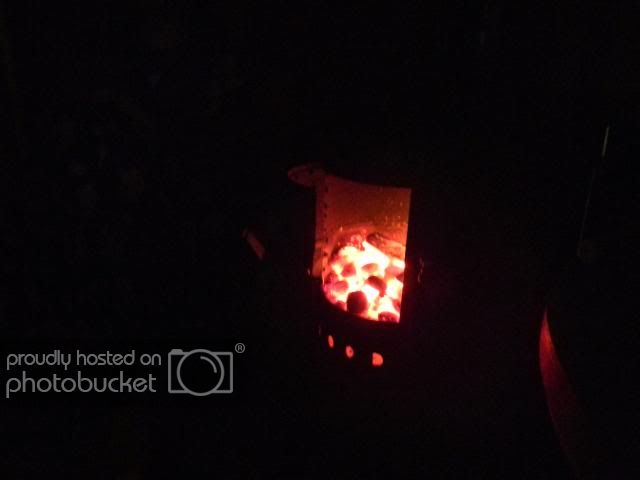
I used my home made LPG stove to get the cherry red as my oxy cylinder is empty then a LPG torch for the annealing.

I do hate it when you make a tap and it just not quite right...and you have to start again.

However the process can be reversed by heating the item back up to cherry red and placing it in a bucket of lime for 6+ hours.
then it can be re-machined BTW: this works fantastically on steel balls if you want to drill or make a part with a knob or ball on it

Hope this might help someone!
 
Signed-In Members Don't See This Ad

mredburn

IAP Activities Manager
Staff member
Joined
Jul 5, 2009
Messages
8,754
Location
Fort Myers FL
Most of us do not have the skills or patience or tools to do that. Its great that you have both ability and know how. The rest of us have to use money to buy them. I have always wanted to tackle something like this but time is a big factor. I have always enjoyed making as much of the tools/fixtures I need as I can.
 

frank123

Member
Joined
Feb 5, 2012
Messages
613
Location
Colorado
I've made taps and hardened bushing out of drill rod, pretty much the same way you do.

One thing that makes it easier for me is to wrap the party in a sealed envelope of tool wrap ( a stainless steel sheet that looks like a large piece of shim stock but is made specifically for heat treating) with sliver of wood in side. When the heat is put on it the wood will burn off all the oxygen long before it gets hot enough to oxidize the steel so you end up essentially doing your heat treating in an oxygen free atmosphere and don't have that scale to clean off after wards. Do not quench it inside the envelope, bad things can happen like serious steam explosions.

I've always preferred to use an O or A grade steel when I have it since I find far less distortion occurs during quenching, but W grade works well on small parts.

I've never tried lime for annealing, I've got to thry that sometime. I usually use vermiculite or firebrick granules.

Which brings me to a firebrick forge, easily made by hollowing out a firebrick (the soft kind like used for kilns, not the stuff they make fireplaces out of) and putting a hole in the side for a torch to be used to put heat into it -the torch head sticks in the hole but not all the way through, just enough for the flame to be confined to the inside chamber of the brick- and a piece of firebrick to cover the front to keep the heat up. Propane works for most metals with MAPP being useful for very high temp use for stuff that needs around 2000 degrees (most hand propane torches lack the BTU output to sustain that high a temperature but a large one or two of them will do it). Add a pyrometer (fancy name for a high temperature thermometer) to monitor the heat and you can do some really sophisticated heat treating with a simple little home made thing like this.

All in all, making your own taps, bushings and other tooling gives an excuse to do two fun things: Get a metal lathe and play with fire and flaming hot metal.
 

Curly

Member
Joined
Nov 20, 2010
Messages
4,860
Location
Saskatoon SK., Canada.
mototrev I have never seen a tap 'fluted' in that way before. Thanks for posting the thread. :)

Frank would you be able to put up a picture of your firebrick forge? I think I understand the description but a picture would confirm it.
 

frank123

Member
Joined
Feb 5, 2012
Messages
613
Location
Colorado
mototrev I have never seen a tap 'fluted' in that way before. Thanks for posting the thread. :)

Frank would you be able to put up a picture of your firebrick forge? I think I understand the description but a picture would confirm it.

I'll see if I can find time to do that tomorrow, the one I'm using now is A little larger made out of a couple of firebricks, but the principle and construction is the same - I just made this one a little larger to heat treat knives when I only have one to do and don't want to fire up my larger forge (got one that needs to be done now so I'll maybe do it and take a picture of it being used if I have the time free).
 

edstreet

Member
Joined
Aug 12, 2007
Messages
3,684
Location
No longer confused....
Making a DIY pyrometer.


This is a firebrick forge. T26 bricks, 4 x 4 1/2 x 13, 234 CU inch. There is also a '1 brick' forge as well. You can use practically any type of material, coffee can's for example.

...

IMG_1808.JPG


This is what you can do in them :)
IMG_1821.JPG


This is sterling silver.

This is a stove pipe I used with a 1" flat T26 brick, satanite and kaowool lining. The pyrometer is on the right side and that reading is in F.
IMG_6315.JPG
 
Last edited:

mototrev

Member
Joined
Oct 12, 2013
Messages
20
Location
Melbourne
Love the simplicity of the fire bricks!

These are 10BA taps made from drill rod and have been in use for 20 yrs. They have cut 100's if not 1000's of threads

This is the most common method flats on 2 sides.
needs some lead to help tapping square. like an intermediate tap.
In larger sizes they are prone to cross thread if not tapped using a lathe or drill press.
I tried making 3 sided points with out much success.


frank123

Member
Joined
Feb 5, 2012
Messages
613
Location
Colorado
My simple firebrick forge, a bit larger than a single brick one -this was three bricks- but the same principle. The steel frame provides support to keep it from cracking apart after repeated very high temperature operation and the brick in front is just to help keep heat in and even because I didn't go to the trouble of making a proper firebrick closure for it (works fine that way and is simple). MAPP gas or a larger propane burner can easily reach 2000 degrees plus with this.

As you can see, these bricks are amazingly good insulators, over 1600 degrees F (my target soak temp for the steel I'm using here) inside and cool to the touch outside, be sure to have a fire extinguisher on hand. I've never needed one but it isn't optional. Don't do it indoors, a CO danger exists in enclosed spaces.

Sorry I forgot to rotate the pics before uploading them.

If anyone is interested I'll describe how I got that long tubular chamber but it isn't needed for anything as small as a tap nor is more than one brick in size (the smaller the faster it heats and the less gas it uses).
 

Attachments

  • P1010041.jpg
    P1010041.jpg
    283.9 KB · Views: 217
  • P1010042.jpg
    P1010042.jpg
    286.1 KB · Views: 214
  • P1010044.jpg
    P1010044.jpg
    93.2 KB · Views: 196
  • P1010045.jpg
    P1010045.jpg
    204.7 KB · Views: 204

Curly

Member
Joined
Nov 20, 2010
Messages
4,860
Location
Saskatoon SK., Canada.
Thanks for the pictures. They confirm what I had pictured and may be of help to others down the road. Now to go and straighten my neck. :wink::)

 
Top Bottom