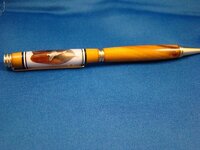
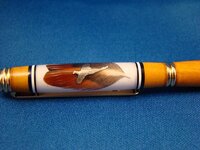
5th times a charm

Signed-In Members Don't See This Ad
See more from Kenny Durrant

Kenny Durrant

Member
Joined
Sep 11, 2012
Messages
2,512
Location
Sachse Tx. 75048
It took 5 times to cast the feather before it turned out as good as it did. I was tired and almost ready to give up so when I noticed the feather looked a little rough I thought what the heck. I just wanted to see what it would look like. With that being said I started with a pheasant feather and overlayed a pheasant from a North Dacota State Quarter on top. I went through a few feathers so kinda lost track of the color scheme. I wanted to use Bois D' Arc, horse apple, for the main body of the pen. By color scheme I wanted a feather with golds and browns or bronze because as the wood ages it turns darker. It starts out a light yellow and over time it darkens. You can see the streaks in the pen shown. I changing some things on my molds so this was a broad experiment. As always comments welcome. Thanks
 

Attachments

  • iap pic #2 003.jpg
    iap pic #2 003.jpg
    74.7 KB · Views: 236
  • iap pic #2 004.jpg
    iap pic #2 004.jpg
    67.9 KB · Views: 310
Signed-In Members Don't See This Ad

firewhatfire

Member
Joined
Mar 7, 2011
Messages
3,813
Location
Columbiana, Alabama
the real question is how did you get that off your fingers. Every feather I have tried to glue down has ended up on my finger enough to glue it crooked or not at all.

Impressive concept and completion.

Phil
 

SDB777

Member
Joined
Feb 6, 2010
Messages
6,620
Location
Cabot, Arkansas USA
Still fighting feather here, haven't got one to laydown yet. Think I'm trying to use feathers that are too big, stiff, or whatnot.....


I really like the overall concept that you ended up with. Well done!!!!


Scott (always one tiny piece outta place) B
 

scotian12

Member
Joined
Sep 9, 2007
Messages
985
Location
Halifax, Nova Scotia, Canada.
Kenny...this is a work of art and craftsmanship. You have successfully combined feather and metal casting,segmenting, great color combination of wood and feathers all on a small sized pen.We will look forward to your next creation. Use a larger canvas of a pen the next time to show us more. Congratulations.
 

BSea

Member
Joined
Dec 28, 2009
Messages
4,628
Location
Little Rock, Arkansas
Very cool idea. I idea of using the pheasant cutout really adds to the look. Great Job!!


Great Job Kenny! But i must correct you and say that it is from the South Dakota quarter not the North Dakato, DAMHIKT!!
You said don't ask, but how did you know that?!?!?:biggrin:
 

Kenny Durrant

Member
Joined
Sep 11, 2012
Messages
2,512
Location
Sachse Tx. 75048
Thanks for all the replies. As far as glueing the feather it's realy easy. I start by trimming the down off the bottom and leaving a small part of the quill hanging out. I use tweesers to hold the stub of quill and use spray adhesive to gule the feather. It only takes a small film of glue to hold the feather in place. Too much glue and the feather will gum up. Start at the top of the feather and lay it down on the tube keeping it straight or following the conture of the feather. Lay the tube with the quill centered on the bottom on a paper towel and roll it side to side to finish sticking the feather on the tube. The resin will desolve the spray glue so I use white glue,elmers, to seal up the feather. When the glue is cured it's ready to cast. Thanks again and let me know if you have any questions.
 

D.Oliver

Member
Joined
May 10, 2011
Messages
3,531
Location
Faith SD
I started with a pheasant feather and overlayed a pheasant from a North Dacota State Quarter on top.

Them theres fighting words. You've just offended an enire state. But on the other hand I'm sure North Dakota is extremely flattered :biggrin:. Great job on the pen.
 

plantman

Member
Joined
Jan 2, 2012
Messages
3,437
Location
Green Bay, Wi
Thanks for all the replies. As far as glueing the feather it's realy easy. I start by trimming the down off the bottom and leaving a small part of the quill hanging out. I use tweesers to hold the stub of quill and use spray adhesive to gule the feather. It only takes a small film of glue to hold the feather in place. Too much glue and the feather will gum up. Start at the top of the feather and lay it down on the tube keeping it straight or following the conture of the feather. Lay the tube with the quill centered on the bottom on a paper towel and roll it side to side to finish sticking the feather on the tube. The resin will desolve the spray glue so I use white glue,elmers, to seal up the feather. When the glue is cured it's ready to cast. Thanks again and let me know if you have any questions.

:good::good: Kenny; Two thumbs up for a fantastic looking pen. Great combination of all aspects of pen making rolled into one. When I glue feathers I use a dentist probe to straighten or rearrange the layout. Keeps your hands clean, and places the feathers where you want them. You can get a set of 5 or 6 from Harbor Freight cheap, or ask your Dentist for some old ones at $250 a visit. Jim S
 

Gilrock

Member
Joined
Oct 18, 2011
Messages
560
Location
Tucson, AZ
Cool I'd like to make a blank like that...I think I just saw a pheasant run by...gotta go grab the bb gun...lol.
 
Top Bottom