Acrylic Advice

Signed-In Members Don't See This Ad

ChrisS1975

Member
Joined
Aug 20, 2015
Messages
7
Location
Fishers, Indiana
I am fairly new to pen making and encountered a problem last night that I couldn't seem to correct. I was turning an acrylic blank and I could not eliminate the chatter. I adjusted my depth of cut, speed, tool. Nothing seemed to help. I thought maybe it was the blank, but the next blank I put on to turn, literally blew apart on the lathe as I was turning it. I can't understand what has happened, as I have made several pens over the past few weeks with the same set up. Any advice would be much appreciated and welcomed!
Thanks,
Chris
 
Signed-In Members Don't See This Ad

beck3906

Member
Joined
Aug 13, 2005
Messages
2,139
Location
Belton, TX 76513
Make sure your tool rest is close to the blank as it spins. You may need to adjust it as the diameter gets smaller.

Use one hand supported against the tool rest to help stabilize your tool on the rest.
 

Charlie_W

Member
Joined
Nov 16, 2011
Messages
5,918
Location
Sterling, VA USA
Chris,
Please tell us what turning tool you are using and in what orientation....scraping or cutting.
Also, did you round off corners of the blank first to lessen the chance of catching a corner and damaging/ruining the blank?

How far is your tol rest from the blank?

Do you have a standard mandrel or adjustable? Mandrel saver?
Are you tjrning two blanks on the mandrel at once ore just one.

Are you using a 60 degree live tail center in the end of the mandrel or just a wood turning point?

I know it is a lot of questions at once but will help with answers that help you.
Also, some will round off the ends of the blank on a sander to remove the end corners. These are the most likely spots to cause a breakout.
 

TonyL

Member
Joined
Mar 9, 2014
Messages
8,916
Location
Georgia
Many variables to eliminate...how about ensuring that the tailstock is snugged-up, and the quill is tightened? The answer to Chairlie's questions will help much.
 

Charlie_W

Member
Joined
Nov 16, 2011
Messages
5,918
Location
Sterling, VA USA
Also, the different compounds that make acrylic, plastic resin blanks vary. Some turn easier than others. Some are just more "Chippy" in nature.
For those who cast blanks with PR, differences in how much activator/hardner is added will make a difference too.
 

WriteON

Member
Joined
Aug 21, 2013
Messages
3,319
Location
Florida & Pa
Sharp tools are a must. Take very small/light cuts. And yes all acrylics are different. Some cut like smoothly, other chip apart.
Just some thoughts and comments. It's a learn by doing process. Mishaps and mistakes are part the game. We learn from them(as you are in the process of doing). You'll get the hang of it as you go along. Maybe for the next bank or two use scraps or inexpensive pieces.
What blank were you working on. Some blanks are very sensitive and like to self destruct.
Maybe for try a rounded acrylic blank. You will enjoy the finished result. Acrylic has beauty of it's own. Have fun.
 
Last edited:

mike4066

Member
Joined
Sep 24, 2014
Messages
353
Location
Akron, Ohio
Chris,


Are you using a 60 degree live tail center in the end of the mandrel or just a wood turning point?
This was actually my problem (ok one of a few) when I first started. I was using the center that came with my lathe and the play in the end was causing chatter/harmonic vibrations.
 

Charlie_W

Member
Joined
Nov 16, 2011
Messages
5,918
Location
Sterling, VA USA
Chris,


Are you using a 60 degree live tail center in the end of the mandrel or just a wood turning point?
This was actually my problem (ok one of a few) when I first started. I was using the center that came with my lathe and the play in the end was causing chatter/harmonic vibrations.

Yup! And damaging the point on your center too. You are right, it does make a difference.
 

Joey-Nieves

Member
Joined
Sep 5, 2012
Messages
362
Location
Vega Baja, Puerto Rico
All of the above, but.......
What kind of acrylic where you using? there are many types of materials and some are more brittle than others. PR blanks that made by most of us, are very brittle, they require a lite touch and a very sharp tool and in my case I turn at the highest speed my lathe will go. Aluminite blanks are nicer to turn but many also chatter and chip if you don't use a sharp tool and a lite hand. The commercial ones you buy are softer and come out like a orange peel, those are easier to turn.

Try going "in" to the blank from the left (if your right handed) and just cut a tenon about 1/8" and about 1/8" deep, then eat way another 1/8" and another until you get to the other side, this is very boring but it works, repeat and as the blank gets rounder the cutting will get smoother. I do this with most everything I turn and with practice you will round out a blank without chipping or breaking it in no time at all.

Hope this helps
Joey
 

jttheclockman

Member
Joined
Feb 22, 2005
Messages
19,151
Location
NJ, USA.
Lots of good advice in the above posts. All are contributing factors. The one thing that gets overlooked at times is speed. It is far better to turn at a faster speed. Presenting the tool to the blank is also important. The correct angle of the tool and also the handling of the tool. You need to have a firm grip on the tool so it does not bounce on the blank. Acrylics can be hard and chippy but are doable. Sharp tools is a must also. I always work the ends down first and then move toward the center. I do this going both ways on the blank, right to left and left to right. I always finish up all blanks with a sharp skew. Best tool in the tool box.

I am sure Ed Brown has some videos somewhere on this. I know at one time Ed Davidson AKA YoYoSpin had videos in the library.

Practice makes perfect.:)
 

Skie_M

Member
Joined
Aug 7, 2015
Messages
2,737
Location
Lawton, Ok
Really didn't like the chippy acrylics, but a cheap faceshield from HFT solved the major problem for me (chips flying at my face).


A good firm grip is good advice ....

Move slowly, take small cuts .... also great advice ...

Ultra-sharp tools is a must, for acrylics.

Using your chisels correctly ..... ahh, now there's a subject that many will expound upon in great detail and discourse and argue with each other over which of them is more right than the other, all while saying that, "your method may work OK for you, but mine is better, so you should try it and see!"


But starting with the basics is usually also a good way to go.

Generally, you will want to keep a good firm grip so that your chisel is held tight against the tool rest, with the rest as close to the work as is comfortable to you (in order to eliminate chatter and vibration). You will want to move the chisel SLOWLY into the work piece, making contact first NOT WITH THE EDGE OF YOUR CUTTING TOOL, but with THE BEVEL OF YOUR CUTTING TOOL.

As the bevel rubs against the work piece, you use your off-hand (that is holding the back of your tool handle for leverage) to raise the back of the chisel and drop the edge down just to where the tool starts cutting. This is the most effective cutting angle you can maintain!

You have to practice this sequence of events til they become ingrained in you .... firm contact with the toolrest, rub bevel, lift back of tool til you start cutting.

This is the normal standard with all roughing gouges, bowl gouges, scrapers, and skews (though with the skew it's more of a slight rocking motion to get the edge of that chisel exactly where you want it .... skews are slightly more advanced than the basic chisels). Once you have mastered this technique, I suggest you try out everybody else's methods, and see what really works for you and you alone.

Keep in mind that certain specialty tools do not follow these steps, and many tools (the skew especially included) can and are used in different ways to perform different tasks. Learning the hows and whys and where to use a certain tool and technique to perform specific tasks are the stepping stones to becoming a master craftsman.


I just wish I was at least HALFWAY there. :)
 

Chasper

Member
Joined
Mar 22, 2007
Messages
1,987
Location
Indiana
I had a couple chattering blanks this morning. For me it is usually because I'm putting too much pressure on the blank or because my turning tool is not sharp enough. What I usually do is to just plough through the chatter until I get near final size and then make a few light cuts to remove the chatter marks. If the blank is chippy that won't work, I switch from a scraper to a sharp skew.
 

ChrisS1975

Member
Joined
Aug 20, 2015
Messages
7
Location
Fishers, Indiana
Charlie,
I was using a square carbide mini turning tool. I did not round the edges off first. I always set the tool rest as close to the blank as I can, but I never move it again during the process. I have an adjustable mandrel, and no mandrel saver. I was turning two blanks at once. I had a 60 degree live center in the end of the mandrel with not too much pressure. I had my lathe running about 2200 RPM.
I hope I answered them all,
Chris
 

ChrisS1975

Member
Joined
Aug 20, 2015
Messages
7
Location
Fishers, Indiana
Thank you to everyone for the great tips! Your advice is very deeply appreciated. I know I will be picking your collective brains as I develop my skills.
 

Fish30114

Member
Joined
Oct 18, 2014
Messages
484
Location
Burbs of Atlanta,Georgia
Chris, first thing let me say that I like carbide tools--BUT I would have hazarded a guess that was what you were using. I actually was turning some Italian flag blanks from PSI, and had issues with them blowing up--they actually had bubbles which was the problem, but when I called PSI, the first thing the tech rep asked was if I was using a carbide tool--and recommended against it for their polyester resin blanks. Steel is more forgiving than Carbide, also I always run acrylic blanks of any kind on the belt sander and take the corners off--sometimes substantially!! You can knock the corners off with a file if you don't have another method, it works pretty darn well. I would definitely do that, as well as trying steel tools.

I personally think your lathe speed is sufficient and you are using the tool rest in an OK fashion for a pen--i.e. when you turn a pen, the material you remove is not so much that it is a must to move your tool rest closer to the workpiece. That being said keeping the rest close to your work is a major key to keeping chatter away!
I am one that likes a pen mandrel, you'll find that a lot of folks around here are going to push TBC--turning between centers--which requires special bushings or a dead center in your headstock that is larger than the tube in the blank you are turning, and a sufficiently sized live center in your tailstock-also larger than the tube in the piece you are turning, BUT having said that I am a big fan of mandrel savers. in fact I have 3 or 4 different ones. you can tighten your tailstock without much fear of bending/flexing your pen mandrel, it sounds like you are using the setup you have properly, not to much pressure on the tailstock--just enough to stay in position and the blanks spin well. All in all it sounds like you're approaching it well, I would definitely start with rounding the corners off of your blanks, and trying a steel tool for a while.

You can't learn without asking ?'s, so keep at it!
 

H2O

Member
Joined
Dec 24, 2014
Messages
246
Just from my experience...

I had an issue with chatter and out of round on my first couple of pens. Then as a test, I was offered a set of bushings and the centers to turn without the mandrel to try.
That solved all of the problems. Tightening the tailstock, just to snug the point in the mandrel, is enough to flex the thin shaft. This coupled with the length of the shaft and putting force against it to cut, is more than enough to flex it.
In addition, the stock bushings are not necessarily concentric. Using the between centers bushings and the 60 degree centers, gives a larger radial contact surface and helps to lock them together.
One last thing, make sure the ends of the blank are square and flat to the centerline of the hole. Not being square can cause the bushings to want to angle to match the end.

I have very little experience, but this was some of the problems that were pointed out to me for my situation.
 

TurtleTom

Member
Joined
Jul 24, 2015
Messages
701
Location
Checotah, Oklahoma 74426
Chatter is a harmonic imbalance that feeds on itself. This causes machinists to pull their hair out. The worst culprit is the boring bar just when you are making the last pass the mass of the work dropped below the harmonic threshold for that particular tool. A days work and and expensive piece of metal scrapped.

Tool weight, tool speed has little effect, tool rigidity, distance of tool to work, RPM, poorly supported work not tight enough or just too long and spindly. All these thing affect chatter.

Try a tool with a wide vertical orientation, like a parting tool. If you get a chatter with a parting tool it has nothing to do with the machine and tooling but the part itself.

Take frequent coffee breaks, the brain has to figure it out. :)
 
Last edited:

kaydubya

Member
Joined
Aug 22, 2014
Messages
29
Location
Dunedin, New Zealand
Yes, I have a pen mandrel, I checked the straightness and it seems pretty good.

Chris, I wonder if "pretty good" is good enough. Your mandrel needs to be perfectly straight. To check, remove the tailstock, secure the tool rest as close as possible to (and parallel to) the mandrel, then slowly turn the lathe by hand. If the space between the mandrel and the tool rest varies at all in width during each revolution I suspect that might be your problem.
 
Last edited:

randyrls

Member
Joined
Feb 2, 2006
Messages
4,829
Location
Harrisburg, PA 17112
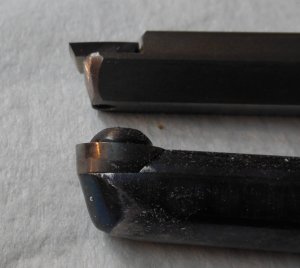
Chris; There are differences between carbide tools. A more "blunt" carbide tool will peel off endless ribbons of any acrylic, but a sharper tool will be much too grabby. In the photo below, the lower carbide bit will be good for acrylics, but not for wood. The upper carbide bit will not work well on acrylics, but worked well or wood.

I round off the square corners on all blanks on a disc sander.

Your bit should be below the center line of the blank. The further you go below centerline the more aggressive carbide becomes, but it puts more stress on the blank. I use a credit card sized diamond hone to "sharpen" carbide bits regularly.


View in Gallery
 

jcm71

Member
Joined
May 5, 2011
Messages
1,660
Location
Chattanooga, TN
One thing that was not mentioned (unless I missed it), was a poor glue job. I think every time I have had a blowout it was because I did a poor job gluing the blank to the tube. After you drill, how closely does the tube fit into the blank? It should not bind and should slide easily all the way through. There should, however, be no appreciable gaps between the tube and the blank. If you have too tight a fit, you will squeegee the glue off of the tube when inserting it. If it is too loose, you will not get a proper bond between tube and blank.
 
Last edited:

TurtleTom

Member
Joined
Jul 24, 2015
Messages
701
Location
Checotah, Oklahoma 74426
One thing that was not mentioned (unless I missed it), was a poor glue job. I think every time I have had a blowout it was because I did a poor job gluing the blank to the tube. After you drill, how closely does the tube fit into the blank? It should not bind and should slide easily all the way through. There should, however, be no appreciable gaps between the tube and the blank. If you have too tight a fit, you will squeegee the glue off of the tube when inserting it. If it is too loose, you will not get a proper bond between glue and blank.

I also thought of this, and have a solution: Before I put glue on the tube I put some glue in the far side of the blank while I'm turning it to make sure I get it all the way around. It's running down inside a little while I do this which is what I want. You want to make sure you have something blocking the hole in the brass tube to keep glue out. I use a potato. When you push the glued brass tube in and turning as you go you will shove glue out the other side, meaning you have a 100% glue up.
Did you get some glue in the tube? A letter drill B will get that out of a brass tube for 7mm pens. I use a battery powered drill for this. Be careful and don't drill a hole in your hand.
 

kaydubya

Member
Joined
Aug 22, 2014
Messages
29
Location
Dunedin, New Zealand
One thing that was not mentioned (unless I missed it), was a poor glue job. I think every time I have had a blowout it was because I did a poor job gluing the blank to the tube. After you drill, how closely does the tube fit into the blank? It should not bind and should slide easily all the way through. There should, however, be no appreciable gaps between the tube and the blank. If you have too tight a fit, you will squeegee the glue off of the tube when inserting it. If it is too loose, you will not get a proper bond between glue and blank.

I also thought of this, and have a solution: Before I put glue on the tube I put some glue in the far side of the blank while I'm turning it to make sure I get it all the way around. It's running down inside a little while I do this which is what I want. You want to make sure you have something blocking the hole in the brass tube to keep glue out. I use a potato. When you push the glued brass tube in and turning as you go you will shove glue out the other side, meaning you have a 100% glue up.
Did you get some glue in the tube? A letter drill B will get that out of a brass tube for 7mm pens. I use a battery powered drill for this. Be careful and don't drill a hole in your hand.

For a long time now, I've been gluing my tubes into blanks with polyurethane glue (Gorilla brand) and I've never had a solitary failure. The reason is that this type of glue swells as it sets, thereby filling up any tiny voids and adhering to every surface. Yes, it does ooze out the ends, but the surplus is easy to remove, once dry, with a craft knife (if any glue has set inside either end of the tube it is also easy to remove the same way). As an added precaution, prior to gluing I always mount my bare tubes on the pen mandrel, turn the lathe on and buff with 80 grit paper to provide a good key. The only disadvantage is that polyurethane glue is relatively slow drying so I have to glue up a day in advance of turning.
 

1080Wayne

Member
Joined
Feb 5, 2006
Messages
3,344
Location
Brownfield, Alberta, Canada.
One thing that was not mentioned (unless I missed it), was a poor glue job. I think every time I have had a blowout it was because I did a poor job gluing the blank to the tube. After you drill, how closely does the tube fit into the blank? It should not bind and should slide easily all the way through. There should, however, be no appreciable gaps between the tube and the blank. If you have too tight a fit, you will squeegee the glue off of the tube when inserting it. If it is too loose, you will not get a proper bond between glue and blank.

I also thought of this, and have a solution: Before I put glue on the tube I put some glue in the far side of the blank while I'm turning it to make sure I get it all the way around. It's running down inside a little while I do this which is what I want. You want to make sure you have something blocking the hole in the brass tube to keep glue out. I use a potato. When you push the glued brass tube in and turning as you go you will shove glue out the other side, meaning you have a 100% glue up.
Did you get some glue in the tube? A letter drill B will get that out of a brass tube for 7mm pens. I use a battery powered drill for this. Be careful and don't drill a hole in your hand.

For a long time now, I've been gluing my tubes into blanks with polyurethane glue (Gorilla brand) and I've never had a solitary failure. The reason is that this type of glue swells as it sets, thereby filling up any tiny voids and adhering to every surface. Yes, it does ooze out the ends, but the surplus is easy to remove, once dry, with a craft knife (if any glue has set inside either end of the tube it is also easy to remove the same way). As an added precaution, prior to gluing I always mount my bare tubes on the pen mandrel, turn the lathe on and buff with 80 grit paper to provide a good key. The only disadvantage is that polyurethane glue is relatively slow drying so I have to glue up a day in advance of turning.

Agree on the use of polyurethane , with the addition that a quick immersion of the blank in water either before or after the glue is added to the far side , will allow you to turn within 2-3 hours . Works with both wood and plastics . Immersion of the tube with the glue applied would also work . Water hastens polyurethanes cure .
 

Skie_M

Member
Joined
Aug 7, 2015
Messages
2,737
Location
Lawton, Ok
Watch out adding water to woods .... can cause swelling of the blank, and shrinking during drying after the pen has been finished will result in it being out-of-round ...
 

TurtleTom

Member
Joined
Jul 24, 2015
Messages
701
Location
Checotah, Oklahoma 74426
It's probably just me, but I equate using Gorilla glue with Scraping fingernails down blackboards and tying cat's tails together; but I like using hide glue so I'm not squeamish. je ne sais quoi.
 

ChrisS1975

Member
Joined
Aug 20, 2015
Messages
7
Location
Fishers, Indiana
Thanks again for all the advice. Upon further investigation of what remained of the blank and tube, and your helpful hints, I think it was a bad glue job. I do remember the tube being slightly tighter going in during assembly. I have turned a few more acrylic pens since my initial post with no issues, thanks in large part to kind help. Thank you.
Chris
 

efrulla

Member
Joined
Oct 15, 2014
Messages
84
Location
Warrensburg, NY USA
I turn with mini carbide tools as well. What cutter are you using? I found that the square cutter will chatter with acrylics and so I use the radius cutter on acrylics and I find it chatters less if at all. It might have something to do with how much of the carbide is presented to the blank.
 

csr67

Member
Joined
Jan 27, 2015
Messages
355
Location
Eastvale CA
Watch out adding water to woods .... can cause swelling of the blank, and shrinking during drying after the pen has been finished will result in it being out-of-round ...

I started using gorilla glue with great results. I have not had a single blow out since changing from epoxy and CA. I give the drilled blank a quick dunk in water before inserting the glued up tube. This is not enough moisture penetration to cause any issues with a wood blank. The foam out from poly glue is very easy to clean up.
 

ChrisS1975

Member
Joined
Aug 20, 2015
Messages
7
Location
Fishers, Indiana
I turn with mini carbide tools as well. What cutter are you using? I found that the square cutter will chatter with acrylics and so I use the radius cutter on acrylics and I find it chatters less if at all. It might have something to do with how much of the carbide is presented to the blank.

I have found the same thing. I have started using the radius cutter more for my acrylics.
 
Signed-In Members Don't See This Ad

TurtleTom

Member
Joined
Jul 24, 2015
Messages
701
Location
Checotah, Oklahoma 74426
Watch out adding water to woods .... can cause swelling of the blank, and shrinking during drying after the pen has been finished will result in it being out-of-round ...

I started using gorilla glue with great results. I have not had a single blow out since changing from epoxy and CA. I give the drilled blank a quick dunk in water before inserting the glued up tube. This is not enough moisture penetration to cause any issues with a wood blank. The foam out from poly glue is very easy to clean up.

I may have to eat my shorts for this , but with that much success, and as much tear out I get with this red oak tree I cut, I may have to rethink the large black primate glue.
 
Top Bottom