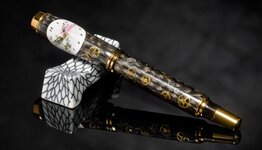
My first watch-parts pen.

Signed-In Members Don't See This Ad
See more from ugrad

ugrad

Member
Joined
Aug 21, 2012
Messages
99
Location
UK
I had a lot of fun making this even though I made quite a lot of mistakes. It really was a journey and one I am happy that I took. I learned a lot especially how to overcome the problems I encountered.

Please feel free to rip it apart, my next one will be better. It's a Jnr. Gent 24k FP

Regards
Peter

JG_watchparts.jpg
 
Last edited:
Signed-In Members Don't See This Ad

turncrazy43

Member
Joined
Apr 22, 2012
Messages
1,104
Location
Marietta, GA
Peter, very nice for a first attempt mat watch part blank. What was the base material you applied the watch parts over? The fit and finish are nice to.
___________________________________________
Everyday I'm vertical is a great day
 

healeydays

Member
Joined
Nov 30, 2012
Messages
1,057
Location
Bedford NH
Hi Peter,

Very nice pen. I can't tell from the picture what is on the watchface. Did you have any problems turning and parts catching as you turned and what would you do differently?

Mike B
 

ericofpendom

Member
Joined
Jun 6, 2012
Messages
371
Location
Bolton, England
Hi Peter, very nice for first attempt. Could probably do with a few more parts on it though. Tell us all a little about how you went about it.

Eric...
 

ugrad

Member
Joined
Aug 21, 2012
Messages
99
Location
UK
Hi guys, the base material is carbon fibre sleeve, I really don't know what the dial is, it was my first one so I used a face that wasn't one of the best, just to try it and see what problems I ran into. I had tried two other dials, but the first one wasn't lined up properly and with the 2nd. the paint cracked.

I would not use epoxy again for the carbon fibre, it was messy and I now use CA to glue it to the tube. I would also not put hands on the dial unless there was lots of space on the pen kit. The hands and a couple of the gears stand a little proud and while they didn't catch when turning, I can see where they have been polished with the micro mesh. I would also put more gears, cogs etc onto the tubes mine looks a little sparse.

Regards
Peter
 

ugrad

Member
Joined
Aug 21, 2012
Messages
99
Location
UK
Hi Peter, very nice for first attempt. Could probably do with a few more parts on it though. Tell us all a little about how you went about it.

Eric...

Hi Eric

I just finished my reply to others and see you mentioned my lack of parts :biggrin: I do and did agree.

I have trawled the IAP for info on how to make them, but there was no walkthrough I came across, so I thought about all the steps I thought it would need.

I tried bending some of the cogs/wheels and when that didn't work I made a wooden former which kinda worked, but not as well as I liked so I made a former out of Aluminium. I will post a photo of it if anyone would like to see it. I thought I could use the former to bend the dials, but that didn't work out great as it can scratch them. I ordered a block of PTFE to make a former for the dials, but I never got round to making it as I found I could easily bend the dials around transfer punches by hand.

I have found a source of Pearl ex if you still use it 21g & 14g.

Regards
Peter
 

ericofpendom

Member
Joined
Jun 6, 2012
Messages
371
Location
Bolton, England
Hi Peter, very nice for first attempt. Could probably do with a few more parts on it though. Tell us all a little about how you went about it.

Eric...

Hi Eric

I just finished my reply to others and see you mentioned my lack of parts :biggrin: I do and did agree.

I have trawled the IAP for info on how to make them, but there was no walkthrough I came across, so I thought about all the steps I thought it would need.

I tried bending some of the cogs/wheels and when that didn't work I made a wooden former which kinda worked, but not as well as I liked so I made a former out of Aluminium. I will post a photo of it if anyone would like to see it. I thought I could use the former to bend the dials, but that didn't work out great as it can scratch them. I ordered a block of PTFE to make a former for the dials, but I never got round to making it as I found I could easily bend the dials around transfer punches by hand.

I have found a source of Pearl ex if you still use it 21g & 14g.

Regards
Peter

Hi Peter, have you seen the videos that Chad is doing on making the watch part pen blanks? here is a link to it. It is very good. http://www.penturners.org/forum/f56/video-1-watch-parts-pen-makinkg-series-111978/

I am still using the pearlescent powders that you told me about from Ebay. I have just bought some new colours.

How is your casting coming along?

Regards

Eric...
 

ugrad

Member
Joined
Aug 21, 2012
Messages
99
Location
UK
Hi Peter, very nice
Hi Peter, have you seen the videos that Chad is doing on making the watch part pen blanks? here is a link to it. It is very good. http://www.penturners.org/forum/f56/video-1-watch-parts-pen-makinkg-series-111978/

I am still using the pearlescent powders that you told me about from Ebay. I have just bought some new colours.

How is your casting coming along?

Regards

Eric...

Yes I saw the video and was quite pleased he released it when he did as I was thinking of doing a tutorial on how I did it, but the video will be far better:)

The casting is fine when the weather permits, I have made a few molds so that I can cast in clear PR (as per the watch part pen). I have also done a few others with the copper & aluminium clad and also one with Paua Abalone.

I am working on some others when time permits and the next one will be a coin pen. Just a couple of glitches to iron out first.

Regards
Peter
 

Curly

Member
Joined
Nov 20, 2010
Messages
4,851
Location
Saskatoon SK., Canada.
To heel the scar.

I would also not put hands on the dial unless there was lots of space on the pen kit. The hands and a couple of the gears stand a little proud and while they didn't catch when turning, I can see where they have been polished with the micro mesh.

You can repair a spot that you cut or sand through by applying a CA finish just like you would with a wooden pen.
 

ugrad

Member
Joined
Aug 21, 2012
Messages
99
Location
UK
You can repair a spot that you cut or sand through by applying a CA finish just like you would with a wooden pen.

Yes, I realise that Pete, I thought I would leave it as it is for now, to see how the brass holds up over time, I can then take apart and apply CA.

Thanks for the thought, I do appreciate it.

Regards
Peter
 

healeydays

Member
Joined
Nov 30, 2012
Messages
1,057
Location
Bedford NH
I too like the pen. I think if you overload it with parts, it just looks cluttered. The think I have noticed that is also happening with you is the non brass parts get lost in the CF. I've been having that same problem, so I am trying to spread the brass around a bit more.
 

ugrad

Member
Joined
Aug 21, 2012
Messages
99
Location
UK
Nice work and I agree that to many parts makes the pen look to "busy". Where do you get the carbon fiber from? Thanks

I don't think it will help you as I am in the UK, but I get the carbon fibre sleeve from <http://www.easycomposites.co.uk/carbon-fibre-reinforcement/braid/carbon-fibre-braided-sleeve-20mm.aspx>

Make sure that the sleeve you buy will expand or contract to the tube diameters you will be using.

regards
Peter
 

ugrad

Member
Joined
Aug 21, 2012
Messages
99
Location
UK
I too like the pen. I think if you overload it with parts, it just looks cluttered. The think I have noticed that is also happening with you is the non brass parts get lost in the CF. I've been having that same problem, so I am trying to spread the brass around a bit more.

Thank you, I still think it could do with more brass, but you are right about the non-brass components getting lost. There are quite a few and if you look carefully (maybe not possible in the photo) then it doesn't seem quite so sparse.

I have some white sleeve so maybe I will reserve all the dark parts for that.

Regards
Peter
 

ugrad

Member
Joined
Aug 21, 2012
Messages
99
Location
UK
Peter wonderful pen! That is a pen that I want to make but I don't do any casting myself. I'd love to buy one already casted. Congrats!

You can buy it if you want :) , but casting is not that difficult especially with PR. You can make your own mould or buy one. There is a thread from a guy from Spain who has made a simplified mould that would be easy and cheap to make.

Regards
Peter
 

jttheclockman

Member
Joined
Feb 22, 2005
Messages
19,151
Location
NJ, USA.
One thing you have to remember when doing something like that is the use of CF will take up quite a bit of room so this leaves little room for parts when it comes to thickness.
 

razor524

Member
Joined
Oct 22, 2009
Messages
280
Location
Pueblo, Colorado
[/quote]

I tried bending some of the cogs/wheels and when that didn't work I made a wooden former which kinda worked, but not as well as I liked so I made a former out of Aluminium. I will post a photo of it if anyone would like to see it.

[/quote]

I would love to see a photo of the "former" if you don't mind!

BTW, I can never get this quote thing right!
 
Last edited:

ugrad

Member
Joined
Aug 21, 2012
Messages
99
Location
UK
I would love to see a photo of the "former" if you don't mind!

BTW, I can never get this quote thing right![/QUOTE]

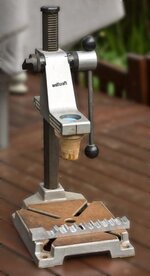
This is the former and press I use with transfer punches to bend the wheels etc.

Regards
Peter

Press_former.jpgFormer.jpg
 

ugrad

Member
Joined
Aug 21, 2012
Messages
99
Location
UK
Way, way WAY past my skill level. I'm very (really very) impressed.

It's just a piece of aluminium drilled with holes of different diameters and cut through the centre on the bandsaw. With hindsight I should have cut it through below centre to make the troughs wider at the top.

Regards
Peter
 
Top Bottom