SQUARING JIG "allie" style

Signed-In Members Don't See This Ad

wood-of-1kind

Member
Joined
Jul 10, 2005
Messages
4,115
Location
Toronto, ON, Canada
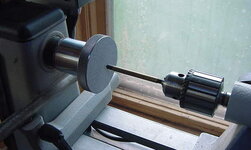
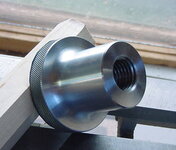
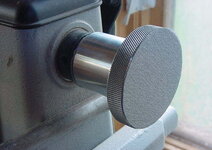
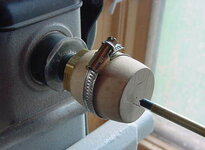
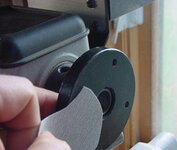
First of all, allow me to say thanks to Jim Byron (JimB) for inspiring this style of squaring jig. My version is an all aluminum machined version that runs very true and easily accepts PSA (peel & stick abrasives). When you team this jig with the 'knock out' tool set (assorted shafts?:biggrin:) there is no pen kit that it will not handle. A 'simple' design but extremely handy when you want to square up your pen blanks. Quick to install and quick to remove with the 'knurled' grip. The last two(2) pixs are my original prototypes (wood and brass nut and a plain steel faceplate). Don't laugh they work, but not as good as the "allie" version.:wink:
 

Attachments

  • MVC-029S.JPG
    MVC-029S.JPG
    27.8 KB · Views: 531
  • MVC-031S.JPG
    MVC-031S.JPG
    23.6 KB · Views: 466
  • MVC-032S.JPG
    MVC-032S.JPG
    31.4 KB · Views: 461
  • MVC-034S.JPG
    MVC-034S.JPG
    25.2 KB · Views: 564
  • MVC-037S.JPG
    MVC-037S.JPG
    28.2 KB · Views: 436
Last edited:
Signed-In Members Don't See This Ad

edman2

Local Chapter Leader
Joined
Feb 2, 2007
Messages
1,375
Location
Greenbrier, AR. USA.
Hmmm...wondering if you had the pendant backer plate and index plate if you could make that work by sticking sandpaper to the face? Like what you did. Better that what I use.
 

Texatdurango

Member
Joined
Apr 23, 2007
Messages
4,649
Location
Show Low, Arizona
Nice idea and looks good but I see one drawback. Since sanding will be done from 3/4" in to the center, all the sandpaper outside that range is just wasted.

I ran into the same thing with my little 1" sanding arbor, after a few pens, the paper is worn out around the pen diameter but the rest never gets used.
 

wood-of-1kind

Member
Joined
Jul 10, 2005
Messages
4,115
Location
Toronto, ON, Canada
Nice idea and looks good but I see one drawback. Since sanding will be done from 3/4" in to the center, all the sandpaper outside that range is just wasted.


.

Not quite George, there's 'no waste' in my world. I purposely made the surface larger so that I can use it for my tool handles that are normally 1.25" minimum diameter. Sandpaper (even PSA) is fairly inexpensive and if figure that I can make these for pennies per disc.
 

JimB

Member
Joined
Mar 18, 2008
Messages
4,682
Location
West Henrietta, NY, USA.
That looks so good I don't think I would have realized it was inspired from my design if you hadn't given me credit:biggrin:. I never could make it look like that. Nice job.
 

leehljp

Member Liaison
Joined
Feb 6, 2005
Messages
9,331
Location
Tunica, Mississippi,
I added a piece of plywood to the faceplate (as in your last pict) and added a few coats of Poly and sand smooth. PSA sandpaper works well on it. Yep, the HF punches in a chuck give a great fit for the different tube sizes.

I have said it before and say it again. Thanks JimB for the original; and thanks to you Peter, for posting the Allie!
 
Last edited:

PenPal

Member
Joined
Nov 29, 2006
Messages
2,708
Location
Canberra, A.C.T., Australia.
Hi

Like your ideas but for me my pen lathe is locked in the mandrel collet is held thru the headstock so that lathe is dedicated, this way I keep my accuracy for pen turning with repeatability.
I admire your machining love the improv method as well.

Peter.
 

jskeen

Member
Joined
Oct 11, 2007
Messages
1,754
Location
Crosby, Texas, USA.
That is a great idea, brilliant in it's simplicity. I've wanted to get away from the pen mill for some time, but was leery of how to maintain the precise 90 degree angle between the shaft and the sanding wheel. And right there on the lathe is a perfect set up, already aligned and ready to go between a face plate and the bore of the tailstock. Doh!!! (smack forehead) Now why didn't I think of that?? A chunk of 1/8 aluminum plate and some jb weld on an old steel faceplate, faced off with a simple fixed jig (since I can't turn, thread and knurl a solid one like yours).....hmmm

Now the hard question. use a different transfer punch for each tube, or use a spare mandrel and the sleeves I've been making for the last couple of years? Punches would eliminate the inherent runout of a sleeve, but only if one is a close enough fit for a given tube. HMMM. And only if the TIR of the jacobs chuck + any slop between the punch and the ID of the tube is less than the sleeve. Hmmm, I can see some dial indicator time in my future.

PS. Ok, I just realized this thread is over a year old! And I never saw it before now. Anyway, it's well worth resurrecting just in case anybody else can use it.
 
Last edited:

JimB

Member
Joined
Mar 18, 2008
Messages
4,682
Location
West Henrietta, NY, USA.
In my original design (I still use it today) I don't worry about run out due to the gap between the punch and the brass tube. The reason is you are holding your blank and sliding it along the punch up to the the sanding disk. At the same time you are applying light downward preasure to hold the tube flat against the punch. It's very simple and I have never had a problem.
 

greggas

Member
Joined
Jun 21, 2009
Messages
1,109
Location
North Easton, MA
Curtis ( Mesquiteman) turned me on to this method when he visited last week. It is by far the best method I have seen / used. So simple, yet works great. I use the pen disassembly tool ( steel rods) that bought at PSI some time ago and that gives me a perfect fit on every style of pen.

Used this on a run of about 50 assorted pens the other day and took about 90 minutes. Excellent job...so glad that I finally have a solution to squaring up blanks and cleaning off CA.

Just be careful with heat build-up on certain oily woods like DI, African Blackwood, Coco, etc or it will kill the sandpapper sooner than you'd like...I kept these untl the end and that way was able to toss the paper after all were done
 
Last edited:

jskeen

Member
Joined
Oct 11, 2007
Messages
1,754
Location
Crosby, Texas, USA.
In my original design (I still use it today) I don't worry about run out due to the gap between the punch and the brass tube. The reason is you are holding your blank and sliding it along the punch up to the the sanding disk. At the same time you are applying light downward preasure to hold the tube flat against the punch. It's very simple and I have never had a problem.

again "DOH!"

as usual, i'm making things harder then they need to be. It's an engineer thing, the doc's tell me there is no known cure for it.
 

greggas

Member
Joined
Jun 21, 2009
Messages
1,109
Location
North Easton, MA
What is PSA sandpaper. And where do you get it for pennies a disk?

adhesive backed sandpaper available at most hardware / paint / big box stores.

What I use instead is peel and stick velcro on a piece of MDF with velcro backed sandpaper ( available in sheets in the same store or an line or if money is not an issue you can use the 2" round velcro disks sold by al of the turning supply companies)
 

soligen

Member
Joined
May 11, 2010
Messages
1,085
Location
Sterling Heights, Michigan
Thanks for bumping this up. Great I idea!!

I just checked - my pen mill head fits into a collet, so I'm going to chuck up the mill head with the back side showing and attached the PSA to it. No cash required - gotta love it.
 

workinforwood

Member
Joined
Mar 1, 2007
Messages
8,173
Location
Eaton Rapids, Michigan, USA.
It looks really great Peter! I have not used a barrel trimmer for one of my actual pens in quite some time though...I just stickem in a collet and part the ends square. I admire you people with the ingenuity to find different ways of doing things!
 
Top Bottom