Making accent bands for pens

Signed-In Members Don't See This Ad

Texatdurango

Member
Joined
Apr 23, 2007
Messages
4,649
Location
Show Low, Arizona
In another thread I mentioned doing a tutorial on making accent bands but as I set out to organize the tutorial I realized that it's not that big of a deal and my method can be explained with a few photos instead of a full blown tutorial. So, with that in mind here's the poor mans version of making accent bands.

First, a little background is in order. I started using sterling silver for lower body accent rings and cap bands. The accent rings are nothing more than sterling silver "washers" sandwiched in-between two parts of the pen body, not much else to add to that.

The cap bands are made from .625" sterling silver tubing with .020" wall thickness. I would use a collet and a home made contraption to hold and align the cap and ring while compressing the silver into a shallow groove I cut into the cap body. Needless to say, this was a very slow, tedious process with a high failure rate so I started looking for a different way of attaching the bands.

It is rare for many pen makers let alone pen company to share their secrets but I got a hint from one company and it was one word..... "Sleeves", so off I went.

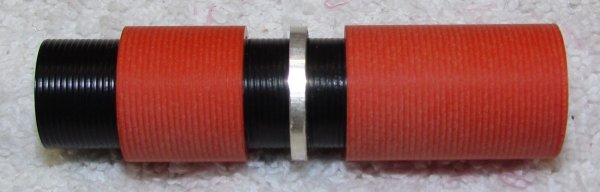
This photo show my earliest attempt at sleeving and the idea is simple, you make an inner (black) and outer (orange) sleeve and bond them together sandwiching the metal ring in-between. The trick is to make the inner sleeve wider than the threads you are going to cut into the cap. I quickly realized that I didn't need to make the entire cap sleeved, just a portion where the bands were going to be so this phase never left the mockup stage.

1_BAND-COMBO-MOCKUP.jpg


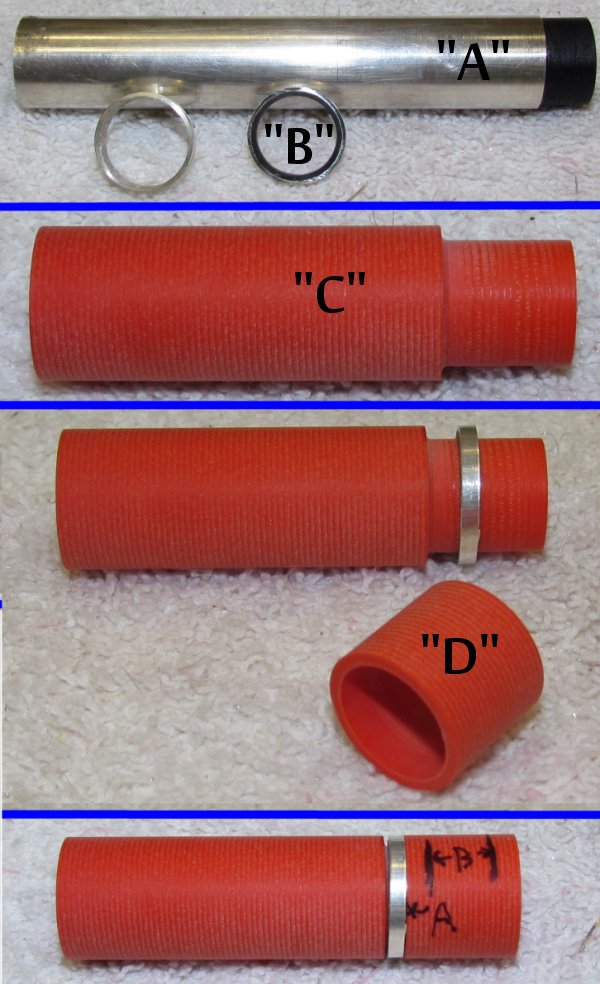
Now fast forward through several trials to my current method. It all starts with the silver tube ("A" in the photo), available at many jewelry supply houses. I use .625" diameter tube but with a wall thickness of only .020" I needed it to be thicker so I turned an alumilite rod to fit inside the silver tube and epoxied it in place. Then I drilled out the center and sliced the tube into thin slices ("B" in the photo) to become accent bands.

I cut the cap ("C" in the photo) to length and diameter then turn a tenon at the lower end for the bands to slide onto. Remember, this diameter must allow room inside the cap for the main body threads.

Notice the silver ring sliding over the tenon, make sure it's a snug fit so the ring has just enough room for a good glue bond and I do not recommend using CA for this else you will wind up with a lot of glue bonding before you're ready!

From an end cutoff, I turn the piece ("D" in the photo) the same outer diameter and inner diameter as the silver band. Looking at the photo you can see that by cutting the orange piece into thin bands you can create a spacer to go between two silver bands as well as an end piece. Once all the pieces have been cut, sanded and dry fitted, I use epoxy to glue everything together and clamp the assembly tight while curing. Set the assembly aside for 24 hours and don't get in a hurry to turn the cap smooth or you'll realize that turning silver generates heat quickly and heat makes uncured epoxy slip and things spin, not that I would know first hand of course! :biggrin:

1_BAND-COMBO-1.jpg


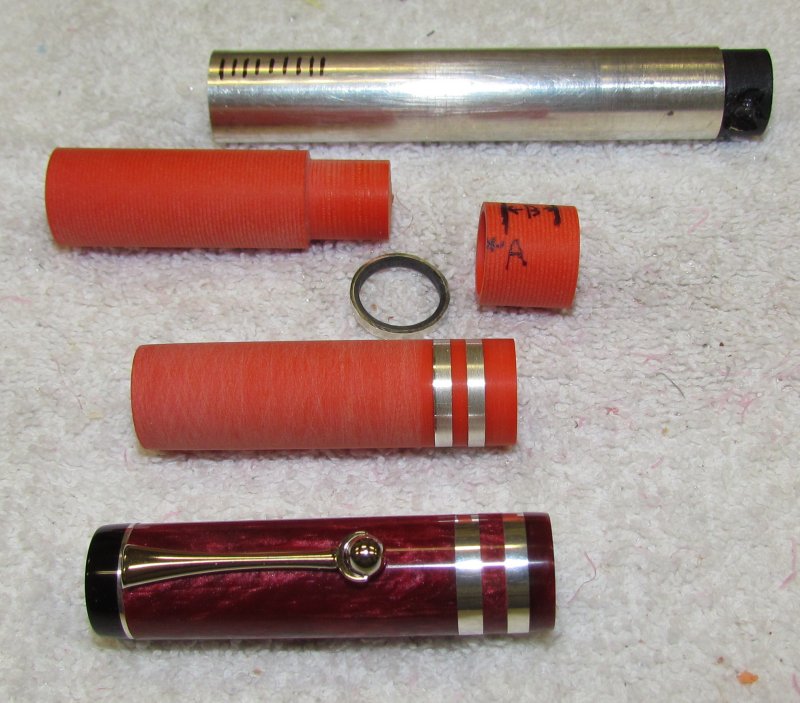
This photo shows all the pieces in order of how they all come together with a finished cap at the bottom. I use a cheap Harbor Freight mini-saw to cut the tubing and the body spacers are parted off on the lathe. On some pens I add a silver washer at the top between the finial and the cap because I think it adds a little to the look. Let your imagination be your guide, use one, two or more bands, and vary their widths if you like.

1_BAND-COMBO-2.jpg


Well there you have it, this is the best way I have found to mount accent bands to my pens. When I get filthy rich I'll do the same with gold tubing!
 
Last edited:
Signed-In Members Don't See This Ad

043Turning

Member
Joined
Jan 26, 2011
Messages
55
Location
Werribee ~ Victoria ~ Australia
this is a great idea have you thought of rather than making a thread and screwing the outer diameter to sandwich the Silver ring

in the photos it looks like there is still a screw thread if this is true , maybe a long rebate or tennon would work and then it would be silver ring plastic ringsilver ring and then the cap ring - it would mean that RP resin and other less threadable (if this is a word) materials could still be used

BUT 5 Stars for the idea

<edit> re-reading the post it appears that hte screw thread has gone ...So not it's gotta be at least a 5.5 out of 5
 
Last edited:

043Turning

Member
Joined
Jan 26, 2011
Messages
55
Location
Werribee ~ Victoria ~ Australia
...........
The cap bands are made from .625" sterling silver tubing with .020" wall thickness. I would use a collet and a home made contraption to hold and align the cap and ring while compressing the silver into a shallow groove I cut into the cap body. Needless to say, this was a very slow, tedious process with a high failure rate so I started looking for a different way of attaching the bands.


Quick Question where did you get your tubing / sleaving from...?
 

skiprat

Passed Away Mar 22, 2022
In Memoriam
Joined
Oct 19, 2006
Messages
7,812
Location
In a Skip in Wales
You made it look real easy George. :biggrin: Not only do the rings look good, they also reinforce the vulnerable area around the cap threads.

How expensive does the waste from parting cost in comparison to the cost of the tube? 50/50? Have you found the tubing in various diameters?

Nicely done and thanks for the quick tutorial:wink:

Now, can you please do another one that shows how you made the plain red material turn into that cool pearled stuff in the finished cap:tongue:
 

Dalecamino

Local Chapter Leader
Joined
Jan 2, 2008
Messages
14,572
Location
Indianapolis, In.
Thanks George, This saved me from a lot of head scratching. I knew this was going to have to be the best way of attaching the rings. You've pretty well illustrated how to do it. Thanks again!
 

Texatdurango

Member
Joined
Apr 23, 2007
Messages
4,649
Location
Show Low, Arizona
Here are some additional comments and questions answered.......

Do you scuff the tube so the glue sticks better?
No, I use the scuffles epoxy! Scuffing, like sanding, is a waste of time :)
in the photos it looks like there is still a screw thread if this is true , maybe a long rebate or tennon would work and then it would be silver ring plastic ringsilver ring and then the cap ring - it would mean that RP resin and other less threadable (if this is a word) materials could still be used
BUT 5 Stars for the idea
<edit> re-reading the post it appears that hte screw thread has gone ...So not it's gotta be at least a 5.5 out of 5
Sorry for the confusion but nothing is threaded together. One of the cutters I use with my metal lathe makes a cut that looks like grooves on a phonograph record. As I stated earlier, all this can be done on a wood lathe but using a metal lathe makes much more accurate cuts with nothing more to do than turn a flywheel!
The cap bands are made from .625" sterling silver tubing with .020" wall thickness.
Quick Question where did you get your tubing / sleaving from...?
I had been getting it from metalliferous.com but when I called last week to reorder, they told me their supplier of many silver items can't supply the goods now so I'm searching!
You made it look real easy George. Not only do the rings look good, they also reinforce the vulnerable area around the cap threads.
How expensive does the waste from parting cost in comparison to the cost of the tube? 50/50? Have you found the tubing in various diameters?
Nicely done and thanks for the quick tutorial
Now, can you please do another one that shows how you made the plain red material turn into that cool pearled stuff in the finished cap
After doing these caps this way for a while now, I agree that gluing the inner and outer sleeves together really reinforces the area where the cap threads are.

As far as silver waste, since the narrowest parting tool I have is the same width as the rings themselves I don't part the tubing. Instead, I use a modified mini chop saw from Harbor Freight and cut up several rings at once. I'm guessing the little blade is less than .030" thick so very little waste.

I have silver tubes in different diameters but find that the 5/8" tube is by far the most popular size for my pen sizes.

As far as how I change the orange blank to burgundy, I'm sorry but some secrets are best kept.

Here is the little saw I use….
http://www.harborfreight.com/media/...b33525d08d6e5fb8d27136e95/i/m/image_17028.jpg
 

OKLAHOMAN

Member
Joined
May 17, 2006
Messages
10,228
Location
Costa Rica

BRobbins629

Passed Away Dec 28, 2021
In Memoriam
Joined
Mar 8, 2006
Messages
4,037
Location
Richmond, VA, USA.
r
Quick Question where did you get your tubing / sleaving from...?
I had been getting it from metalliferous.com but when I called last week to reorder, they told me their supplier of many silver items can't supply the goods now so I'm searching!
[/quote]
I gave up on them long ago and started turning them in wax and having them cast in silver. Opens up the the range of diameters and thicknesses. This one is .60 diameter and .020 thickness. A little rough right out of the caster but with a little sanding polishes right up. A reasonably easy process and maybe even less expensive.

attachment.php
 

Attachments

  • Tube.JPG
    Tube.JPG
    130 KB · Views: 948

IPD_Mr

Member
Joined
Jun 27, 2007
Messages
3,707
Location
Zionsville, In
George - If I remember correctly you have a few photos of the HF mini chop saw that you modified to cut your rings. Do you have a link to those? I went looking and could not find them. No rush BTW, I know you are trying to get product done for LA.
 

Texatdurango

Member
Joined
Apr 23, 2007
Messages
4,649
Location
Show Low, Arizona
r
Quick Question where did you get your tubing / sleaving from...?
I had been getting it from metalliferous.com but when I called last week to reorder, they told me their supplier of many silver items can't supply the goods now so I'm searching!
I gave up on them long ago and started turning them in wax and having them cast in silver. Opens up the the range of diameters and thicknesses. This one is .60 diameter and .020 thickness. A little rough right out of the caster but with a little sanding polishes right up. A reasonably easy process and maybe even less expensive.

[/quote]

Bruce, I would love to be able to reach up on a shelf and select from one of many diameter tubes! Could we talk you into doing a little write up on what it would take to get from raw silver to a tube?

Assuming I have no silver working tools, what would I need to buy to get started in casting my own tubes?

Also, yesterday I got in a variety of 22 gage sterling disks that I will have to punch out to make into washers so will have quite a few "mini disks" left over. I realize the composition of sterling and .999 fine silver are different but can they be mixed when casting items such at these tubes?
 

Texatdurango

Member
Joined
Apr 23, 2007
Messages
4,649
Location
Show Low, Arizona
George - If I remember correctly you have a few photos of the HF mini chop saw that you modified to cut your rings. Do you have a link to those? I went looking and could not find them. No rush BTW, I know you are trying to get product done for LA.
I don't understand, they are in my IAP photo album! :confused::wink:
 

IPD_Mr

Member
Joined
Jun 27, 2007
Messages
3,707
Location
Zionsville, In
George - If I remember correctly you have a few photos of the HF mini chop saw that you modified to cut your rings. Do you have a link to those? I went looking and could not find them. No rush BTW, I know you are trying to get product done for LA.
I don't understand, they are in my IAP photo album! :confused::wink:

That is why I couldn't find it, was looking for a thread. :redface:
 

BRobbins629

Passed Away Dec 28, 2021
In Memoriam
Joined
Mar 8, 2006
Messages
4,037
Location
Richmond, VA, USA.
Bruce, I would love to be able to reach up on a shelf and select from one of many diameter tubes! Could we talk you into doing a little write up on what it would take to get from raw silver to a tube?

Assuming I have no silver working tools, what would I need to buy to get started in casting my own tubes?

Also, yesterday I got in a variety of 22 gage sterling disks that I will have to punch out to make into washers so will have quite a few "mini disks" left over. I realize the composition of sterling and .999 fine silver are different but can they be mixed when casting items such at these tubes?
I will try to do a little write up. Too cold in the shop for a demo, but I think I can describe the process. Will do so in another thread.

You don't need any silver working tools. All you will be doing is making a wax tube and sending it out for casting. You get back something that looks like the picture I posted.

I get my tubes cast in sterling, not fine silver unless I want to use transparent enamel, but that's another topic. You could send in your sterling scrap and they can combine that with casing grain up to about 50% usually. You will only get charged for what they use of their supply.
 

EBorraga

Passed Away July 17, 2022
In Memoriam
Joined
Oct 19, 2009
Messages
4,049
Location
Louisville, KY
I've picked up alot of aluminum and brass rods from speedymetals.com. They have a wide variety of sizes and thickness.
 

Texatdurango

Member
Joined
Apr 23, 2007
Messages
4,649
Location
Show Low, Arizona
George, thanks for sharing your method!

Is there any concern about tarnishing using uncoated metal bands?

Not as far as I'm concerned. When they start to tarnish, and they will, it's just a reminder to the owner that the parts are indeed silver not some coated silver plate.

Two pens that I use all the time have bands and show no signs of tarnish yet and it's been at least a year, perhaps it's because I polish them now and then with a soft cloth and a shot of Novus #1 plastic polish. Who knows, that may help.
 

plano_harry

Member
Joined
Jan 12, 2012
Messages
1,959
Location
Plano, TX 75093
How are you turning the end cutoff "part D" for spacer and cap -- metal lathe?
Are you drilling the ID after turning the OD?
Chop saw to cut for thickness, or part off?

Thanks for the great tutorial!
 

Texatdurango

Member
Joined
Apr 23, 2007
Messages
4,649
Location
Show Low, Arizona
1. How are you turning the end cutoff "part D" for spacer and cap -- metal lathe?
2.Are you drilling the ID after turning the OD?
Chop saw to cut for thickness, or part off?

Thanks for the great tutorial!

1. I put part "D" as shown into a collet chuck mounted on my Jet mini lathe then part off the rings. Some things are still done better and faster on a wood lathe! :)

2. I turn down all my blanks between centers on the metal lathe because it's SO accurate, from then on the blanks are held by collets for everything. I keep the Beall collet chuck mounted on my Jet mini lathe full time, I probably couldn't get it off if I tried! :wink:

"C" and "D" are both initially turned to .590" so they can fit in a 19/32" collet, probably the most widely used collet I have and I wish I had two of them. Once held in a collet, it's a breeze drilling these blanks, even with very thin walls.
 

Texatdurango

Member
Joined
Apr 23, 2007
Messages
4,649
Location
Show Low, Arizona
Thanks George, very cool! Now where's the tutorial on making a diamond encrusted pen body?

I started to do one but when I do my diamond pens I start with an 18K solid gold blank and I figured that most members here were too cheap to spend the money so I didn't bother with the tutorial!
 

OKLAHOMAN

Member
Joined
May 17, 2006
Messages
10,228
Location
Costa Rica
George it's wasn't the 18K solild gold blank that held me back it was the 47 2K diamonds.:rolleyes:
Thanks George, very cool! Now where's the tutorial on making a diamond encrusted pen body?

I started to do one but when I do my diamond pens I start with an 18K solid gold blank and I figured that most members here were too cheap to spend the money so I didn't bother with the tutorial!
 

Texatdurango

Member
Joined
Apr 23, 2007
Messages
4,649
Location
Show Low, Arizona
George, I found some "trim rings", but I think the smallest ID is the same as your OD, so they may be too large...
Atlas Billiard Supplies - Sterling Silver
Good grief! Even if they had the sizes I wanted I would look elsewhere, those prices are aboutfour times what they should be!

I bought some round discs last week and am going to punch holes in them myself. I'm too cheap to buy one of the "jewelers" hole punches for $200+ so I have an idea how to make my own setup using Harbor Freight transfer punches. I'll share the idea if it works, or might even share if it doesn't work just to see some others screw up some washers! :biggrin:
 
Signed-In Members Don't See This Ad
Top Bottom