Gilrock
Member
This is sort of a follow on thread to the Getting Started Kitless thread a couple weeks ago. About the time that thread started I had just purchased new taps and dies to make the larger body pens with #6 nibs. If you missed it below is a link to a very good post in that thread where George gave a lot of information for making a pen of this size.
http://www.penturners.org/forum/f56/getting-started-kitless-102679/index2.html#post1455622
So I thought why not try out the instructions so I somewhat followed them taking a few liberties along the way and this is a link to the pen I ended up producing that I posted earlier in SOYP.
http://www.penturners.org/forum/f13/my-custom-cracked-ice-103532/#post1464211
I had already made 5 or so pens with a #5 nib so I kinda knew already how to measure for the different parts. There were a couple times where I measured and said that doesn't need to be drilled that deep. And then later I was putting it together and had the "ah ha" moment and said "oh...I see why he was drilling that deep".
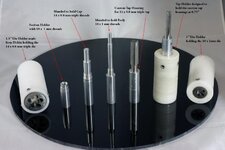
My first couple tries at making the #5 sized pens I was using the collet chuck to hold the cap and body during shaping and I had a lot of problems with it not being on center when I had to flip it around or re-chuck it up. And I even snapped a body one time since there was no internal support. So I decided to make mandrels to hold the section, body, and caps while doing shaping operations. I also very early on got the idea from George to make a die holder out of Delrin and that morphed into the idea to make a tap holder that was similar. I had to make all new tooling for this larger pen.
So I thought I'd share a photograph of the tooling I made to create this #6 sized pen since it should give you an idea of what you need to make if you wanted to try to create similar mandrels. To make the mandrels you just need to basically make the inverse of the pen you need to hold. I usually keep the sections that are going into the pen just a little shorter than how deep I'll be drilling inside the body or cap.
This is a large copy of the image so you can really see the threading up close or you can view the attached thumbnail image but it's much harder to see everything:
http://www.threebuttes.com/pencreator/images/pens/Tooling.jpg

